
Image Source: www.mrrooter.com
Expert Tips: How To Clean Kitchen Sink Drain With Garbage Disposal
Keeping your kitchen sink drain and garbage disposal clean is very important. It stops bad smells and keeps your plumbing working well. What is the best way to clean a kitchen sink drain with a garbage disposal? A mix of natural methods and regular care works best. How often should you clean it? You should do a quick clean daily and a deeper clean once a week or month. Can you use harsh chemicals? No, avoid harsh chemicals. They can harm your disposal and pipes. This guide will show you easy steps to keep your drain and disposal fresh and clear.
The Value of a Clean Drain and Disposal
A clean kitchen is a happy kitchen. Your sink drain and garbage disposal are busy parts of it. They handle food scraps and water every day. If you do not clean them, problems can start. Bad smells can fill your kitchen. Food bits can build up. This can make water drain slowly. It can even lead to clogs. Regular cleaning stops these issues. It keeps your kitchen fresh. It also helps your disposal last longer.
Why Cleaning Matters
Cleaning your sink drain and garbage disposal helps in many ways. It keeps your kitchen smelling nice. It stops germs from growing. It also makes sure your sink drains water fast. A well-kept disposal works better. It breaks down food scraps more easily. This means fewer plumbing problems for you. It saves you money on plumber visits.
Common Causes of Clogged and Smelly Drains
Many things can make your sink drain get clogged or smell bad. Knowing these causes helps you stop them. Most problems come from what we put down the drain.
Food Waste Issues
Your garbage disposal is great for food scraps. But some foods are trouble.
* Starchy foods: Rice, pasta, and potato peels swell with water. They can make a thick paste. This paste sticks to the pipes.
* Fibrous foods: Celery stalks, corn husks, and onion skins have tough fibers. These fibers can wrap around the disposal blades. They stop the blades from spinning freely.
* Coffee grounds: These look small. But they collect in pipes. They form a thick sludge. This sludge can block water flow.
* Eggshells: Many people think eggshells sharpen blades. This is a myth. The thin membrane in eggshells can stick to pipes. It can catch other food bits.
Grease Buildup in Sink Drain
Grease, oil, and fat are big enemies of your drain. When hot, they flow easily. But they cool down in your pipes. They turn solid. This sticky goo grabs other food particles. Over time, this creates a major blockage. A small amount of grease can cause a big problem. Even hot water does not help much. It just moves the grease further down the pipe before it hardens. This is a very common reason for a slow draining sink.
Not Enough Water
When you use your disposal, you need plenty of cold water. Water helps flush food through the blades. It also pushes it all the way through the pipes. If you use too little water, food scraps can sit in the disposal or pipes. This leads to bad smells and clogs.
Lack of Regular Cleaning
Food bits and grease can build up inside your disposal and pipes. This happens even if you are careful. These bits start to rot. This causes a terrible smell. Not cleaning often lets these things grow and get worse. This is why regular cleaning is key.
Essential Tools and Supplies for Drain Cleaning
You do not need many special tools to clean your sink drain and disposal. Most items are already in your kitchen.
Basic Cleaning Supplies
Here is what you will need:
* Dish soap: Good for cutting grease and general cleaning.
* Baking soda: A natural cleaner and odor absorber.
* White vinegar: Breaks down grime and kills germs.
* Ice cubes: Helps clean and sharpen disposal blades.
* Citrus peels: Lemon, lime, or orange peels make things smell good.
* Hot water: For flushing and dissolving.
* A brush: A long-handled bottle brush or disposal brush.
* Flashlight: To look inside the disposal.
* Hex wrench (Allen key): Usually comes with your disposal. It helps fix jams.
* Pliers: To pull out stuck items.
* Bucket: To catch water if you take pipes apart.
Step-by-Step Guide: Daily Maintenance and Cleaning
Regular, simple steps keep your drain and disposal in top shape. These tips prevent most problems before they start.
Daily Habits for a Clean Disposal
Good habits every day make a big difference.
1. Plenty of cold water: Always turn on cold water before you use the disposal. Keep it running for 30 seconds after the grinding stops. This flushes food through the pipes.
2. Small batches: Do not put too much food in at once. Feed scraps slowly.
3. No forbidden items: Do not put grease, oil, large bones, or fibrous materials down the drain. We will talk more about these later.
4. Quick rinse: After washing dishes, rinse the sink with hot water. This helps clear any small bits.
Weekly Refresh for Freshness
Once a week, do a quick deep clean to stop smells. This is a great way to deodorize garbage disposal naturally.
1. Ice and citrus peel trick: Fill the disposal with about two cups of ice cubes. Add a handful of lemon, lime, or orange peels. Turn on cold water. Turn on the disposal. The ice cleans the blades. The peels leave a fresh smell.
2. Dish soap flush: Put a few drops of dish soap into the disposal. Run cold water and the disposal for a minute. The soap helps clean the inside surfaces.
Monthly Deep Clean
A monthly cleaning helps prevent grease buildup in sink drain and other issues.
1. Baking soda and vinegar flush: This is a classic and very effective natural drain cleaner recipe.
* Pour one cup of baking soda into the drain.
* Slowly pour one cup of white vinegar after it.
* You will see fizzing. This is good! It means it is working. The baking soda is alkaline. The vinegar is acidic. They react to loosen grime.
* Let it sit for 15-30 minutes. You can even leave it overnight for tough smells.
* After waiting, flush the drain with a large pot of very hot water. Be careful not to use boiling water if you have PVC pipes. Hot tap water is fine. This helps clear away all the loosened gunk.
2. Brush cleaning: With the disposal off and unplugged (or breaker tripped for safety!), use a long brush to scrub under the rubber splash guard. Food bits often hide here. Clean the splash guard itself. You can even take it out and wash it in the sink with soap and water.
Tackling Common Issues: Clogs and Odors
Even with regular care, problems can happen. Here are solutions for smelly kitchen drain issues and how to clear slow draining sink problems. These are effective garbage disposal unclogging methods.
Addressing Smelly Drains
A bad smell from your kitchen sink is often a sign of old food or grease.
1. The ice and citrus method: As mentioned, this is a top way how to deodorize garbage disposal. The ice scrapes off stuck-on food. The citrus leaves a fresh smell.
2. Baking soda and vinegar solution: This natural drain cleaner recipe works wonders for smells. The fizzing action breaks down odor-causing gunk.
3. Salt and ice scrub: Pour a cup of rock salt or coarse salt into the disposal. Add a few ice cubes. Run cold water and turn on the disposal. The salt helps scrub away residue.
4. Dish soap and hot water: Run hot water for a minute. Add a good squeeze of dish soap. Run the disposal for another minute. This helps wash away grease and food films.
Clearing a Slow Draining Sink or Clog
A slow drain can be frustrating. A full clog is worse. Here are steps to fix it.
H4: Initial Checks and Safety First
Before you start, safety is key.
* Turn off power: Always turn off the power to your disposal at the circuit breaker before reaching into the drain. This is crucial!
* Use a flashlight: Look inside the drain with a flashlight. See if you can spot anything obvious like a spoon or a coin.
H4: Manual Removal of Obstructions
If you see something, try to remove it carefully.
* Pliers or tongs: Use needle-nose pliers or tongs to grab the item. Never use your hand if the power is still on.
H4: Dealing with Jams (Disposal Won’t Spin)
If your disposal hums but does not spin, it is jammed.
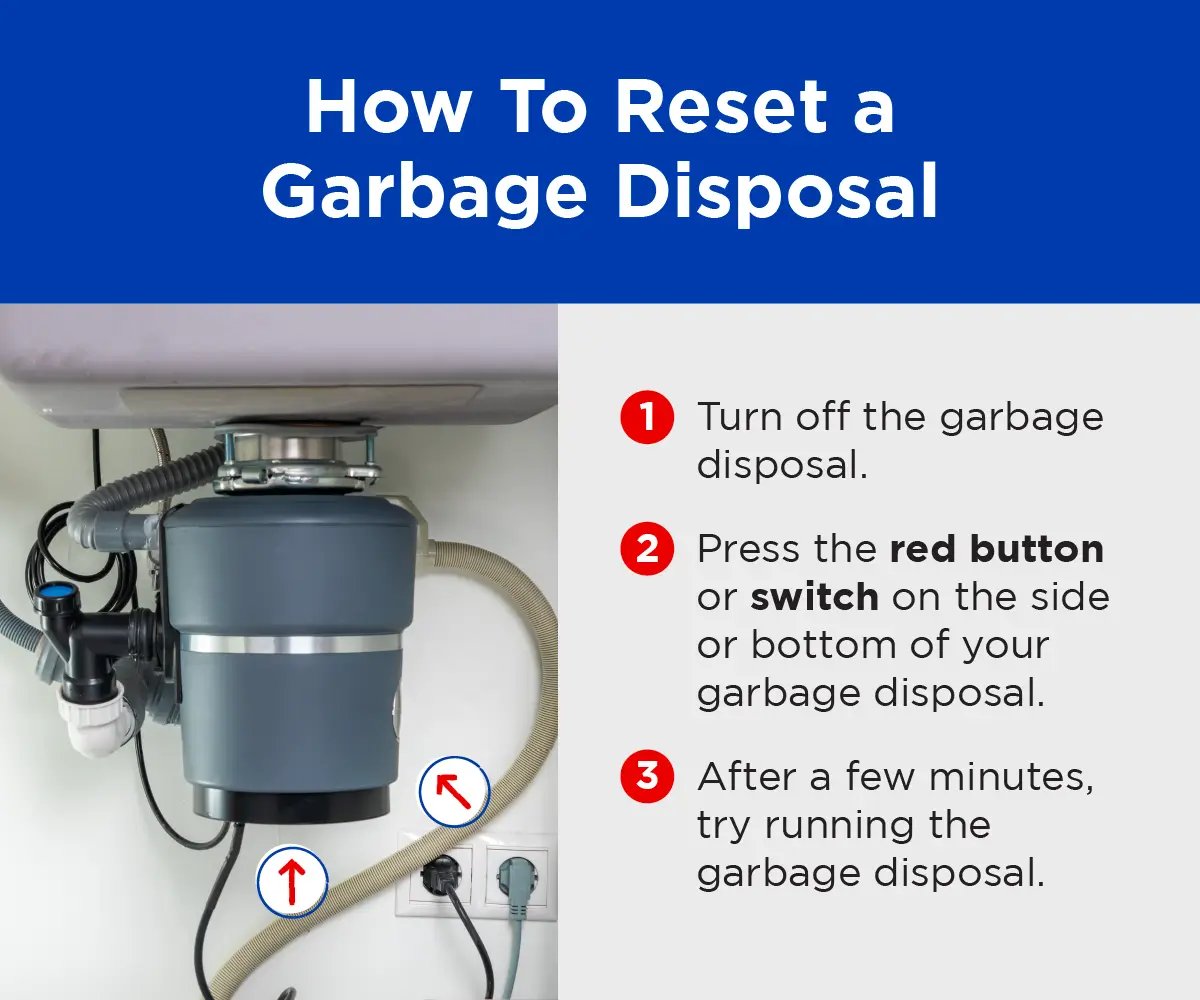
1. Check the reset button: Look under the disposal unit. There is usually a small red reset button. Push it firmly. If it pops back out, wait 10 minutes and try again.
2. Use the hex wrench: If the reset button does not work, insert the hex wrench (Allen key) into the small hole in the center bottom of the disposal. Turn it back and forth. This helps free the motor. Do this until it turns easily.
3. Repeat reset: Once the wrench turns freely, remove it. Push the reset button again. Turn the power back on at the breaker. Run cold water and turn on the disposal.
H4: Baking Soda Vinegar Drain Cleaner for Minor Clogs
This method is great for minor grease buildup in sink drain or general slow drains.
1. Remove standing water: Scoop out any standing water from the sink.
2. Pour baking soda: Pour one cup of baking soda down the drain.
3. Add vinegar: Follow with one cup of white vinegar. The mix will fizz.
4. Wait: Let it sit for at least 30 minutes. An hour is better for tougher clogs.
5. Flush: Flush with hot water. For persistent clogs, you might need to repeat this. This is a very effective natural drain cleaner recipe.
H4: Plunger Method
If the drain is still slow, a plunger can help.
1. Fill the sink: Fill the sink with enough water to cover the plunger cup.
2. Seal the other drain: If you have a double sink, block the other drain tightly with a stopper or wet cloth.
3. Plunge: Place the plunger over the drain. Plunge up and down firmly for about 15-20 seconds.
4. Check: Remove the plunger. See if the water drains faster. Repeat if needed.
Advanced Cleaning and Maintenance Techniques
For deeper cleaning or ongoing care, some other methods can be useful.
Enzyme Drain Cleaner for Disposals
These cleaners use natural enzymes and bacteria. They break down food waste, grease, and other organic matter. They are safe for disposals and pipes.
* How they work: Enzymes digest the gunk that causes clogs and smells. They do not use harsh chemicals.
* How to use: Follow the product directions. Usually, you pour it down the drain at night. This gives it time to work while the drain is not in use.
* Benefits: Safe, effective for ongoing maintenance, and good for preventing future issues. They are not for immediate, severe clogs, but great for maintenance.
Cleaning the P-Trap
Sometimes, the clog is not in the disposal but in the P-trap. This is the curved pipe under your sink.
1. Safety first: Turn off power to the disposal. Put a bucket under the P-trap.
2. Loosen nuts: Use pliers to loosen the slip nuts on both ends of the P-trap.
3. Remove trap: Carefully remove the P-trap. Water will come out into the bucket.
4. Clean: Clean out any gunk inside the trap. Use a brush or old rag.
5. Reassemble: Put the P-trap back. Make sure the nuts are tight. Turn on water slowly to check for leaks.
Using a Drain Snake (Auger)
For stubborn clogs, a drain snake can reach deeper into pipes.
1. Manual snake: These are usually hand-cranked. They have a long flexible cable.
2. How to use: Feed the cable into the drain. Turn the handle to push it further. When you hit the clog, work the snake to break it up or pull it out.
3. Caution: Be gentle, especially with PVC pipes. You do not want to damage them. If you are unsure, it is best to call a professional.
Deciphering What NOT to Put Down Your Disposal
Prevention is the best approach. Knowing what to avoid putting down your garbage disposal will save you a lot of trouble. This is key for maintaining garbage disposal health.
The “Never” List for Disposals
Here are things that should never go into your garbage disposal:
* Grease, oil, and fat: They cool and solidify in pipes, causing massive grease buildup in sink drain. Pour them into an old can or jar and throw them in the trash.
* Fibrous vegetables: Celery, asparagus, corn husks, onion skins, artichokes. Their stringy fibers can tangle around the blades and motor.
* Starchy foods: Rice, pasta, potato peels, bread. They expand with water and create sticky clogs.
* Bones: Small bones might seem okay. But even small ones are too hard. They can dull blades or jam the motor. Large bones are a definite no.
* Fruit pits: Peach pits, avocado pits, cherry pits. They are hard and will not break down. They can jam the disposal.
* Eggshells: The inner membrane can stick to the grinding chamber. It can also catch other food particles.
* Coffee grounds: They seem fine but clump together like cement in your pipes.
* Harsh chemicals: Bleach, drain cleaners with lye, or other strong chemicals can damage your disposal’s parts (especially rubber seals) and pipes. They also do not break down food waste effectively.
* Non-food items: Paper towels, plastic, metal, rubber bands, glass. These can cause serious damage to the blades or motor.
Food Waste Disposal Cleaning Tips: Proper Scrapping
Instead of putting these items down the disposal, put them in the trash. You can also start a compost bin for many food scraps. This is better for the environment.
When to Call a Professional
Sometimes, the problem is too big for a DIY fix. Knowing when to call a plumber can save you time and prevent worse damage.
Signs You Need a Plumber
- Persistent clogs: If you have tried all the steps above and the drain is still clogged or very slow.
- No power: If the disposal unit is not getting power and the reset button does not work after trying the hex wrench.
- Strange noises: If the disposal makes loud grinding, clanking, or humming noises but does not work. This could mean a serious internal problem.
- Leaks: If water is leaking from the bottom of the disposal or from pipes under the sink.
- Water backup: If water is backing up into other sinks or tubs, it suggests a bigger clog further down your main drain line.
A professional plumber has specialized tools and knowledge. They can quickly diagnose and fix complex plumbing issues. Do not hesitate to call them when needed. It protects your home and plumbing system.
Frequently Asked Questions (FAQ)
Q1: Can I use boiling water to clear a drain?
A1: You should use very hot tap water, not boiling water. Boiling water can soften or warp PVC pipes, leading to leaks. It can also melt grease further down the pipe, causing it to re-solidify and create a worse clog.
Q2: How often should I clean my garbage disposal?
A2: Do a quick refresh weekly (ice and citrus). Do a deeper clean (baking soda and vinegar) once a month. Daily habits like running plenty of cold water are also key.
Q3: Is it okay to put small fruit pits down the disposal?
A3: No, avoid all fruit pits. They are very hard and can jam or damage the disposal blades. Throw them in the trash instead.
Q4: My disposal hums but does not spin. What should I do?
A4: First, turn off the power at the breaker. Look inside the disposal with a flashlight for any visible items. If clear, use a hex wrench (Allen key) in the center hole on the bottom of the disposal to turn the motor manually. Then, push the red reset button on the bottom. Turn the power back on and try again.
Q5: Can I put dish soap down the drain to clean it?
A5: Yes, dish soap is good. It helps break down grease and food film. Use a few drops with cold water and run the disposal. It is not a harsh chemical.
Q6: Are chemical drain cleaners safe for garbage disposals?
A6: Most harsh chemical drain cleaners are not safe. They can damage the rubber and plastic parts of your disposal. They are also bad for your pipes and the environment. Stick to natural methods like baking soda and vinegar. Enzyme drain cleaner for disposals are a safer chemical option for maintenance.
Q7: Does grinding eggshells sharpen disposal blades?
A7: This is a common myth. Eggshells do not sharpen blades. The thin membrane inside them can stick to the grinding chamber, trapping other food particles and contributing to clogs. It’s best to avoid putting them down the disposal.
Q8: How can I tell if my slow drain is a clog or a bigger plumbing issue?
A8: If natural methods like baking soda and vinegar or plunging do not work after several tries, or if water is backing up in other parts of your house (like a shower or toilet), it likely means a deeper main line clog. This needs a professional plumber.