
Yes, you can absolutely stain kitchen cabinets, and it’s a fantastic way to give your kitchen a fresh, updated look without the high cost of replacement. This DIY project allows you to change the color, enhance the wood grain, and breathe new life into tired, worn cabinetry. If you’re wondering how to stain cabinets or considering a kitchen cabinet update, you’ve come to the right place. We’ll cover everything you need to know, from preparation to finishing.
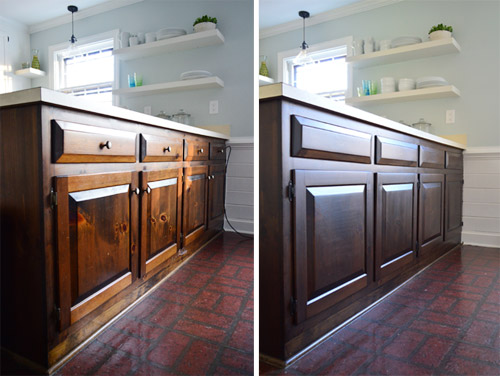
Image Source: images.younghouselove.com
Why Stain Your Kitchen Cabinets?
Staining cabinets offers several compelling advantages for homeowners looking to refresh their kitchen:
- Aesthetic Transformation: Staining allows you to completely change the color of your cabinets. Whether you want a rich espresso, a warm honey tone, or something completely different, stain provides a versatile solution.
- Highlighting Wood Grain: Unlike paint, stain soaks into the wood, allowing the natural beauty of the wood grain to show through. This can add depth and character to your cabinets.
- Cost-Effectiveness: Compared to replacing cabinets or even refacing cabinets, staining is often the most budget-friendly option for a significant kitchen cabinet update.
- Durability: When done correctly with a good quality finish, stained cabinets can be very durable and resistant to wear and tear.
- DIY Friendly: While it requires patience and attention to detail, staining cabinets is a very achievable DIY project for many homeowners.
When Staining Isn’t the Best Option
While staining is a great choice for many, there are situations where it might not be the ideal solution:
- Laminate or MDF Cabinets: Cabinets made from laminate or particleboard with a thin veneer are generally not suitable for staining. Stain won’t penetrate these materials properly, leading to an uneven or blotchy finish.
- Existing Dark Painted Cabinets: If your cabinets are currently painted a dark color, you might have difficulty achieving a lighter stain color without extensive stripping.
- Desire for a Solid Color: If you prefer a uniform, opaque color and don’t want the wood grain to show, painting kitchen cabinets is a better choice.
- Extremely Damaged Cabinets: Cabinets with significant structural damage might require more extensive cabinet restoration rather than just staining.
Refinishing Cabinets: The Staining Process Explained
Refinishing cabinets by staining involves several key steps. Each stage is crucial for achieving a professional-looking result.
Step 1: Preparation is Key
Proper preparation is the most critical phase of cabinet refinishing. Skipping or rushing this step will inevitably lead to a poor finish.
Removing Cabinet Doors and Drawers
- Label Everything: As you remove each door and drawer front, label it with a piece of masking tape. Note its location (e.g., “Upper Left Door,” “Drawer Front 3”). This will save you a lot of headaches during reassembly.
- Store Hardware: Keep the screws and hinges organized. You might want to store them in labeled plastic bags corresponding to each door or drawer.
Cleaning the Cabinets
- Degrease Thoroughly: Kitchen cabinets are prone to grease buildup. Use a strong degreaser or a solution of TSP (trisodium phosphate) substitute and water. Wear gloves and ensure good ventilation.
- Scrub Gently: Use a sponge or a soft cloth to clean all surfaces. Don’t use abrasive scrubbers that could scratch the wood.
- Rinse and Dry: Wipe down all surfaces with a clean, damp cloth to remove any degreaser residue. Allow the cabinets to dry completely.
Sanding for Adhesion
Sanding is essential to create a surface that the stain can adhere to.
- Initial Sanding: Use a medium-grit sandpaper (120-150 grit) to scuff up the existing finish. You don’t need to remove the old finish entirely if it’s in good condition, just dull it.
- Smooth Sanding: Follow up with a finer-grit sandpaper (180-220 grit) for a smoother surface.
- Sanding the Grain: Always sand in the direction of the wood grain.
- Dust Removal: After sanding, use a shop vacuum with a brush attachment to remove as much dust as possible. Then, wipe down all surfaces with tack cloths. Tack cloths are sticky and are excellent at picking up fine dust particles.
Stripping (If Necessary)
If your cabinets have a thick, chipped, or peeling finish, you might need to strip them before sanding.
- Chemical Strippers: These are effective but require caution. Follow the manufacturer’s instructions carefully, wear protective gear (gloves, eye protection, respirator), and work in a well-ventilated area.
- Sanding: After stripping, you’ll likely still need to sand to remove any remaining residue and prepare the wood.
Step 2: Choosing Your Stain
The type of stain you choose will significantly impact the final look and the application process.
Types of Wood Stain
- Oil-Based Stain: This is the most traditional type of stain.
- Pros: Deep penetration, rich color, forgiving application, readily available in many colors.
- Cons: Longer drying times, requires mineral spirits for cleanup, can sometimes lead to blotching on certain woods.
- Water-Based Stain: These are becoming more popular due to their quick drying times and easier cleanup.
- Pros: Fast drying, low VOCs, water cleanup, less prone to blotching on soft woods like pine.
- Cons: Can raise the wood grain, requiring an extra sanding step; colors may appear less rich than oil-based stains.
- Gel Stain: A thicker, more viscous stain that sits on the surface of the wood rather than penetrating deeply.
- Pros: Excellent for covering existing finishes without heavy stripping, less prone to drips and runs, great for applying over laminate or previously painted surfaces, can create a “painted” look while still showing some grain.
- Cons: Can appear more like a translucent paint than a traditional stain, may not highlight wood grain as much. This is a popular choice for DIY cabinet staining.
- Dye Stain: Penetrates the wood deeply and provides very vibrant, rich colors.
- Pros: Intense color, excellent grain definition.
- Cons: Can be difficult to control, very prone to blotching, requires a pre-stain conditioner.
Wood Conditioner
For soft woods like pine, maple, or birch, using a pre-stain wood conditioner is highly recommended. It helps the stain penetrate the wood more evenly, preventing blotchy patches. Apply it according to the manufacturer’s instructions before applying the stain.
Step 3: Applying the Stain
This is where you bring your cabinets to life with color.
Testing the Stain
- Scrap Wood: Always test your stain on a scrap piece of the same wood you’re using for your cabinets, or on an inconspicuous area of the cabinet itself (like the back of a door). This allows you to see the true color and practice your application technique.
- Multiple Coats: If you want a darker color, you can apply multiple coats of stain, allowing adequate drying time between each.
Application Techniques
- Brush: A good quality natural bristle brush (for oil-based stains) or synthetic bristle brush (for water-based stains) is ideal. Apply the stain evenly, working with the wood grain.
- Rag (Wipe-On Stain): Gel stains and some oil-based stains are designed to be applied with a lint-free cloth. Apply a generous amount of stain to the cloth and wipe it onto the cabinet surface in the direction of the grain.
- Foam Brush: Foam brushes can also be used, especially for smaller areas or intricate details.
Staining Process
- Apply Generously: Apply a liberal amount of stain to a section of the cabinet door or drawer front.
- Work with the Grain: Spread the stain evenly using your chosen applicator, always moving in the direction of the wood grain.
- Allow Penetration: Let the stain sit for the time recommended by the manufacturer (usually 5-15 minutes). This allows the stain to penetrate the wood.
- Wipe Off Excess: Using a clean, lint-free cloth, wipe off the excess stain, again working in the direction of the grain. Apply even pressure for a consistent color.
- Repeat: Continue this process section by section until the entire door or drawer front is stained.
Step 4: Drying and Second Coats
- Drying Time: Allow the stain to dry completely. This can take anywhere from 24 to 72 hours, depending on the type of stain, humidity, and temperature. Rushing this step can lead to problems with the topcoat.
- Second Coat (Optional): If you desire a darker or richer color, apply a second coat of stain after the first coat has dried completely. Follow the same application and wiping process.
Step 5: Sealing and Topcoat
A protective topcoat is essential to seal in the stain and protect your cabinets from moisture, grease, and wear.
Types of Topcoats
- Polyurethane (Oil-Based): Very durable, amber in color, which can slightly warm the stain color.
- Polyurethane (Water-Based): Dries clear, less yellowing over time, still durable but may not be as robust as oil-based.
- Polyacrylic: A water-based acrylic finish that dries clear and is very durable. It’s a good choice if you want to maintain the truest color of your stain.
- Varnish: Offers good protection but can be more prone to yellowing than polyurethane.
- Lacquer: Dries very quickly, but can be more prone to damage from moisture or heat.
Applying the Topcoat
- Light Sanding: After the stain is completely dry, lightly sand the cabinets with a very fine-grit sandpaper (220-320 grit). This helps to smooth out any imperfections and provides a good surface for the topcoat to adhere to.
- Dust Removal: Use a tack cloth to remove all sanding dust.
- Apply Thin Coats: Apply thin, even coats of your chosen topcoat using a high-quality synthetic bristle brush or a foam brush. Avoid overloading the brush, which can lead to drips.
- Work with the Grain: Always brush in the direction of the wood grain.
- Multiple Coats: Apply at least 2-3 coats of topcoat, allowing each coat to dry thoroughly according to the manufacturer’s instructions. Lightly sand between coats with 320-400 grit sandpaper and wipe with a tack cloth to ensure a smooth, durable finish.
Step 6: Reassembly
Once the final topcoat has cured (this can take several days to a week for maximum hardness, even if it feels dry to the touch), you can reattach your cabinet doors and drawers.
Cabinet Finishing Tips for Success
Here are some expert cabinet finishing tips to help you achieve a professional look:
- Ventilation is Crucial: Always work in a well-ventilated area, especially when using oil-based products or strippers. Open windows and use fans.
- Protect Your Workspace: Cover your floors and any surrounding areas with drop cloths to protect them from spills.
- Invest in Quality Brushes and Cloths: Cheap supplies can lead to streaks, lint, and an uneven finish.
- Don’t Rush the Drying Times: Patience is key. Allow ample drying time between coats of stain and topcoat.
- Clean Your Brushes Properly: Clean oil-based brushes with mineral spirits and water-based brushes with soap and water immediately after use.
- Consider a Sprayer: For a perfectly smooth, professional finish, a paint sprayer can be a great investment, but it requires practice and proper setup.
- Check for Drips: Constantly check for drips or runs, especially on vertical surfaces, and smooth them out immediately.
- Follow Manufacturer Instructions: Always read and follow the specific instructions provided by the stain and topcoat manufacturers.
Gel Stain Cabinets: A Popular DIY Choice
Gel stain cabinets have gained immense popularity among DIYers, and for good reason. Its unique formulation offers several advantages for those looking for a kitchen cabinet update:
- Ease of Use: Gel stain is thicker and more viscous than traditional liquid stain. This means it’s less likely to drip and run, making it much more forgiving for beginners.
- Coverage: It acts more like a surface coating than a deep penetrating stain. This allows it to cover existing finishes, including some painted surfaces or darker wood tones, with less intensive prep work. You might not need to strip down to bare wood.
- Controlled Application: Because it’s thicker, you have more control over the application, allowing you to build color gradually and achieve the exact look you desire.
- Wood Grain Enhancement: While it sits more on the surface, gel stain can still effectively highlight the natural wood grain, giving your cabinets a rich, updated appearance.
How to Gel Stain Cabinets
The process for gel staining is similar to traditional staining but with some key differences in technique:
- Prep: Thoroughly clean and lightly sand your cabinets as described in the earlier steps. For gel stain, a good cleaning and a light scuff sand (180-220 grit) are often sufficient, especially if you’re going over an existing finish. Ensure all dust is removed.
- Apply Gel Stain: Apply the gel stain with a high-quality foam brush or a lint-free cloth. Work in small sections and in the direction of the wood grain. Apply it evenly, but you don’t need to saturate the surface like you might with liquid stain.
- Wipe and Blend: Immediately after applying, use a clean, lint-free cloth to wipe off the excess stain. The amount you wipe off will determine the final color depth. You can wipe it back to reveal more or less of the underlying wood or previous finish. Blend the edges of your wiped areas to avoid harsh lines.
- Build Color: For a deeper color, allow the first coat to dry completely (usually 24 hours) and then apply a second coat, repeating the application and wiping process.
- Topcoat: Once you achieve your desired color and the final coat is completely dry, apply your chosen protective topcoat (polyurethane or polyacrylic) with multiple thin coats, sanding lightly between each.
Gel staining is an excellent option for a transformative kitchen cabinet update, offering a manageable and rewarding DIY experience.
Cabinet Restoration vs. Refinishing
While both aim to improve the appearance of cabinets, cabinet restoration and cabinet refinishing have slightly different goals.
- Cabinet Refinishing: Typically involves cleaning, sanding, staining, and applying a new protective finish to existing cabinets. The goal is to update the color and protect the surface.
- Cabinet Restoration: Can encompass refinishing but often includes more extensive repairs. This might involve fixing damaged veneer, repairing structural issues, replacing hardware, or even altering the cabinet’s configuration. Cabinet restoration is about bringing the cabinets back to their original glory or a better-than-original state, often preserving historical integrity.
If your cabinets are structurally sound but just need a cosmetic makeover, refinishing through staining is likely what you’re looking for. If they have significant damage or historical value, a more thorough cabinet restoration might be necessary.
How Much Does Cabinet Refinishing Cost?
The cabinet refinishing cost can vary significantly based on whether you DIY or hire a professional, the size of your kitchen, and the products used.
DIY Cabinet Refinishing Cost
If you’re doing the project yourself, your primary expenses will be for materials:
- Sandpaper and Sanding Blocks: $10 – $30
- Degreaser/Cleaner: $10 – $20
- Wood Conditioner (if needed): $10 – $20
- Stain: $15 – $30 per quart (you might need 1-2 quarts)
- Brushes, Rollers, Rags, Drop Cloths: $30 – $75
- Topcoat (Polyurethane/Polyacrylic): $20 – $40 per quart (you might need 1-2 quarts)
- Tack Cloths: $5 – $10
- Gloves and Respirator: $15 – $30
Estimated DIY Cost: $100 – $300 for an average-sized kitchen.
Professional Cabinet Refinishing Cost
Hiring professionals will significantly increase the cost, but it saves you time and ensures a high-quality finish.
- Labor: This is the biggest factor. Professionals charge for their time, expertise, and the equipment they use.
- Materials: They will also factor in the cost of high-quality materials.
Factors Influencing Professional Cost:
- Kitchen Size: More cabinets mean more labor and material.
- Cabinet Condition: Heavily damaged cabinets requiring extensive repair will cost more.
- Type of Finish: Premium stains and durable topcoats can add to the price.
- Geographic Location: Labor rates vary by region.
Estimated Professional Cost:
- Staining: $75 – $150 per linear foot of cabinetry, or $3,000 – $10,000+ for an average kitchen.
- Painting: Often slightly less expensive than staining, ranging from $60 – $120 per linear foot.
It’s important to get multiple quotes from reputable cabinet refinishing companies to compare prices and services.
Comparing Staining with Other Kitchen Cabinet Update Options
When considering a kitchen cabinet update, staining is just one of several popular options. Let’s compare it to painting and refacing.
Painting Kitchen Cabinets
- Process: Involves cleaning, sanding, priming, and applying multiple coats of paint.
- Pros: Offers a solid, opaque color, a wide range of color choices, can hide imperfections well, generally less expensive than refacing.
- Cons: Requires thorough prep to prevent chipping, can be prone to wear marks on edges, doesn’t showcase wood grain, can look less “premium” if not done expertly.
- When to Choose: If you prefer a uniform color, want to cover dark wood, or are on a tighter budget than refacing allows.
Refacing Cabinets
- Process: Involves keeping the existing cabinet boxes and replacing the doors and drawer fronts with new ones, often with a new veneer applied to the cabinet frames to match.
- Pros: Provides a brand-new cabinet look, very durable, can update the style significantly, often less expensive and disruptive than full cabinet replacement.
- Cons: More expensive than staining or painting, still involves some level of disruption, doesn’t address structural issues within the cabinet boxes themselves.
- When to Choose: If your cabinet boxes are in excellent condition but you want entirely new doors and drawer fronts, or you want a dramatic style change without the cost of full replacement.
Replacing Cabinets
- Process: Completely removing old cabinets and installing new ones.
- Pros: Offers the most flexibility in terms of style, layout, and functionality; brand new everything.
- Cons: The most expensive option, most disruptive, requires significant planning and installation time.
- When to Choose: If your cabinets are structurally unsound, you want to change the kitchen layout, or you have the budget for a complete overhaul.
Staining offers a middle ground, providing a significant aesthetic upgrade at a much lower cost than refacing or replacing, and it allows you to embrace the natural beauty of your wood.
Frequently Asked Questions (FAQ)
Q1: Can I stain over existing varnish or lacquer?
Yes, but it requires proper preparation. You’ll need to clean thoroughly, degrease, and then lightly sand the existing finish to create a dull surface for the stain to adhere to. If the varnish or lacquer is peeling or damaged, you’ll need to strip it first.
Q2: How long does it take to stain kitchen cabinets?
The actual staining process might only take a few days, but the entire project, including prep, drying time between coats, and topcoat application, can easily take 1-2 weeks, or even longer if you’re working around a busy schedule. Patience is essential.
Q3: Will stain cover up wood imperfections?
Stain can minimize the appearance of minor imperfections, but it won’t hide deep scratches, gouges, or significant damage. For those, you’ll need to perform repairs before staining.
Q4: Can I stain cabinets that are already painted?
It depends on the paint. If the cabinets are painted with a latex or acrylic paint, you can often stain over them using a gel stain. You’ll need to clean and sand the cabinets thoroughly. If the paint is chipping or peeling, it must be removed. You cannot stain over oil-based paint without significant preparation, and even then, results can be unpredictable.
Q5: What’s the best stain color for kitchen cabinets?
This is subjective and depends on your kitchen’s overall style, countertop material, flooring, and personal preference. Popular choices include:
- Medium browns: Versatile and warm.
- Espresso/Dark browns: Modern and sophisticated.
- Gray stains: Contemporary and neutral.
- Honey/Light browns: Traditional and inviting.
Always test your stain on scrap wood to see how it looks in your kitchen’s lighting.
Q6: How many coats of stain should I apply?
Typically, one coat is sufficient for a lighter, natural look that highlights the wood grain. For a darker, richer color, two or even three coats can be applied, allowing each coat to dry completely before applying the next.
Q7: Do I need a topcoat after staining?
Absolutely. A topcoat (like polyurethane or polyacrylic) is crucial to protect the stain from moisture, grease, heat, and general wear and tear. Without a topcoat, your stained cabinets will be susceptible to damage and won’t last as long.
Q8: Can I stain cabinets without removing them?
While it’s possible to stain cabinets without removing doors and drawers, it makes the process much more difficult and can lead to uneven application and drips. For the best results, removing them is highly recommended.
By following these steps and tips, you can successfully stain your kitchen cabinets, achieving a beautiful and durable finish that transforms your kitchen’s appearance. This DIY cabinet staining project is a rewarding way to achieve a high-impact kitchen cabinet update.