
Can you paint laminate kitchen cabinets? Yes, you absolutely can paint laminate kitchen cabinets! With the right preparation and materials, you can achieve a beautiful, updated look for your kitchen without the expense of full replacement. This comprehensive guide will walk you through the entire process of refinishing laminate cabinets, offering cabinet painting tips for a smooth and successful DIY cabinet makeover.
Laminate cabinets can be a challenge to paint because of their slick, non-porous surface. Many people worry that paint won’t adhere properly or that the finish will chip easily. However, by following a detailed process, you can overcome these hurdles and achieve professional-looking results. This guide is designed to make kitchen cabinet resurfacing accessible to everyone, even if you’re new to DIY projects. We’ll cover everything from laminate cabinet preparation to choosing the best paint for laminate, ensuring your cabinet restoration is a success.
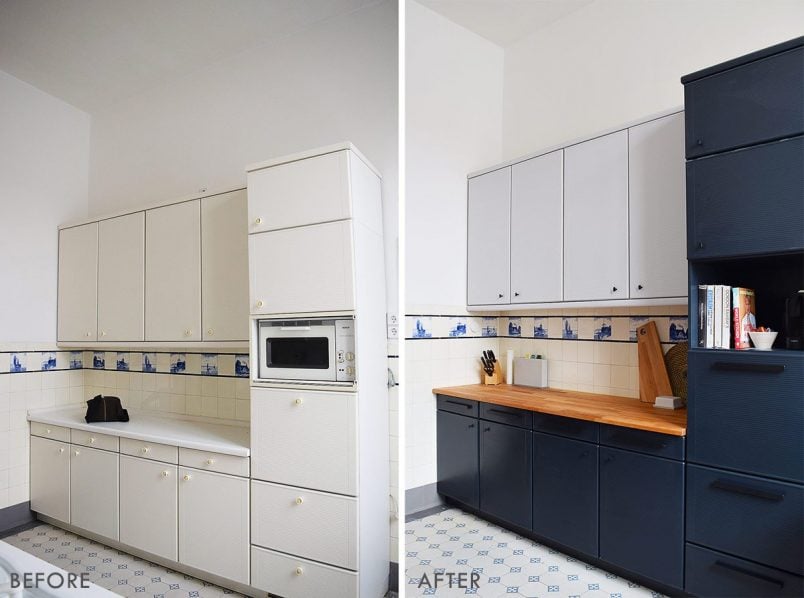
Image Source: www.littlehouseonthecorner.com
Why Paint Your Laminate Cabinets?
Updating your kitchen doesn’t always mean a complete overhaul. Painting your existing laminate cabinets is a fantastic way to:
- Save Money: It’s significantly cheaper than replacing cabinets.
- Update Your Style: Easily change the color and feel of your kitchen.
- Boost Home Value: A fresh coat of paint can make a big difference.
- Reduce Waste: Repurposing existing cabinets is an eco-friendly choice.
Laminate cabinets, often made with a particleboard or MDF core covered in a thin layer of plastic or vinyl, can look dated. Painting offers a simple yet impactful solution for updating kitchen cabinets.
What You’ll Need for Your DIY Cabinet Makeover
Gathering all your supplies before you start is crucial for a smooth workflow. Here’s a comprehensive list:
Preparation & Cleaning:
- Screwdriver or drill with appropriate bits (for removing hardware)
- Degreaser or TSP (Trisodium Phosphate) substitute
- Clean rags or sponges
- Bucket
- Fine-grit sandpaper (180-220 grit)
- Sanding block or orbital sander (optional, for efficiency)
- Tack cloth
- Painter’s tape
- Drop cloths or old sheets
Priming & Painting:
- Laminate cabinet primer (specifically designed for slick surfaces like laminate)
- High-quality paint roller with a fine-nap cover (specifically for cabinets)
- Paintbrushes (angled brush for details, foam brush for touch-ups)
- Paint tray
- Best paint for laminate (e.g., Benjamin Moore ADVANCE, Sherwin-Williams Emerald Urethane Trim Enamel, or cabinet-specific paints)
- Optional: Paint sprayer for a smoother finish
Finishing Touches:
- New cabinet hardware (knobs, pulls)
- Cabinet cleaner for maintenance
The Step-by-Step Guide to Painting Laminate Cabinets
This detailed process breaks down each stage of painting your laminate cabinets. Following these steps carefully will ensure a durable and beautiful finish.
Step 1: Cabinet Preparation is Key
This is arguably the most important step. Proper laminate cabinet preparation ensures your paint will adhere and last.
Removing Doors and Hardware
- Label Everything: As you remove cabinet doors and drawers, label each piece with a number or letter corresponding to its location. This makes reassembly much easier. Use painter’s tape and a pen.
- Remove Doors and Drawers: Use your screwdriver or drill to carefully detach hinges from the doors and drawers from their glides.
- Remove Hardware: Take off all knobs, pulls, and any other hardware from the doors and drawer fronts. Keep them in a safe place.
Cleaning the Surface Thoroughly
Laminate surfaces can have grease, grime, and residue. You need to remove all of it.
- Degrease: Mix a strong degreaser or a TSP substitute with warm water according to the product instructions.
- Wipe Down: Use a clean rag or sponge dipped in the cleaning solution to wipe down every surface of the cabinets, including doors, drawer fronts, and the cabinet frames. Pay close attention to areas around the stove and sink, as these often accumulate more grease.
- Rinse: Wipe down all surfaces with a clean rag dampened with plain water to remove any cleaning residue.
- Dry: Allow the cabinets to dry completely. You can speed this up with a fan.
Lightly Sanding for Adhesion
While laminate is smooth, a light sanding creates a “tooth” for the primer and paint to grab onto.
- Choose Your Grit: Use fine-grit sandpaper, typically 180-220 grit. Avoid coarse sandpaper, which can damage the laminate.
- Sand Gently: Lightly sand all surfaces you intend to paint. The goal isn’t to remove the laminate, but to dull the sheen and create a slightly rough texture.
- Focus on Edges and Corners: These areas can be trickier to sand, so a sanding block is helpful here.
- Wipe Away Dust: After sanding, use a tack cloth to meticulously remove all sanding dust. This is critical for a smooth finish. You can also use a damp cloth, but ensure the surface is bone dry before proceeding.
Step 2: Applying a High-Quality Laminate Primer
Using a laminate cabinet primer is non-negotiable. This special primer is designed to bond to slick surfaces and block stains.
- Choose the Right Primer: Look for a bonding primer specifically formulated for laminate, melamine, or other slick surfaces. Oil-based primers are often recommended for their superior adhesion, but water-based options are available and easier to clean.
- Apply the First Coat:
- Stir Well: Thoroughly stir the primer.
- Use a Roller and Brush: Use a fine-nap roller for larger flat surfaces and an angled paintbrush for edges and corners.
- Apply Thin, Even Coats: Avoid applying the primer too thickly, as this can lead to drips and an uneven finish. Aim for thin, consistent coverage.
- Work in Sections: Paint one door or drawer front at a time, or work on the cabinet frames section by section.
- Allow for Proper Drying: Let the first coat of primer dry completely according to the manufacturer’s instructions. This usually takes a few hours.
- Sand Lightly (Optional but Recommended): Once the primer is dry, you can very lightly sand it with 220-grit sandpaper or a fine-grit sanding sponge. This helps smooth out any imperfections and ensures a better bond for the paint. Again, use a tack cloth to remove all dust.
- Apply a Second Coat of Primer: Apply a second coat of primer, especially if the original laminate color is dark and you’re painting it a lighter shade, or if you notice any areas where the primer didn’t cover evenly. Allow it to dry completely and lightly sand again if desired.
Step 3: Painting Your Cabinets
Now comes the fun part – applying the paint! Choosing the best paint for laminate is important for durability and finish.
Selecting the Best Paint for Laminate
For cabinets, you want a paint that is durable, washable, and resistant to chips and scratches.
- Alkyd Enamels (Oil-Based): These offer excellent adhesion and a very hard, durable finish. However, they can have strong fumes, require mineral spirits for cleanup, and may yellow slightly over time.
- Water-Based Acrylic Enamels (Latex): Modern water-based acrylic enamels, especially those with urethane additives, are excellent choices. They offer good durability, are easier to clean up with water, and have low VOCs (Volatile Organic Compounds). Look for “cabinet enamel” or “trim enamel” formulations.
Popular and Recommended Paints:
| Paint Type | Brands (Examples) | Pros | Cons |
|---|---|---|---|
| Urethane Alkyd | Benjamin Moore ADVANCE, Sherwin-Williams Emerald Urethane Trim Enamel | Excellent durability, smooth finish, good adhesion. | Higher cost, can have stronger odors than latex. |
| High-Quality Latex | Behr Premium Plus Interior Eggshell/Satin (ensure it’s a durable enamel finish), PPG | Easy cleanup, low VOCs, good durability. | May not be as hard as alkyds, can be prone to marking if not properly cured. |
| Cabinet Specific | Farrow & Ball Modern Emulsion, General Finishes Milk Paint (with appropriate topcoat) | Specialized formulations for furniture and cabinets, beautiful finishes. | Can be more expensive, specific application instructions. |
Applying Paint: Techniques for a Smooth Finish
- Stir Your Paint: Always stir your paint thoroughly before and during use.
- Apply Thin, Even Coats: Just like the primer, thin coats are best. Overloading the roller or brush will lead to drips and a messy finish.
- Use Your Roller for Flat Surfaces: Load your fine-nap roller with paint. Apply the paint in a “W” or “M” pattern to ensure even coverage, then lightly roll over the area to smooth it out. Avoid pressing too hard.
- Use Your Brush for Edges and Details: Use an angled sash brush for the edges of doors, drawer fronts, and any detailed areas. Keep your strokes smooth and consistent.
- Paint Doors and Drawer Fronts: It’s often easiest to paint cabinet doors and drawer fronts laid flat on a protected surface. This prevents drips from running down the face. You may need to paint the back of doors if they are visible.
- Paint Cabinet Frames: Once the doors and drawers are done, paint the cabinet frames. Use painter’s tape to protect any areas you don’t want to paint, like the backsplash or countertop.
- Allow Adequate Drying Time Between Coats: This is critical for durability. Most paints require at least 4-6 hours of drying time between coats. Check the manufacturer’s recommendations.
- Apply a Second Coat of Paint: Once the first coat is dry to the touch, apply a second coat. You may need a third coat for full coverage, especially if you’re going from a dark to a light color. Lightly sand with 220-grit sandpaper between coats if desired for an ultra-smooth finish, remembering to tack cloth away dust.
Step 4: Curing and Reassembly
Patience is rewarded here. Paint needs time to cure fully.
- Curing Time: While paint may feel dry to the touch in a few hours, it takes days, or even weeks, for the paint to fully cure and harden. During this curing period, be gentle with your cabinets. Avoid scrubbing them or placing heavy items against them. Refer to your paint’s specifications for exact curing times.
- Reattach Hardware: Once the paint has fully cured (usually after a week or two), you can reattach your original hardware or install new knobs and pulls.
- Rehang Doors and Drawers: Carefully rehang the cabinet doors and reinsert the drawers.
- Clean Up: Clean your brushes, rollers, and paint trays thoroughly. Dispose of drop cloths and used tape.
Frequently Asked Questions About Painting Laminate Cabinets
Q1: Will paint peel off laminate cabinets?
Paint can peel off laminate if the surface isn’t properly prepared. The slick, non-porous nature of laminate requires a bonding primer specifically designed for these surfaces. Skipping the cleaning and light sanding steps will significantly increase the risk of peeling.
Q2: What is the best paint for laminate cabinets?
The best paint for laminate is typically a high-quality acrylic enamel or a urethane-modified alkyd enamel. Brands like Benjamin Moore ADVANCE and Sherwin-Williams Emerald Urethane Trim Enamel are excellent choices because they offer superior adhesion, durability, and a smooth, hard finish that stands up to daily kitchen use. Always use a primer specifically made for laminate surfaces first.
Q3: Can I use chalk paint or milk paint on laminate?
While chalk paint and milk paint are popular for furniture, they are generally not the best choice for kitchen cabinets, especially laminate. These paints are porous and require a topcoat for protection and durability. Without a very robust topcoat, they can be susceptible to moisture and wear, which is common in kitchens. If you do use them, ensure you thoroughly prep the laminate and use a durable polycrylic or polyurethane topcoat.
Q4: How long does it take to paint laminate kitchen cabinets?
The time can vary depending on the size of your kitchen, how many doors and drawers you have, and whether you choose to use a paint sprayer. However, a realistic timeline for a DIY project, including prep, priming, painting, and drying, is typically 3-5 days of active work, spread out over a week or two to allow for drying and curing.
Q5: Do I need to sand laminate cabinets before painting?
Yes, it’s highly recommended to lightly sand laminate cabinets before painting. Use fine-grit sandpaper (180-220 grit) to scuff up the surface. This creates a microscopic “tooth” that helps the primer and paint adhere better. Don’t sand aggressively; the goal is to dull the sheen, not to remove the laminate. Always wipe away all dust with a tack cloth afterward.
Q6: Can I spray paint laminate cabinets?
Yes, spraying laminate cabinets can achieve a very smooth, professional finish. If you choose to spray, ensure you have a well-ventilated area, use a respirator, and protect surrounding surfaces meticulously. You’ll still need to follow the same preparation and priming steps. A good quality HVLP (High Volume Low Pressure) sprayer is recommended.
Q7: How do I clean painted laminate cabinets?
Once your cabinets are fully cured, clean them with a soft cloth and mild, non-abrasive cleaner. Avoid harsh chemicals or abrasive scrubbers, which can damage the finish. For tougher spots, a solution of water and a little dish soap is usually effective. Wipe dry with a clean cloth.
Advanced Cabinet Painting Techniques for a Flawless Finish
For those looking to elevate their DIY cabinet makeover even further, consider these advanced cabinet painting techniques:
Using a Paint Sprayer
A paint sprayer can offer the most professional and seamless finish.
- Preparation: Mask off everything that you don’t want painted.
- Primer: Apply primer with the sprayer.
- Paint Application: Apply thin, even coats of paint, overlapping each pass slightly.
- Drying: Allow adequate drying time between coats as per the paint manufacturer’s instructions.
Achieving a Smooth, Brushstroke-Free Finish
Even with rollers and brushes, you can achieve a smooth finish:
- High-Quality Tools: Invest in good quality brushes and fine-nap rollers.
- Thin Coats: Multiple thin coats are always better than one thick coat.
- Back-Rolling: After applying paint with a roller, lightly go over the wet paint with a clean, dry roller to remove any texture.
- Flow Enhancers: Some paints benefit from a paint additive to improve flow and leveling, reducing brush marks. Always check the paint manufacturer’s recommendations.
Adding Glaze or Distressing
- Glazing: After painting and the paint has fully cured, a glaze can be applied to add depth and an antique look. This involves applying a thinned-down coat of colored paint or a commercial glaze, then wiping it off selectively to highlight details or create a desired effect.
- Distressing: For a farmhouse or shabby chic look, you can lightly distress the painted cabinets using sandpaper or steel wool, particularly on edges and corners, to reveal the original laminate or a base coat.
Maintaining Your Newly Painted Laminate Cabinets
Proper maintenance will ensure your cabinet restoration lasts for years to come.
- Gentle Cleaning: Use a soft cloth and mild soap.
- Avoid Harsh Chemicals: Bleach, ammonia, and abrasive cleaners can damage the paint finish.
- Wipe Spills Immediately: Kitchens are prone to spills; wipe them up promptly.
- Be Mindful of Friction: Avoid dragging heavy pots or pans across painted cabinet fronts.
Painting laminate kitchen cabinets is a rewarding project that can dramatically transform your kitchen’s appearance. By focusing on meticulous laminate cabinet preparation, using the right laminate cabinet primer and best paint for laminate, and employing careful cabinet painting techniques, you can achieve beautiful and durable results. This DIY cabinet makeover is a testament to how strategic kitchen cabinet resurfacing can breathe new life into your home. Enjoy your updated kitchen!