
Can I remove lower kitchen cabinets myself? Yes, with the right tools and a careful approach, you can remove lower kitchen cabinets without causing damage to your walls, floors, or the cabinets themselves. This comprehensive guide will walk you through the entire process of kitchen cabinet removal, from preparation to safely detaching base cabinets.
Removing lower kitchen cabinets, often referred to as base cabinets, is a common task during kitchen renovations or when replacing old countertops. Doing it yourself can save money, but it’s crucial to proceed with caution to avoid costly mistakes. This guide will equip you with the knowledge and steps needed for a successful and damage-free kitchen renovation cabinet removal. We’ll cover the necessary tools for cabinet removal, how to protect your floors during cabinet removal, and detailed instructions on how to dismantle lower cabinets and detach base cabinets safely.
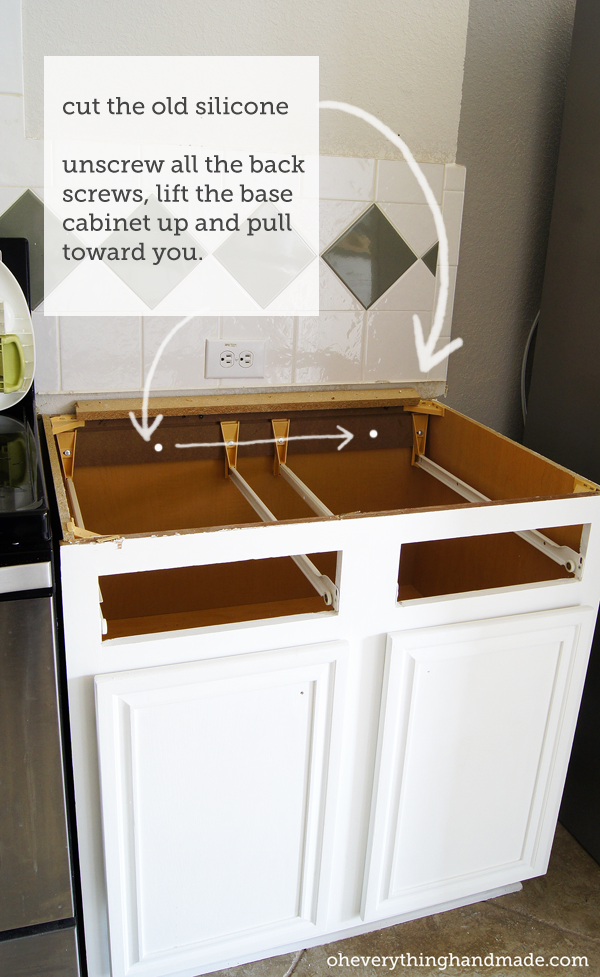
Image Source: www.oheverythinghandmade.com
Preparing for Cabinet Removal
Before you even think about picking up a tool, thorough preparation is key to a smooth and damage-free kitchen cabinet removal. This stage is as important as the actual removal process, ensuring safety and efficiency.
Gathering Your Tools and Materials
Having the right equipment readily available will make the job much easier and prevent you from having to stop mid-task. Here’s a list of essential tools for cabinet removal:
- Safety Gear:
- Safety glasses
- Work gloves
- Dust mask
- Pry Bar Set: Various sizes for leverage.
- Screwdrivers: Both Phillips and flathead, in a range of sizes. A cordless drill/driver with various bits will significantly speed up this process.
- Putty Knife or Scraper: For gently prying away caulk and paint.
- Utility Knife: For scoring paint or caulk.
- Hammer: For tapping tools into place or gentle persuasion.
- Socket Wrench Set: For any nuts or bolts securing the cabinets.
- Level: To check if the cabinets are plumb before removal.
- Measuring Tape: To document cabinet dimensions if needed.
- Buckets or Totes: For organizing screws and hardware.
- Painter’s Tape: For marking and labeling.
- Cardboard or Drop Cloths: For protecting floors during cabinet removal.
- Reciprocating Saw (Optional): For stubborn connections if all else fails, use with extreme caution.
- Stud Finder: To locate mounting screws if they’re not immediately visible.
- Flashlight: To see into dark spaces.
Shutting Off Utilities
This is a critical safety step. Your kitchen cabinets are often connected to plumbing and electrical lines, especially if there’s a sink or appliances integrated.
- Water Supply: Locate the shut-off valves for your kitchen sink. These are typically found under the sink, often attached to the hot and cold water supply lines. Turn these valves clockwise until they are tightly closed. To be absolutely sure, open the faucet to drain any residual water and confirm that no more water flows.
- Electrical Supply: If your cabinets house any electrical components (e.g., under-cabinet lighting, garbage disposal switch), you must turn off the power to that circuit at your main electrical panel (breaker box). If you’re unsure which breaker controls the kitchen circuit, it’s best to turn off the main breaker for the entire house as a safety precaution. Never work on electrical wiring without ensuring the power is completely off. Use a non-contact voltage tester to confirm the power is indeed off before touching any wires or connections.
Clearing the Cabinets and Work Area
A clear workspace is essential for both safety and efficiency.
- Empty Cabinets: Remove everything from the cabinets and drawers. This makes them lighter and prevents items from falling during the removal process.
- Remove Doors and Drawers: For most safe cabinet removal, it’s easier and safer to remove cabinet doors and drawers first. This reduces the weight of the cabinet boxes and gives you better access to the mounting hardware.
- Doors: Open the cabinet door. You’ll typically see screws holding the hinges to the cabinet frame. Unscrew these carefully. You might want to label the doors and their corresponding cabinet frames with painter’s tape so you know where they go if you plan to reuse them.
- Drawers: Pull the drawer out as far as it will go. There are usually small clips or levers on the drawer slides that you need to press to release the drawer from the slide mechanism. Gently lift the drawer off the slides.
- Protect Floors: This is crucial for protecting floors during cabinet removal. Lay down thick cardboard, old blankets, or heavy-duty drop cloths in front of and underneath the cabinets you’ll be working on. Ensure the protective layer extends far enough to catch any dropped tools or debris. This will prevent scratches, dents, and stains.
Detaching the Base Cabinets
Now that your workspace is prepped, it’s time to focus on how to detach base cabinets from their fixed positions. This often involves removing screws, clips, or sometimes glue.
Locating and Removing Mounting Hardware
Base cabinets are typically secured in several places:
- Through the Back: Most cabinets are screwed directly into wall studs through their back panels. You’ll often find these screws located at the top and bottom of the cabinet carcass.
- Through the Top: Countertops are usually attached to the cabinets with screws or adhesive. If you’re removing cabinets with an existing countertop, you’ll need to detach the countertop first, or at least disconnect it from the cabinets. Screws might go through the top of the cabinet into the underside of the countertop.
- Underneath: Sometimes, cabinets are secured to the floor or to supporting structures from below.
- Adjacent Cabinets: Cabinets are often screwed together to form a continuous bank. You’ll need to dismantle lower cabinets by separating them from their neighbors.
Step-by-Step Screw Removal:
- Inspect the Cabinet Interior: Open the cabinet doors and drawers (or remove them entirely). Look for screws along the top inside edge of the cabinet, often screwed into the underside of the countertop.
- Check Cabinet Backs: If the back of the cabinets is accessible (e.g., the wall isn’t finished behind them yet, or you have a peninsula/island), look for screws going into the wall studs. A stud finder can help you locate the studs if you can’t see them.
- Look for Seams: Examine where cabinets meet each other. They are usually joined with screws from the inside of one cabinet into the side of the adjacent cabinet.
- Use the Right Tools: Employ your screwdrivers or drill/driver with the appropriate bits. Turn screws counter-clockwise to loosen them. If screws are stripped or difficult to remove, a bit of penetrating oil might help, but use it sparingly to avoid staining.
- Use a Putty Knife for Caulk: If the cabinets have been caulked along the wall or countertop, use a utility knife to carefully score the caulk line. Then, gently use a putty knife to pry the caulk away. This prevents paint and drywall damage.
- Address Stubborn Screws: For screws that are particularly tight or rusted, a socket wrench or an impact driver can be effective. Be careful not to overtighten or strip the screw head, which can make removal much harder.
Separating Adjacent Cabinets
To dismantle lower cabinets, you’ll need to separate them from each other.
- Locate Joining Screws: Open each cabinet and look along the vertical edges where two cabinets meet. You should find screws driven from one cabinet’s side panel into the adjacent one.
- Remove Joining Screws: Unscrew these joining screws. You may need to hold the adjacent cabinet steady to prevent it from shifting as you remove the screws.
- Labeling: If you plan to reinstall these cabinets, it’s a good idea to label each cabinet with a number or letter and mark which side connects to which. Painter’s tape is perfect for this.
Dealing with Countertop Attachment
If your cabinets are still attached to a countertop, this needs to be addressed before you can fully detach base cabinets.
- Check for Screws: Look for screws that pass from the cabinet carcass into the underside of the countertop.
- Consider Adhesive: Some countertops are also adhered to the cabinets with construction adhesive. If this is the case, you’ll need to carefully work a putty knife or scraper between the countertop and the cabinet to break the bond.
- Support the Countertop: If you’re removing the cabinets but keeping the countertop, ensure the countertop is adequately supported once the cabinets are removed. You might need temporary supports like 2x4s.
- Removal with Countertop: In some cases, it might be easier to remove the cabinets still attached to the countertop if the countertop is being replaced anyway. This usually requires at least two people due to the weight.
Safely Removing the Cabinet Box
With all the fasteners removed, the cabinet box should be loose. This is where safe cabinet removal is paramount to avoid injury or damage.
Getting Leverage and Support
- Crowbar Technique: Once screws are out, you might need to gently persuade the cabinet away from the wall. A pry bar is useful here. Place a piece of scrap wood or cardboard under the pry bar where it meets the wall or floor to protect the surfaces. Apply gentle, steady pressure to create a small gap.
- The “Jiggle” Method: Sometimes, a bit of gentle rocking or jiggling can help loosen the cabinet from the wall if there’s residual adhesive or paint holding it.
- Assistance is Key: For larger or heavier cabinets, never attempt to remove them alone. Having a second person to help support the weight and guide the cabinet is essential for safe cabinet removal and to prevent damage to the cabinet itself or your surroundings.
How to Unmount Kitchen Cabinets
This is the final step in separating the cabinet from its location.
- Check for Any Remaining Connections: Do one last check to ensure no screws, nails, or clips are still connecting the cabinet to the wall, floor, or adjacent cabinets.
- Gentle Pulling: With your helper, start to gently pull the cabinet away from the wall.
- Scrap Wood for Protection: Place scrap wood or cardboard under the cabinet’s base to protect the flooring as you slide it out.
- Tilt and Lift: Once the cabinet is free from the wall, it’s often easiest to tilt it forward slightly to clear any countertop overhang, then lift it straight up and out.
- Carry with Care: When carrying the cabinets, try to keep them upright as much as possible. If you need to lay them down, do so on their protected sides, not their open fronts.
Removing Wall Cabinets from Below (for Base Cabinets)
While the title refers to lower kitchen cabinets, sometimes people may be confused about how base cabinets connect to the wall, especially regarding removing wall cabinets from below. This phrasing might imply how to access the mounting points of base cabinets that are attached to the wall from the front side (which is uncommon for base cabinets, but might apply to some aspects of access).
For base cabinets, the primary mounting is from behind or through the top/sides. However, if there’s a desire to get leverage or access from below, here’s how it relates to base cabinets:
- Accessing Lower Mounting Points: If screws are driven from the floor up into the base cabinet (less common, but possible in some installations), you would need to access these from underneath the cabinet.
- Countertop Interference: The main reason you might think of “removing wall cabinets from below” in the context of base cabinets is if the countertop is still attached, and you’re trying to gain leverage to pry the cabinet away from the wall, possibly from underneath the countertop’s overhang. In this scenario, you’d still be working around the countertop.
- Island Base Cabinets: For base cabinets that are part of an island and might be accessible from all sides, you might have screws attaching them to the island’s frame or sub-top from below.
The crucial point for how to unmount kitchen cabinets that are base cabinets is focusing on the fasteners that attach them to the wall studs, adjacent cabinets, and the countertop. Access is usually from the inside of the cabinet or from the back.
Reinstalling or Disposing of Cabinets
Once the cabinets are removed, you’ll either be reinstalling them, storing them, or disposing of them.
For Reinstallation
- Labeling is Crucial: If you labeled your doors, drawers, and cabinet boxes, now is the time to use those labels.
- Inspect for Damage: Check the cabinets for any damage incurred during removal. Minor dings can often be repaired.
- Prepare for Installation: Ensure the new location is prepped and ready for cabinet installation.
For Disposal
- Check Local Regulations: Before disposing of cabinets, check your local waste disposal regulations. Some areas have specific procedures for disposing of large items or construction debris.
- Donation: If the cabinets are still in good condition, consider donating them to a local Habitat for Humanity ReStore or another architectural salvage yard. This is an eco-friendly option.
- Break Down if Necessary: If cabinets are too large to transport easily, you might need to break them down further. Be careful when doing this, especially if using power tools, and always wear safety gear.
Table: Common Issues and Solutions During Removal
| Issue | Potential Cause | Solution |
|---|---|---|
| Stripped Screw Heads | Over-tightening, using the wrong size screwdriver | Use a screw extractor kit, or try a rubber band between the screwdriver and screw head for better grip. |
| Paint or Caulk Sealing the Cabinet | Cabinet painted or caulked to the wall/countertop | Score caulk lines with a utility knife, then gently use a putty knife to break the seal. For paint, score along the edge. |
| Cabinet Won’t Budge | Hidden screws, strong adhesive, wall anchors | Double-check all visible areas for screws. Gently tap the pry bar into a seam to break adhesive bonds. Use a reciprocating saw as a last resort, with extreme caution. |
| Damage to Drywall or Flooring | Too much force, lack of protection | Use protective materials (cardboard, drop cloths) under and around the cabinet. Apply gentle, even pressure. Use scrap wood with pry bars. |
| Heavy Cabinet is Difficult to Move | Large size, multiple components still attached (e.g., countertop) | Get help from another person. Remove doors, drawers, and any other removable parts to lighten the load. |
FAQ: Your Kitchen Cabinet Removal Questions Answered
Here are some common questions people have when undertaking kitchen cabinet removal:
Q1: How long does it typically take to remove lower kitchen cabinets?
A: The time can vary significantly depending on your experience, the number of cabinets, and how they are installed. For a standard set of 5-8 lower cabinets, it might take anywhere from 2 to 6 hours for one person working carefully, or much faster with an assistant.
Q2: Do I need to remove the countertop before removing base cabinets?
A: It depends on your project. If the countertop is being replaced, it’s often easier to remove it with the cabinets. If you’re keeping the countertop, you absolutely must detach it from the cabinets first, usually by removing screws from underneath or carefully prying it loose.
Q3: What if my cabinets are glued to the wall?
A: If cabinets are glued, you’ll need to gently pry them away using a putty knife or scraper. Work slowly and steadily to break the adhesive bond. You might need to use a pry bar with protective wood placed between the bar and the wall.
Q4: Can I remove kitchen cabinets without a helper?
A: While it might be possible for very small, lightweight cabinets, it’s generally not recommended. Base cabinets, especially when still attached to a countertop, can be heavy and awkward. Having a helper ensures safe cabinet removal, prevents injury, and reduces the risk of damaging the cabinets or your home.
Q5: What’s the best way to protect my floor during cabinet removal?
A: Use thick cardboard, old blankets, or heavy-duty drop cloths placed directly in front of and beneath the cabinets. Ensure the protective layer is wide and long enough to catch any dropped items or debris.
By following these detailed steps, you can confidently approach the task of dismantling lower cabinets and successfully detach base cabinets without causing damage. Remember to prioritize safety, take your time, and enlist help when needed for a smooth kitchen cabinet removal experience.