
Can you regrout a kitchen tile counter yourself? Yes, absolutely! Regrouting your kitchen tile counter is a fantastic DIY project that can make a dramatic difference in its appearance. It’s a way to refresh your kitchen without a major renovation. This guide will walk you through every step of regrouting tile countertop steps, from preparation to the final seal, so you can achieve a professional-looking finish.
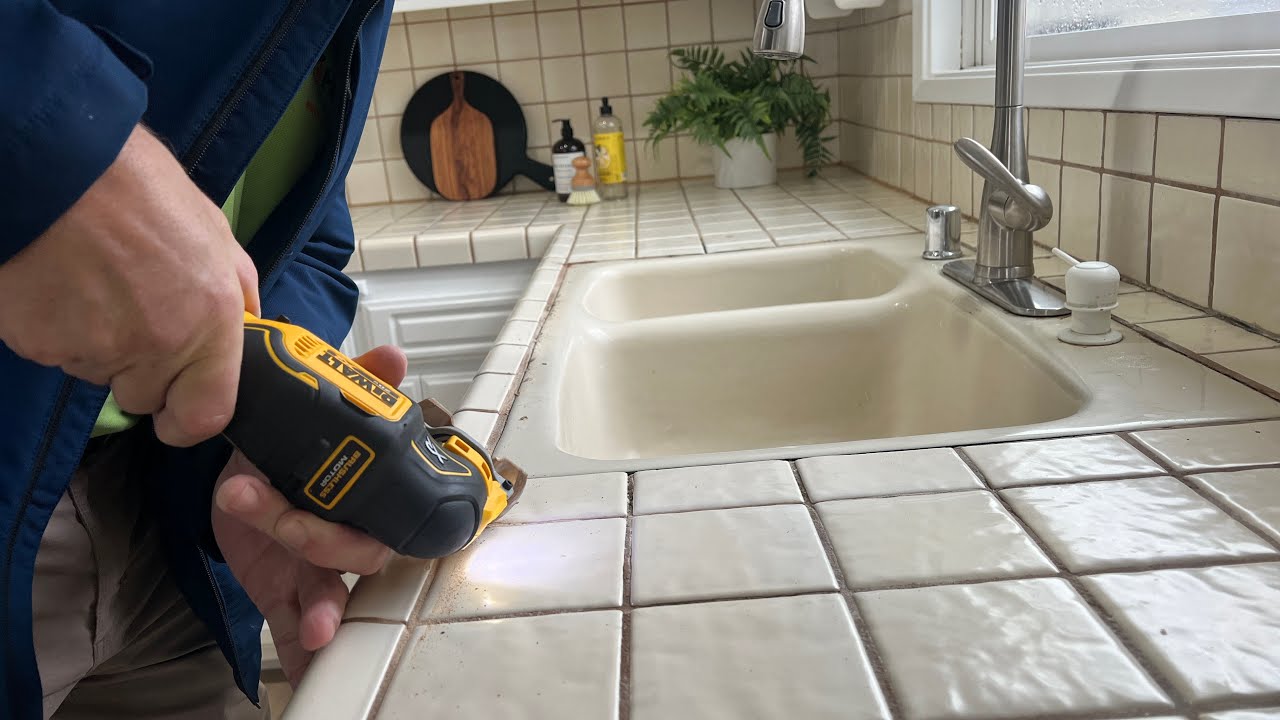
Image Source: i.ytimg.com
Why Regrout Your Kitchen Counter?
Over time, the grout between your kitchen tiles can become stained, cracked, or even crumble away. This not only looks unsightly but can also lead to bigger problems. Grout is porous and can absorb spills, leading to mold and mildew growth. Damaged grout can also allow water to seep beneath your tiles, potentially damaging the countertop substrate. DIY grout repair kitchen is a practical solution for restoring both the beauty and functionality of your tile. It’s a budget-friendly alternative to replacing the entire countertop and can revitalize the heart of your home.
Comprehending Grout: The Foundation of Your Tile
Before diving into the process, it’s helpful to understand what grout is and why its condition matters. Grout is the material that fills the spaces between tiles. It provides structural support and prevents dirt and moisture from getting under the tiles. The type of grout used can significantly impact the durability and maintenance of your kitchen counter.
Types of Grout for Kitchen Counters
Choosing the best grout for kitchen counters is crucial for longevity and ease of care.
- Cementitious Grout: This is the most common type. It’s made from Portland cement, fillers, and pigments.
- Sanded Grout: Contains sand and is best for wider grout lines (1/8 inch or more). The sand provides strength and prevents shrinkage.
- Unsanded Grout: Does not contain sand and is used for narrower grout lines (less than 1/8 inch). Sand in unsanded grout can scratch delicate tiles.
- Epoxy Grout: More durable and less porous than cementitious grout, making it highly resistant to stains and chemicals. It’s also more expensive and can be trickier to work with for DIYers. It’s often recommended for high-traffic areas and where hygiene is paramount.
- Urethane Grout: A good middle ground between cementitious and epoxy grout. It offers good stain resistance and flexibility but is also more expensive than cementitious grout.
For most kitchen tile counters, a high-quality sanded cementitious grout or an epoxy grout will provide the best results. Consider your tile type and the width of your grout lines when making your selection.
Grout Color Options Kitchen: More Than Just White
The color of your grout can dramatically alter the look of your tiled surface. It can blend in with your tiles for a seamless appearance or create a bold contrast to highlight the tile pattern.
- Neutral Colors (Gray, Beige, White): These are classic choices that offer a timeless look and can complement a wide range of tile colors.
- Darker Colors (Charcoal, Black, Dark Brown): These can hide stains and grout discoloration better than lighter colors, especially in a busy kitchen environment. They can also make tiles pop.
- Bold Colors (Blue, Green, Red): These can add a unique personality to your kitchen but require careful consideration to ensure they match your overall design.
When choosing grout color options kitchen, consider the color of your tiles, your cabinet colors, and the overall aesthetic you’re aiming for. Always test a small area with a grout sample if possible.
Essential Regrouting Tools and Supplies
Gathering the right regrouting tools and supplies before you start is key to a smooth and successful project.
Tools You’ll Need:
- Safety Glasses: Protect your eyes from dust and debris.
- Dust Mask: Essential for preventing inhalation of grout dust.
- Work Gloves: Protect your hands.
- Utility Knife or Grout Saw: For initial grout removal.
- Oscillating Multi-Tool with Grout Removal Blade: The fastest and most efficient way to remove grout.
- Grout Scraper or Putty Knife: For stubborn bits of old grout.
- Stiff-Bristled Brush or Old Toothbrush: For cleaning grout lines.
- Bucket: For mixing grout and for rinsing sponges.
- Grout Float: A specialized tool with a rubber or urethane base for applying grout.
- Grout Sponge: A dense, porous sponge specifically designed for cleaning grout.
- Clean Rags or Microfiber Cloths: For wiping away excess grout.
- Caulking Gun: For applying caulk to expansion joints.
- Painter’s Tape: To protect surrounding surfaces.
Supplies You’ll Need:
- New Grout: Choose based on your tile type and desired color.
- Grout Sealer: To protect the new grout.
- Caulk: To seal edges and expansion joints.
- Water: For mixing grout and cleaning.
Step-by-Step Guide to Regrouting Your Kitchen Counter
This section covers the entire process, from preparing your workspace to the final finishing touches. Following these regrouting tile countertop steps carefully will ensure a durable and beautiful result.
Step 1: Preparation is Key
Proper preparation prevents damage to your kitchen and makes the regrouting process much easier.
- Clear the Countertop: Remove everything from your tile counter.
- Protect Surrounding Areas: Use painter’s tape to mask off any adjacent countertops, cabinets, backsplashes, or walls. This will prevent accidental damage from your tools or grout. Pay close attention to the edges where the tile meets the wall or cabinetry.
- Ventilate the Area: Open windows and doors for good airflow, especially when using power tools and dealing with grout dust.
Step 2: Grout Removal Kitchen Counter
This is the most labor-intensive part of the job, but crucial for a good finish. The goal is to remove as much of the old grout as possible without damaging the tiles.
Methods for Grout Removal:
-
Manual Removal (Grout Saw/Utility Knife):
- Start by using a grout saw or a utility knife with a fresh blade.
- Carefully draw the blade back and forth along the grout lines. Apply steady pressure.
- Work slowly and deliberately, trying not to scratch the tile surface.
- This method is best for small areas or for fine-tuning after using power tools.
-
Power Tool Removal (Oscillating Multi-Tool):
- Attach a grout removal blade to your oscillating multi-tool.
- Set the tool to a medium speed.
- Hold the tool firmly and guide the blade along the grout lines.
- Let the tool do the work; don’t force it. Keep the blade angled slightly to avoid hitting the tiles.
- This method is significantly faster but requires more care to avoid damaging tiles.
-
Stubborn Grout: If you encounter very hard or stubborn grout, a small putty knife or a specialized grout scraper can help chip away at it.
Tips for Effective Grout Removal:
- Work in Sections: Don’t try to remove all the grout at once. Tackle one area at a time.
- Depth Matters: Aim to remove about 1/8 to 1/4 inch of the old grout. This creates enough depth for the new grout to adhere properly.
- Clean as You Go: Use a brush or shop vacuum to remove loose grout dust and debris from the lines as you work.
Step 3: Cleaning the Grout Lines
Once the old grout is removed, the lines need to be meticulously clean for the new grout to bond well.
- Vacuum Thoroughly: Use a shop vacuum with a brush attachment to suck up all remaining grout dust from the lines and surrounding surfaces.
- Rinse the Lines: Dampen a sponge or rag with clean water and wipe down the grout lines. This helps remove any fine dust particles. You may need to rinse the sponge frequently.
- Inspect: Look closely at the grout lines. Ensure there are no remaining bits of old grout, dust, or debris. Any contaminants can weaken the new grout’s bond.
Step 4: Mixing the New Grout
Follow the manufacturer’s instructions precisely when mixing your new grout. The consistency should be like peanut butter or thick toothpaste.
- Measure Water: Add the recommended amount of cool, clean water to a clean bucket.
- Add Grout Powder: Gradually add the grout powder to the water while stirring.
- Mix to Consistency: Mix thoroughly until the grout is smooth and lump-free. Avoid over-mixing, as this can introduce too much air.
- Let it Slake: Most grouts need to “slake” for 5-10 minutes. This means letting the mixture sit undisturbed for a short period, then remixing gently. This allows the chemicals in the grout to react properly.
- Working Time: Be aware of the grout’s working time, which is the window you have to apply it before it starts to harden. Mix only as much grout as you can use within this timeframe.
Step 5: Applying the New Grout
This is where the magic happens, transforming your counter’s appearance.
- Load the Grout Float: Scoop a generous amount of mixed grout onto your grout float.
- Apply to Lines: Hold the float at a 45-degree angle to the tile surface.
- Spread and Press: Work the grout into the grout lines, pressing firmly to ensure they are completely filled. Move the float diagonally across the tiles to push the grout into the joints.
- Remove Excess: As you spread, use the edge of the float to scrape off as much excess grout as possible from the tile surface. Again, work diagonally to avoid pulling grout out of the lines.
- Work in Sections: Continue this process, working in manageable sections of the countertop.
Step 6: Initial Grout Cleaning (The First Wipe)
This step removes the bulk of the excess grout from the tile faces.
- Wait Briefly: Allow the grout to set slightly for about 10-20 minutes. It should be firm to the touch but not completely hard.
- Use a Damp Sponge: Dip your grout sponge into a bucket of clean water and wring it out thoroughly. The sponge should be damp, not wet.
- Gentle Wiping: Wipe diagonally across the tiles, using a light touch. The goal is to remove the excess grout film without disturbing the newly filled grout lines.
- Rinse Frequently: Rinse the sponge often in clean water to prevent spreading excess grout. Change the rinse water as it becomes cloudy.
Step 7: Final Grout Cleaning and Shaping
This is where you refine the grout lines and clean the tiles.
- Second Wipe: After another 15-30 minutes, repeat the cleaning process with a damp, well-wrung-out sponge. This time, focus on cleaning the tile surfaces more thoroughly.
- Shape the Grout Lines: If necessary, use the damp sponge to gently smooth and shape the grout lines for a clean finish. Be careful not to press too hard.
- Buff the Tiles: Once the grout has set further (check manufacturer recommendations, usually a few hours), use a clean, dry microfiber cloth to buff the tiles and remove any remaining grout haze.
Step 8: Curing and Sealing
Allowing the grout to cure properly before sealing is essential for its longevity.
- Curing Time: Grout typically takes 24-72 hours to cure, depending on the type and humidity. Avoid using the counter or getting the grout wet during this period. Refer to your grout manufacturer’s instructions for specific curing times.
- Sealing the Grout: Once the grout is fully cured, it’s time to seal it. Sealing protects the grout from stains and moisture, making it easier to clean.
- Apply Sealer: Use a small brush or applicator to apply a thin, even coat of grout sealer to the grout lines.
- Wipe Excess: Wipe off any excess sealer from the tile surface immediately with a clean cloth before it dries.
- Follow Instructions: Adhere strictly to the sealer manufacturer’s drying and reapplication instructions. Most sealers require at least one coat, and some recommend a second coat after a few hours.
Step 9: Caulking Edges and Expansion Joints
This final step provides a clean finish and protects against moisture.
- Apply Caulk: Use a high-quality kitchen and bath caulk to fill any gaps between the tile counter and the walls, cabinets, or other surfaces. Also, apply caulk to any expansion joints (these are often found in longer countertop runs).
- Smooth the Bead: Use a damp finger or a caulk tool to smooth the caulk bead for a neat appearance.
- Clean Up: Wipe away any excess caulk immediately.
Troubleshooting Common Regrouting Issues
Even with the best preparation, you might encounter minor hiccups.
Issue: Grout Not Adhering Properly
- Cause: Grout lines were not clean, were too wet when grout was applied, or the grout was too old.
- Solution: If it’s a small area, you might be able to carefully scrape it out and reapply grout. For larger areas, you may need to remove the affected grout and reapply.
Issue: Tiles Are Scratched
- Cause: Too much pressure was applied during grout removal or cleaning, or abrasive tools were used.
- Solution: Minor scratches might be buffed out. For significant scratches, you might consider a tile repair kit or, in severe cases, tile replacement.
Issue: Grout Haze Remains
- Cause: Grout was not adequately cleaned off the tile surface, or the sealer was applied too soon.
- Solution: Use a specialized grout cleaner for tile counters specifically designed to remove grout haze. Follow the product’s instructions carefully, and ensure good ventilation.
Issue: Grout Cracks After Drying
- Cause: Grout was mixed too thin, the grout lines were not fully packed, or the wrong type of grout was used for the joint width.
- Solution: Carefully remove the cracked grout and reapply, ensuring proper mixing and filling of the lines.
Maintaining Your Regrouted Countertop
To keep your regrouted kitchen counter looking its best:
- Clean Spills Immediately: Especially acidic substances like lemon juice or vinegar, which can etch grout.
- Use Mild Cleaners: Avoid harsh chemicals or abrasive scrubbers that can damage the grout or sealer.
- Reapply Sealer: Depending on usage and cleaning habits, you may need to reapply grout sealer every 6-12 months to maintain protection.
Frequently Asked Questions (FAQ)
Q1: How long does it take to regrout a kitchen tile counter?
A1: For a standard kitchen counter, it can take anywhere from a full weekend to several days, depending on the size of the counter, the complexity of the tile pattern, and your pace. The most time-consuming part is the grout removal kitchen counter.
Q2: Can I regrout over existing grout?
A2: It’s strongly discouraged. New grout applied over old grout will not bond properly, leading to premature failure and a poor finish. You must remove the old grout first.
Q3: What is the best way to clean grout before regrouting?
A3: Thorough vacuuming to remove all dust and debris, followed by wiping the grout lines with a damp sponge and clean water, is the most effective method.
Q4: How do I regrout a tile backsplash in my kitchen?
A4: The process for replacing grout tile backsplash is very similar to regrouting a counter. You’ll follow the same steps for grout removal, cleaning, application, and sealing. The main difference might be the working angle, as you’ll be working vertically.
Q5: How do I choose the right grout color for my kitchen?
A5: Consider your tile color, cabinetry, and overall kitchen style. Lighter grout can make a space feel larger, while darker grout hides dirt and highlights the tiles. Look at examples online or get grout samples to see how they look with your tiles.
Q6: What is the best grout cleaner for tile counters?
A6: For general cleaning, a pH-neutral tile and grout cleaner is recommended. For removing haze after regrouting, look for products specifically labeled for grout haze removal. Always test in an inconspicuous area first.
Regrouting your kitchen tile counter is a rewarding DIY project. With careful preparation, the right tools, and patience, you can achieve a fresh, updated look for your kitchen that you can be proud of.