
Can you plumb a double kitchen sink yourself? Yes, with the right tools and a step-by-step approach, you can successfully plumb a double kitchen sink. This guide will walk you through the entire process, from gathering your supplies to making the final connections. We’ll cover everything you need to know about kitchen sink plumbing for a dual-basin setup, ensuring a leak-free and functional system.
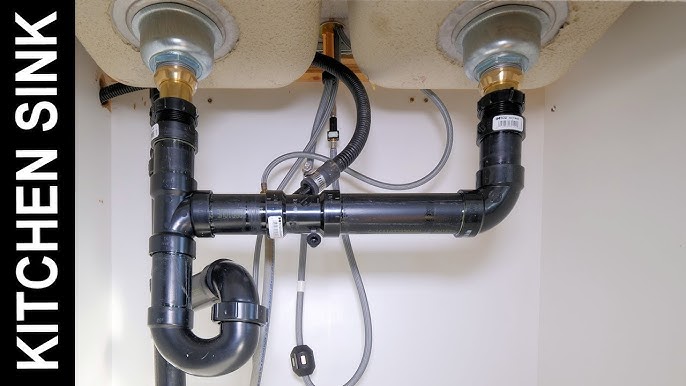
Image Source: i.ytimg.com
Preparing for Your Double Bowl Sink Installation
Before you dive into the actual plumbing, careful preparation is key to a smooth double bowl sink installation. This involves gathering the necessary tools and materials and ensuring your workspace is ready.
Tools You’ll Need
Here’s a list of common tools you’ll want to have on hand:
- Adjustable wrenches (various sizes)
- Pipe wrench
- Plumber’s tape (PTFE tape)
- Plumber’s putty
- Bucket or basin
- Towels or rags
- Safety glasses
- Gloves
- Screwdriver set (Phillips and flathead)
- Hacksaw or PVC pipe cutter
- Measuring tape
- Level
Essential Materials
Having the right materials will make the job much easier. Consider these items:
- Sink drain assembly kits for each sink basin (ensure they are compatible with your sink type and have the necessary strainers and gaskets)
- Tailpieces (short pipes connecting the drain assembly to the P-trap)
- One or two P-traps (depending on your under sink plumbing layout and whether you have a garbage disposal)
- Drain connectors (like a Y-branch or T-fitting) to join the two drain lines
- Chrome-plated brass or ABS plastic drain pipes and fittings
- Water supply lines (flexible braided hoses)
- Shut-off valves (if existing ones are old or not present)
- Optional: Dishwasher drain hose and clamp
- Optional: Garbage disposal unit and its specific plumbing components
Clearing and Cleaning Your Workspace
A clean and accessible workspace under the sink is crucial. Remove everything from the cabinet. Lay down old towels or a tarp to catch any residual water or debris. Inspect the existing plumbing for any signs of damage or leaks.
Installing the Sink Drain Assembly
The sink drain assembly is the first critical step in plumbing your double sink. Each basin needs its own drain.
Attaching the Strainer and Basket
- Apply Plumber’s Putty: Roll a rope of plumber’s putty about ¼ inch thick. Place this rope around the underside of the strainer flange.
- Insert Strainer: Push the strainer flange down into the drain opening of the sink basin. Make sure it sits snugly.
- Secure with Washer and Nut: From the underside of the sink, slide the rubber washer onto the drain body, followed by the friction washer (if included), and then the large mounting nut.
- Tighten the Nut: Hand-tighten the nut first. Then, use an adjustable wrench to tighten it further. Be careful not to overtighten, as this can crack the sink or the drain body. Ensure the strainer is centered.
- Wipe Away Excess Putty: Once the nut is tight, wipe away any excess plumber’s putty that squeezed out around the strainer from the top of the sink.
Connecting the Tailpiece
- Attach Tailpiece: Screw a tailpiece (a short pipe that extends from the drain body) into the bottom of the drain assembly. Hand-tighten it.
- Add Slip Nut and Washer: Slide a slip nut onto the tailpiece, followed by a plastic or rubber washer (cone-shaped with the wider end facing the tailpiece).
- Connect to Drain Body: Thread the slip nut onto the threaded outlet of the drain body. Hand-tighten it.
Repeat this process for both sink basins.
Crafting the Under Sink Plumbing Layout
The under sink plumbing layout is where you connect the two drain lines to a single waste pipe. This is where the P-trap for double sink configuration comes into play.
Types of Double Sink Drain Connections
There are a few common ways to connect the drains from each basin:
- Sanitary Tee (Y-Branch): This is the most common and recommended method. A Y-shaped fitting allows the two tailpieces to connect into a single pipe that then leads to the P-trap.
- Sanitary Cross Fitting: Less common for double sinks, this fitting has four openings, allowing for more complex connections.
- Direct Connection with Trap: In some simpler setups, each basin might have its own P-trap, and these two traps then connect to a single waste line. This can be more complex to ensure proper venting.
For a standard double kitchen sink, using a sanitary tee is usually the most straightforward and effective.
Assembling the Drain Lines and P-Trap
- Position the P-Trap: Place the P-trap assembly under the tailpieces. The P-trap is designed to hold water, creating a seal that prevents sewer gases from entering your home. For a double sink, you’ll typically have one P-trap serving both basins, or in some cases, two separate traps that then merge. The single P-trap method is generally preferred for simplicity and efficiency.
- Connect Tailpieces to the Tee: If you’re using a sanitary tee, connect the tailpiece from one sink basin to one opening of the tee. Connect the tailpiece from the other basin to the second opening of the tee.
- Connect Tee to P-Trap: Connect the outlet of the sanitary tee to the inlet of the P-trap using a short piece of drain pipe and the appropriate slip nuts and washers. Ensure the trap arm (the horizontal part of the P-trap) is pitched slightly downwards towards the main waste line for proper drainage.
- Connect P-Trap to Waste Pipe: Connect the outlet of the P-trap to your main drain pipe (often a larger diameter pipe) using another short piece of pipe, slip nuts, and washers. If you’re connecting drain pipes for the first time, make sure the connections are snug but not overly tight to avoid damaging the plastic.
Ensuring Proper Slope
It’s crucial that all horizontal drain pipes have a slight downward slope (about ¼ inch per foot) towards the main waste pipe. This allows water and waste to flow freely and prevents standing water, which can lead to clogs and odors.
Connecting the Water Supply Lines
Now, let’s focus on getting hot and cold water to your new faucet.
Installing Shut-Off Valves
If your existing shut-off valves under the sink are old, corroded, or nonexistent, it’s wise to replace them before connecting the new supply lines.
- Turn Off Water: Locate the main water shut-off for your house and turn it off. Open a faucet on the lowest level of your home to drain the pipes.
- Drain Residual Water: Place a bucket under the existing valve connection. Unscrew the old supply line. A small amount of water will likely drain out.
- Remove Old Valve: Unscrew the old shut-off valve from the pipe. This may require a pipe wrench.
- Install New Valve: Apply plumber’s tape to the threads of the new shut-off valve. Screw it onto the water pipe. Tighten with a wrench, but again, be careful not to overtighten.
- Turn Water Back On: Slowly turn the main water supply back on and check the new valve for leaks.
Connecting the Faucet Supply Lines
- Prepare Faucet Connections: Your new faucet will have threaded inlets for the hot and cold water supply lines.
- Attach Supply Lines: Connect one end of a flexible supply line to the cold water inlet on the faucet. These usually screw on by hand and then are tightened slightly with a wrench. Repeat for the hot water supply line on the hot water inlet.
- Connect to Shut-Off Valves: Connect the other end of the cold water supply line to the cold water shut-off valve. Again, hand-tighten first, then use a wrench for a snug fit. Repeat for the hot water supply line and the hot water shut-off valve.
- Check for Leaks: Turn the shut-off valves on slowly. Inspect all connections for any drips or leaks. Gently tighten any connections that are leaking.
Sink Faucet Installation
The sink faucet installation is a crucial part of finishing your double sink setup.
Mounting the Faucet
- Prepare Faucet Base: Most faucets come with a gasket or use plumber’s putty to create a watertight seal between the faucet base and the sink deck. Follow the manufacturer’s instructions for your specific faucet.
- Insert Faucet: From the top of the sink, insert the faucet spout and handles through the pre-drilled holes in the sink or countertop.
- Secure Faucet: From underneath the sink, slide any included washers and mounting nuts onto the faucet shanks. Tighten these nuts to secure the faucet firmly in place. Ensure the faucet is aligned correctly before fully tightening.
Connecting Sprayer Hose (If Applicable)
If your faucet includes a spray hose, connect it to the designated fitting under the sink according to the manufacturer’s instructions. Often, this involves a quick-connect fitting or a threaded connection with a washer.
Dishwasher Drain Connection
If you have a dishwasher, you’ll need to connect its drain hose to the sink’s plumbing.
How to Connect a Dishwasher Drain
- Locate the Dishwasher Outlet: The dishwasher drain hose typically has a curved end.
- Connect to Sink Drain: There are two common ways to connect:
- High Loop Method: Secure the drain hose to the underside of the countertop with a strap or clamp, creating a high loop. This prevents dirty sink water from flowing back into the dishwasher. The hose then typically connects directly to a special inlet nipple on the garbage disposal or the sink drain tailpiece.
- Dedicated Inlet: Some tailpieces or garbage disposals have a dedicated inlet nipple for the dishwasher drain hose. If so, feed the hose onto this nipple and secure it with a hose clamp.
- Secure with Clamp: Always use a hose clamp to ensure a secure connection and prevent leaks.
Important Note: Local plumbing codes may require an air gap fitting for dishwasher drains. Check your local regulations.
Garbage Disposal Plumbing
If you’re installing a garbage disposal, this will be integrated into your under sink plumbing layout.
Installing a Garbage Disposal
- Mount Disposal: Mount the garbage disposal unit according to the manufacturer’s instructions. This usually involves a mounting ring and screws that attach to the sink flange.
- Connect Dishwasher Drain (If Applicable): If the disposal has a dishwasher inlet, knock out the plug inside the inlet before mounting the disposal. Then, connect the dishwasher drain hose as described above.
- Connect Disposal Outlet: The disposal will have an outlet pipe that needs to be connected to your drain system. This outlet usually connects to a tailpiece that then goes into your P-trap assembly. You might need an adapter or a specific elbow fitting depending on the disposal and your existing drain pipes.
- Ensure Proper Pitch: Make sure the pipe from the disposal to the P-trap has a slight downward slope.
Testing for Leaks
This is the final and most critical step.
- Fill the Sinks: Fill both basins of the sink with water, one at a time, and then let them drain.
- Inspect All Connections: While the water is draining, carefully inspect every connection you’ve made:
- Drain assemblies
- Tailpieces
- P-trap fittings
- Connections to the main waste pipe
- Dishwasher hose connections
- Garbage disposal connections (if applicable)
- Water supply lines and faucet connections
- Check for Drips: Use a dry paper towel or cloth to wipe down all connections. Any moisture indicates a leak.
- Tighten as Needed: If you find any leaks, gently tighten the offending connection. Sometimes, simply reseating a washer or adding a bit more plumber’s tape can solve the problem.
- Run Water and Disposal: Run both hot and cold water. If you have a garbage disposal, run it with cold water and check its connections as well.
Tip: If a leak persists, disassemble the connection, check for debris or damage on the threads or washers, and reassemble.
Frequently Asked Questions (FAQ)
Q: How do I prevent my double sink drains from backing up?
A: Ensure proper slope on all drain pipes, avoid pouring grease or coffee grounds down the drain, and regularly clean your drains. Using a garbage disposal can also help break down food waste.
Q: What is the purpose of a P-trap?
A: A P-trap is a U-shaped section of pipe that holds water. This water creates a seal, preventing unpleasant sewer gases from entering your home through the drain.
Q: Can I use PVC pipes for my kitchen sink plumbing?
A: Yes, PVC (polyvinyl chloride) pipes are commonly used for kitchen sink plumbing due to their affordability, ease of installation, and durability. Ensure you use the correct primer and cement for PVC connections. ABS is another common material.
Q: What size drain pipes should I use?
A: Kitchen sinks typically use 1 ½ inch diameter drain pipes for tailpieces and the P-trap. The main waste line is usually larger, often 3 or 4 inches in diameter, depending on local codes.
Q: How tight should I make the slip nuts?
A: Slip nuts should be hand-tightened first. Then, use a wrench to tighten them about a quarter turn more. Overtightening can strip the threads or crack the plastic fittings.
By following these detailed steps, you can confidently tackle the plumbing for your double kitchen sink. Remember to work methodically, double-check your connections, and always test thoroughly for leaks. Happy plumbing!