
Yes, you absolutely can refinish your kitchen cabinets yourself, transforming your kitchen with a fresh look without the hefty expense of full replacement. This DIY guide will walk you through the entire process, from initial planning to the final touches, and provide a realistic cost breakdown for your kitchen cabinet update.
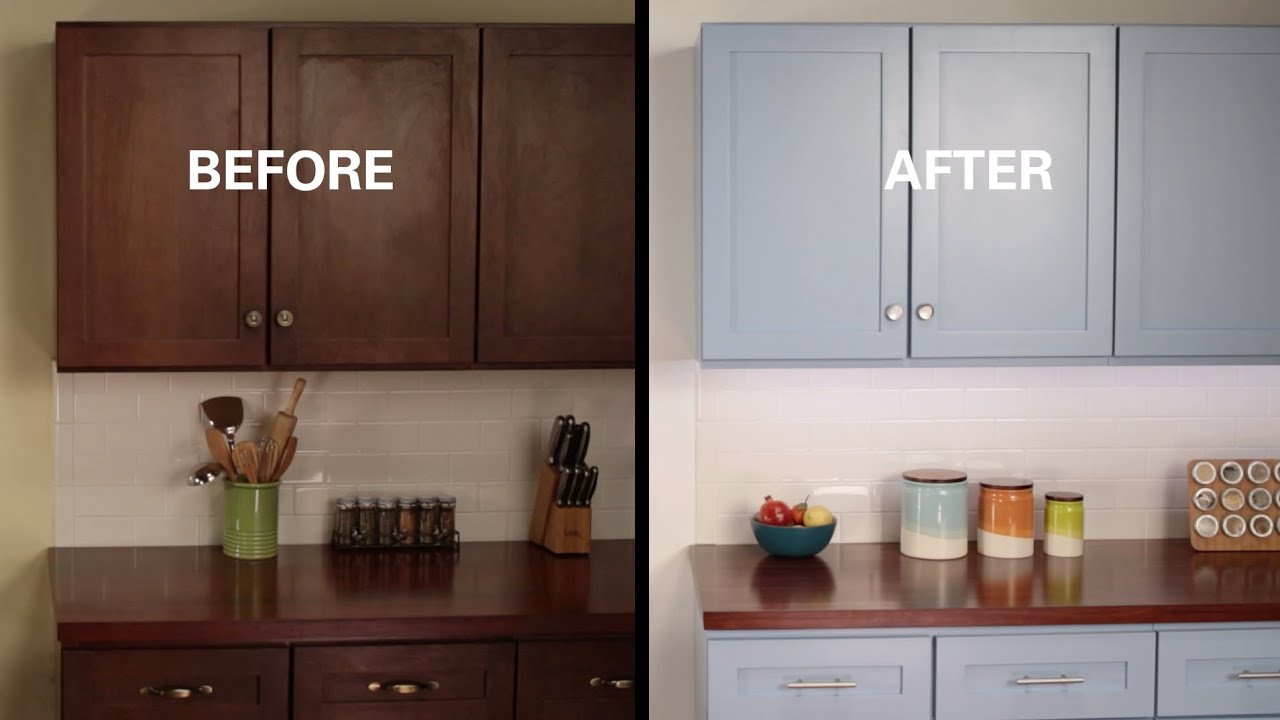
Image Source: i.ytimg.com
Why Refinish Your Kitchen Cabinets?
Updating your kitchen cabinets is a major undertaking that can dramatically change the feel of your home. Refinishing offers a cost-effective way to achieve this. Instead of shelling out thousands for new cabinets, you can breathe new life into your existing ones. This method is also more environmentally friendly, as you’re reusing materials rather than discarding them.
Benefits of DIY Cabinet Refinishing
- Cost Savings: This is the biggest draw. Professional cabinet refinishing can be very expensive. Doing it yourself saves significant labor costs.
- Customization: You have complete control over the final look. Choose any color, stain, or finish you desire.
- Satisfaction: There’s a unique sense of accomplishment in transforming your own space.
- Sustainability: Reusing your existing cabinets reduces waste.
When Refinishing Makes Sense
Refinishing is ideal for cabinets that are structurally sound but have outdated finishes, chipped paint, or worn surfaces. If your cabinet boxes are in good shape and the doors and drawer fronts are intact, refinishing is a fantastic option.
When to Consider Replacement
- Severe Damage: If cabinets are warped, water-damaged, or have extensive structural issues, replacement might be more practical.
- Outdated Layout: Refinishing won’t fix a poorly functioning kitchen layout.
- Deteriorated Materials: If the cabinet material itself is low quality and falling apart, refinishing might not hold up.
Planning Your Kitchen Cabinet Update
Careful planning is key to a successful DIY cabinet refinishing project. It ensures you have the right materials, tools, and a clear understanding of the steps involved.
Choosing Your Refinishing Method
There are several popular ways to refinish kitchen cabinets:
- Cabinet Painting: This is a very popular choice for a modern, clean look. It allows for a wide range of colors.
- Cabinet Staining: If you prefer a wood grain look, staining is the way to go. It enhances the natural beauty of the wood.
- Cabinet Resurfacing: This can involve adding a thin veneer or laminate over existing cabinets, but for DIY, it often refers to a thorough cleaning and sometimes a light sanding and restaining. We’ll focus on painting and staining as the primary DIY refinishing methods here.
Deciding on a Color or Stain
- Color Trends: Look at current kitchen design trends for inspiration. Whites, grays, blues, and greens are popular cabinet colors.
- Your Kitchen Style: Consider your existing decor. A farmhouse kitchen might suit distressed white cabinets, while a modern kitchen could handle sleek black or gray.
- Wood Type: Different wood species take stains differently. Oak often shows a strong grain, while maple is smoother.
- Test Samples: Always test your chosen paint or stain on a scrap piece of wood or an inconspicuous area of a cabinet door before committing.
Gathering Your Tools and Materials
This is where the cost breakdown begins. Having everything ready minimizes interruptions and ensures a smoother process.
Essential Tools:
- Screwdriver Set: For removing cabinet doors and hardware.
- Painter’s Tape: High-quality tape for masking.
- Drop Cloths/Plastic Sheeting: To protect your floors and surrounding areas.
- Sandpaper: Various grits (e.g., 100, 150, 220).
- Sanding Blocks or Electric Sander: For efficient sanding.
- Sanding Sponges: Good for reaching corners and edges.
- Putty Knife: For scraping any old finish or filling small imperfections.
- Wood Filler: For filling holes or cracks.
- Primer: Essential for good paint adhesion and coverage.
- Paint Brushes: High-quality synthetic brushes for smooth application.
- Foam Rollers: For smooth, even coverage on larger flat surfaces.
- Paint Tray and Liners: For easy cleanup.
- Rags or Microfiber Cloths: For cleaning and wiping.
- Safety Gear: Gloves, safety glasses, and a dust mask or respirator.
- Cleaning Supplies: Degreaser or TSP (trisodium phosphate) substitute, water, clean cloths.
- Optional for Staining: Tack cloths, staining pads or rags, polyurethane or topcoat.
Material Considerations:
- Paint: Choose a high-quality cabinet paint. Enamels (like alkyd or acrylic-oil hybrids) offer durability and a smooth finish.
- Primer: A good bonding primer is crucial, especially if painting over laminate or dark finishes.
- Stain: Oil-based stains typically penetrate wood better for richer color. Water-based stains are easier to clean up.
- Topcoat/Sealer: For painted cabinets, a durable topcoat like polyurethane or a cabinet lacquer adds protection. For stained cabinets, polyurethane or a varnish is essential.
- Cabinet Hardware: New knobs, pulls, or hinges can dramatically update the look.
The Refinishing Process: Step-by-Step
The refinishing process requires patience and attention to detail. Rushing can lead to a less-than-perfect finish.
Step 1: Preparation is Paramount (Cabinet Prep Work)
This is the most crucial step. Skipping or rushing prep work will result in a poor final finish.
- Empty Cabinets: Remove all items from your cabinets.
- Remove Doors and Drawer Fronts: Carefully label each door and drawer front with its location using masking tape and a marker. This ensures they go back in the right place.
- Remove Cabinet Hardware: Unscrew hinges, knobs, and pulls. Store them in labeled bags to avoid losing small parts.
- Clean Thoroughly: Use a degreaser or TSP substitute to remove all grease, grime, and food splatters. Kitchen cabinets are notorious for grease buildup. Wash with clean water and dry completely.
- Repair Imperfections: Fill any holes, dents, or scratches with wood filler. Let it dry completely, then sand it smooth.
- Sanding: This step is vital for adhesion, whether you’re painting or staining.
- For Painting: Start with a medium-grit sandpaper (100-150) to scuff up the existing finish. Follow with a finer grit (180-220) for a smoother surface. The goal is to create a surface that the primer and paint can adhere to, not to remove all the old finish.
- For Staining (Cabinet Staining): If you’re painting over a stained finish, you’ll need to remove the old stain and finish. This is where cabinet stripping might come in. Chemical strippers can be effective but require careful handling and ventilation. Sanding thoroughly with progressively finer grits (down to 220 or 320) is often sufficient for removing lighter finishes or preparing bare wood.
- Dust Removal: After sanding, thoroughly wipe down all surfaces with a tack cloth or a damp microfiber cloth to remove all dust. Dust is the enemy of a smooth finish.
Step 2: Priming
Primer creates a uniform base for your paint and helps it adhere better.
- Apply Primer: Apply a thin, even coat of high-quality primer using a brush or roller. For dark colors or wood with strong grain, a stain-blocking primer is recommended.
- Allow to Dry: Let the primer dry completely according to the manufacturer’s instructions.
- Light Sanding: Once dry, lightly sand the primed surfaces with a fine-grit sandpaper (220) and wipe away dust with a tack cloth. This ensures a smooth surface for your paint.
Step 3: Painting (Cabinet Painting)
Patience and thin coats are key to a professional-looking painted finish.
- Apply First Coat: Apply a thin, even coat of your chosen cabinet paint. Use a good quality brush for edges and details and a foam roller for larger surfaces. Avoid applying too much paint, as this can lead to drips and an uneven finish.
- Drying Time: Allow the first coat to dry completely. This can take several hours, depending on the paint and humidity.
- Light Sanding (Optional but Recommended): Once the first coat is dry, you can lightly sand with very fine-grit sandpaper (320-400) to knock down any imperfections or brush marks. Wipe away dust with a tack cloth.
- Apply Subsequent Coats: Apply two or more thin coats, allowing each to dry thoroughly and sanding lightly between coats. Most cabinet painting projects require at least two coats, often three, for full coverage and durability.
Step 4: Staining (Cabinet Staining)
Staining brings out the natural beauty of wood.
- Apply Stain: Apply the stain evenly with a staining pad, foam applicator, or lint-free rag. Work in sections, following the grain of the wood.
- Wipe Off Excess: Allow the stain to penetrate for the time recommended by the manufacturer, then wipe off the excess with a clean, lint-free rag, again following the wood grain. The longer you leave the stain on, the darker the color will be.
- Allow to Dry: Let the stained cabinets dry completely. This can take 24-72 hours.
- Apply Topcoat: Once the stain is fully dry, apply several thin coats of a durable polyurethane or varnish. This protects the wood and the stain. Apply with a brush or foam applicator, allowing adequate drying time between coats. Lightly sand with very fine-grit sandpaper (320-400) between coats for a smoother finish, wiping away dust with a tack cloth.
Step 5: Reassembly and Finishing Touches
The final step brings everything together.
- Reinstall Hardware: Once the paint or stain and topcoat are fully cured (this can take several days to a week for maximum hardness), reattach your cabinet doors and drawer fronts. Install new or cleaned cabinet hardware like knobs and pulls.
- Rehang Doors and Drawers: Carefully rehang the doors and reinsert the drawers.
- Clean Up: Remove all painter’s tape, drop cloths, and clean up your tools.
Cost Breakdown for DIY Cabinet Refinishing
The cabinet refinishing cost for a DIY project can vary significantly based on the size of your kitchen, the quality of materials you choose, and whether you’re painting or staining. Here’s an estimated breakdown:
Material Costs (Average Kitchen Size – Approx. 10-15 cabinet doors and drawer fronts)
| Item | Estimated Cost Range | Notes |
|---|---|---|
| Primer | $30 – $70 | High-quality stain-blocking primer recommended. |
| Paint/Stain | $50 – $150 | Quality cabinet-specific paint or stain. Price varies by brand and type. |
| Topcoat/Sealer | $40 – $100 | Durable polyurethane or cabinet lacquer. |
| Sandpaper & Supplies | $30 – $60 | Assorted grits, sanding blocks, tack cloths, painter’s tape. |
| Brushes & Rollers | $20 – $50 | Quality applicators make a big difference. |
| Cleaning Supplies | $15 – $30 | Degreaser, rags, sponges. |
| Wood Filler/Putty | $10 – $20 | For minor repairs. |
| New Cabinet Hardware | $50 – $300+ | Varies greatly based on style and quantity. This can be a significant cost. |
| Drop Cloths/Plastic | $20 – $40 | For protecting your workspace. |
| Safety Gear | $15 – $30 | Gloves, masks, eye protection. |
| Total Estimated Material Cost | $280 – $850+ | This can increase significantly with high-end hardware or premium finishes. |
Labor Costs Saved
- Professional Cabinet Painting: Can range from $3,000 to $7,000 or more for an average kitchen.
- Professional Cabinet Staining: Often more labor-intensive and can be similar to or higher than painting costs.
- Professional Cabinet Resurfacing: Can also be several thousand dollars.
By undertaking this project yourself, you are saving thousands of dollars in labor.
DIY Cabinet Refinishing: Tips for Success
- Ventilation is Key: Work in a well-ventilated area, especially when using strippers, primers, or certain types of paint and finishes. Open windows and use fans.
- Work in Sections: If you don’t want to be without kitchen access for too long, you can remove and refinish doors and drawer fronts in batches.
- Patience with Drying Times: Don’t rush the drying or curing process. It’s crucial for a durable finish.
- Invest in Quality Tools: Good brushes and rollers will make the application much smoother and the final finish look more professional.
- Read Product Labels: Always follow the manufacturer’s instructions for drying times, application methods, and safety precautions for all products you use.
- Label Everything: When you remove doors, drawer fronts, and hardware, label them clearly so you know exactly where each piece goes.
- Consider a Sprayer: For an ultra-smooth, factory-like finish, you might consider renting or purchasing a paint sprayer. This requires practice and careful masking but can yield excellent results.
Frequently Asked Questions (FAQ)
How long does it take to refinish kitchen cabinets?
The timeframe for DIY cabinet refinishing varies greatly depending on your kitchen size, your experience level, and how much time you can dedicate each day. A common estimate is anywhere from a long weekend to 1-2 weeks of consistent work. The drying and curing times between coats are the biggest time factors.
Can I refinish laminate cabinets?
Yes, you can refinish laminate cabinets, but it requires specific preparation. Clean them thoroughly, then lightly sand with fine-grit sandpaper to create a porous surface. Use a high-quality bonding primer designed for laminate or slick surfaces. Then, proceed with painting as usual. Cabinet painting is the most common method for laminate.
What is the best paint for kitchen cabinets?
High-quality acrylic-latex enamel paints are generally recommended for their durability, washability, and resistance to chipping. Alkyd enamel paints offer a harder finish but are harder to clean up and can have stronger odors. Look for paints specifically labeled for cabinets or trim for the best results.
Can I just repaint my existing cabinets without stripping?
If your current paint or finish is in good condition (no peeling or significant damage), you can often skip the full cabinet stripping process. Thorough cleaning, degreasing, and light sanding to scuff the surface are essential for new paint to adhere properly. This is a common approach for a kitchen cabinet update.
How do I choose new cabinet hardware?
Consider the style of your cabinets and your kitchen. For a modern look, sleek metal pulls or minimalist knobs work well. For a farmhouse or traditional style, consider brushed nickel, oil-rubbed bronze, or decorative ceramic hardware. Measure the existing hole spacing for your pulls to ensure compatibility or be prepared to drill new holes.
By following this comprehensive guide, you can confidently embark on your own kitchen cabinet refinishing adventure, breathing new life into your kitchen and saving a significant amount of money in the process.