
Can you vent a kitchen island sink? Yes, you absolutely can and must vent a kitchen island sink to ensure proper drainage and prevent common plumbing issues. Without a vent, your sink won’t drain correctly, will likely gurgle, and can even cause sewer gases to enter your home. This guide will walk you through the essential steps and considerations for properly venting your kitchen island sink, ensuring a functional and safe plumbing system.
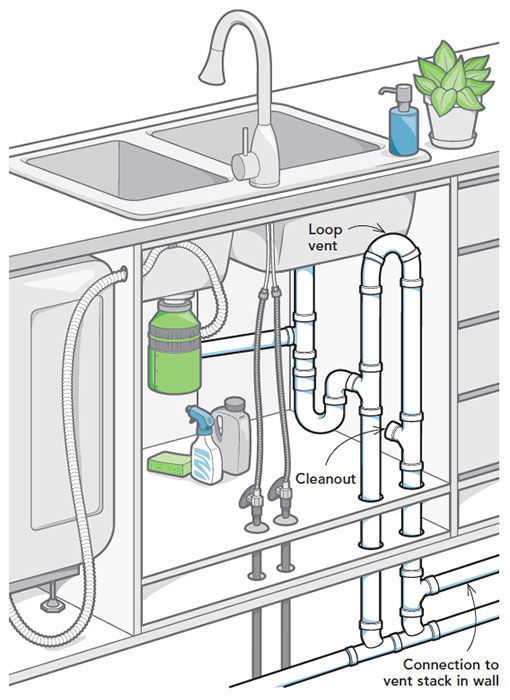
Image Source: images.finehomebuilding.com
The Importance of a Kitchen Sink Vent
A kitchen sink vent is a critical component of any drainage system. It serves a dual purpose: it allows air to enter the drainpipe, equalizing pressure, and it safely directs sewer gases away from your living space. Think of it like breathing for your plumbing. When water drains from a fixture, it creates a vacuum. Without a vent to let air in, this vacuum can suck water out of the P-trap, breaking the critical water seal that keeps nasty odors and gases from entering your home.
Why Island Sinks Need Special Attention
Kitchen islands, by their very nature, are often located far from existing exterior walls where traditional venting might be easily installed. This distance can create challenges for a properly functioning kitchen sink drain system. The goal is to create an effective island sink drainage system that meets plumbing codes and prevents the aforementioned issues.
Deciphering Venting Methods for Kitchen Island Sinks
There are two primary methods for venting plumbing fixtures, and each has its place in a plumbing island sink setup:
Dry Venting Island Sink
Dry venting is the most common and traditional method. In this system, a separate vent pipe runs from the fixture (or a junction of fixture drains) upwards, through the ceiling, and eventually connects to the main vent stack that extends through the roof. This creates a direct air path for the drain.
How Dry Venting Works for an Island Sink:
- Connection Point: The vent pipe is typically connected to the drain line after the P-trap of the island sink. This ensures the P-trap maintains its water seal.
- Vertical Rise: The vent pipe then rises vertically.
- Horizontal Run: It might run horizontally for a short distance before continuing its ascent.
- Connection to Main Vent: The horizontal run eventually connects to an existing vent pipe or the main vent stack.
- Termination: The main vent stack terminates above the roofline, allowing sewer gases to escape safely outdoors.
Advantages of Dry Venting:
- Reliability: It’s a tried-and-true method that is very effective when installed correctly.
- Code Compliance: Most plumbing codes favor or require dry venting for optimal performance.
- Prevents Siphonage: It effectively prevents the siphonage of P-traps.
Disadvantages of Dry Venting:
- Aesthetics: Running a separate vent pipe can sometimes be visually intrusive if not concealed within walls or soffits.
- Installation Complexity: For island sinks, this often requires more extensive work, potentially involving cutting into ceilings and walls to route the vent pipe.
Wet Venting Island Sink
Wet venting is a more space-saving technique where a vent pipe serves multiple fixtures. In this method, the drainpipe from one fixture (typically a fixture lower in the plumbing stack, like a toilet) also acts as the vent for another fixture (like a sink). The key is that the fixture acting as the vent must be located below the fixture it is venting.
How Wet Venting Works for an Island Sink:
- Shared Pipe: The drainpipe from the island sink connects to a larger drainpipe that serves another fixture.
- Fixture Location: This connection is made after the drain from the upper fixture but before the drain from the lower fixture. The lower fixture’s drainpipe then acts as the vent for the island sink.
- Airflow: As water flows down from the upper fixture, it scours the pipe, allowing air to flow up from below to vent the island sink.
Advantages of Wet Venting:
- Reduced Piping: Requires fewer pipes, saving material and labor.
- Space Saving: Can be particularly useful in tight spaces or when minimizing visible piping is a priority.
Disadvantages of Wet Venting:
- Code Restrictions: Not all fixtures can be wet-vented, and specific code requirements dictate how this can be done. For example, you generally can’t wet-vent a kitchen sink with a bathroom fixture or vice versa without specific considerations.
- Potential for Blockages: If not sloped correctly, or if there’s a significant backup in the lower fixture, it can potentially affect the upper fixture’s drainage.
- Proper Sizing is Crucial: The size of the shared drainpipe and vent must be adequate for the combined flow of both fixtures.
Connecting Island Sink to Vent: The Crucial Steps
No matter which venting method you choose, proper connection is paramount. The objective is to ensure that the vent pipe draws air from the drain system without allowing wastewater to enter the vent.
H4: The Role of the P-Trap
Every sink needs a P-trap. This U-shaped bend in the drainpipe holds a small amount of water, creating a seal that prevents sewer gases from rising into your home. This island sink trap seal is vital for hygiene and comfort. The vent pipe connects after the P-trap.
H4: Vent Pipe Sizing and Slope
- Sizing: The size of the vent pipe is determined by the drainage fixture’s size and the number of fixtures it serves. Plumbing codes provide detailed charts for this. For a typical kitchen sink, a 1 ½-inch or 2-inch vent pipe is common. Incorrect sizing can lead to improper airflow and drainage issues.
- Slope: Vent pipes must slope upwards towards the main vent stack. The standard slope is typically ¼ inch per foot. This slope ensures that any moisture or debris that might enter the vent pipe will flow towards the main stack and out, rather than pooling and causing blockages.
H4: Connecting to the Drainage System
- Location of Connection: The vent connection should be made on the drain line after the P-trap. This is typically done using a sanitary tee or a wye fitting.
- The Fitting: A sanitary tee is preferred for vertical connections, while a wye fitting is best for horizontal connections to ensure the wastewater flows smoothly past the vent takeoff. This fitting allows air to enter the drainpipe while preventing wastewater from flowing into the vent.
H4: Running the Vent Pipe
This is where the “island” aspect becomes challenging. The vent pipe needs to travel from the island to a point where it can connect to an existing vent system or be run up through the roof as a new vent.
- Through Cabinets and Floors: The vent pipe will likely need to be routed through kitchen island cabinets, under the subfloor, and then up through the floor joists.
- Ceiling Access: If connecting to a vent stack on an upper floor or attic, it will need to be run up through the ceiling.
- Exterior Wall Venting: In some cases, it might be feasible to run the vent pipe horizontally within a dropped ceiling or soffit to an exterior wall, where it can then be run vertically to the roof.
Island Sink Venting Code: What You Need to Know
Adhering to local plumbing codes is non-negotiable. These codes are designed to ensure safety and proper functionality. The specifics of island sink venting code can vary by region, but some general principles apply:
- Minimum Vent Size: Codes will specify the minimum diameter for vent pipes based on the fixture and its drainage capacity.
- Maximum Horizontal Distance: There are often limits on how far a vent can run horizontally before it needs to rise. This prevents the vent from becoming too long and ineffective.
- Minimum Vent Height: The vent pipe must terminate a certain distance above the fixture it serves to prevent wastewater from backing up into it.
- Air Admittance Valves (AAVs): In some specific situations and jurisdictions, an Air Admittance Valve (AAV) might be permitted as an alternative to a traditional vent pipe. An AAV is a one-way valve that opens to allow air into the drainpipe when negative pressure occurs, but closes to seal the pipe when positive pressure is present, preventing sewer gases from escaping. However, AAVs are often not permitted as the sole vent for a fixture in kitchens or for primary venting on a new installation, especially in island applications where a traditional vent is preferred for reliability. Always check local codes.
H4: Understanding the Island Sink Plumbing Diagram
A clear island sink plumbing diagram is essential before starting any work. This diagram should show:
- The location of the island sink and its P-trap.
- The proposed route of the vent pipe.
- How the vent pipe connects to the existing drainage and venting system.
- The size and slope of all pipes.
- The location of any necessary fittings (wyes, sanitary tees).
This diagram helps visualize the entire island sink drainage system and ensures all components are accounted for.
When to Call a Professional Plumber
While DIY projects can be rewarding, plumbing island sink venting can be complex and requires a good understanding of plumbing principles and local codes. It’s advisable to consult or hire a licensed plumber if:
- You are unsure about local plumbing codes.
- The job involves significant structural modifications (e.g., cutting through joists, running pipes through finished walls and ceilings).
- You are unfamiliar with soldering copper pipes or working with PVC/ABS drainage materials.
- You don’t have a clear island sink plumbing diagram or understanding of the existing system.
- You want to ensure the job is done correctly and meets all safety and code requirements.
Troubleshooting Common Island Sink Venting Issues
Even with proper installation, problems can arise. Here are a few common issues and their likely causes related to island sink venting:
H5: Slow Draining or Gurgling
- Cause: The most common culprit is a blocked or improperly sized vent. This prevents air from entering the drainpipe, creating a vacuum that hinders water flow.
- Solution: Check the vent pipe for blockages (leaves, debris, animal nests if it goes to the roof). Ensure the vent is properly sloped and sized.
H5: P-Trap Siphonage (Water Seal Loss)
- Cause: Insufficient venting allows negative pressure to build up in the drainpipe as water flows out. This vacuum can suck the water out of the P-trap.
- Solution: Ensure the vent pipe is correctly connected after the P-trap and is not blocked. Verify the vent pipe is adequately sized and routed to allow proper air intake.
H5: Unpleasant Odors
- Cause: If the P-trap loses its water seal due to siphonage or evaporation, sewer gases can enter the home.
- Solution: Check for proper venting to prevent siphonage. If the sink is rarely used, run water periodically to keep the P-trap filled. If odors persist, there might be a leak or a faulty vent connection.
Best Practices for a Long-Lasting Island Sink Vent
To ensure your island sink drainage system functions flawlessly for years to come, follow these best practices:
- Use Quality Materials: Invest in durable PVC or ABS pipes and fittings that are approved for drain, waste, and vent (DWV) systems.
- Secure Piping: Properly support and secure all vent pipes to prevent sagging or movement, which can disrupt the slope and lead to blockages.
- Test Thoroughly: After installation, perform a water test by running water through the sink and observing drainage and listening for any unusual noises. You can also use a smoke machine to test for leaks in the vent system.
- Regular Maintenance: Periodically inspect visible parts of the vent system for any signs of damage or leaks. If your vent terminates on the roof, ensure the vent cap is intact and clear of obstructions.
Frequently Asked Questions (FAQ)
Q1: Can I use a standard sink drain vent for an island sink?
A: Yes, if you can connect the island sink’s drainpipe to an existing, properly functioning vent line within your home’s plumbing system. However, the challenge with island sinks is often the distance from existing vents, requiring new pipe runs.
Q2: What is an Air Admittance Valve (AAV) and can it vent my island sink?
A: An AAV is a mechanical vent that allows air into the drainpipe when needed but seals to prevent sewer gas escape. While they can vent fixtures, local plumbing codes must be checked. Many codes do not permit AAVs as the sole vent for a kitchen sink, especially in new installations or island configurations, due to their mechanical nature and potential for failure compared to traditional vents.
Q3: How do I know if my island sink is properly vented?
A: Signs of proper venting include fast, smooth draining without gurgling sounds. If water backs up, the sink gurgles, or you notice sewer odors, it’s likely not vented correctly.
Q4: Does my kitchen island sink need its own vent pipe?
A: It depends on the overall plumbing design. If it can be adequately wet-vented or tied into an existing vent system without compromising the island sink trap seal or drainage of other fixtures, it might not need a completely separate new vent run from the roof. However, it must be vented somehow, and often, for island sinks, a dedicated vent is the most reliable solution.
Q5: What happens if I don’t vent my kitchen island sink?
A: Without a proper vent, the sink will drain slowly, gurgle loudly, and the P-trap can be siphoned, breaking the water seal and allowing dangerous sewer gases and odors into your home. This is a serious health and safety hazard.