
Can you remove a Moen kitchen faucet with a sprayer yourself? Yes, you absolutely can! With a few basic tools and these easy steps, you’ll be able to tackle this DIY project and even be ready to replace your kitchen faucet.
Replacing your kitchen faucet can seem daunting, especially if you’ve never done it before. However, removing an old Moen kitchen faucet with a sprayer is a manageable task for most homeowners. This guide will walk you through the entire process, from preparing your workspace to safely detaching your old fixture.
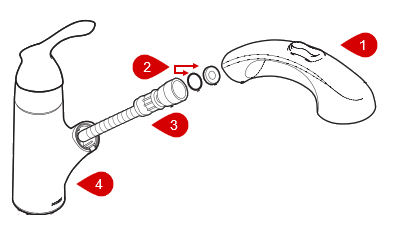
Image Source: solutions.moen.com
Gathering Your Tools and Supplies
Before you begin the actual Moen faucet removal, it’s crucial to have all the necessary tools and supplies ready. This will save you time and frustration later. Think of it as laying out your ingredients before cooking a meal!
Here’s a list of what you’ll likely need:
- Adjustable wrench: This is your most important tool for loosening and tightening various nuts and fittings.
- Basin wrench: This specialized wrench is designed to reach those awkward nuts tucked away under the sink. It’s a lifesaver!
- Bucket or towels: To catch any residual water that might drip when you disconnect the supply lines.
- Safety glasses: Protect your eyes from debris or water splashes.
- Gloves: Keep your hands clean and protected.
- Flashlight or headlamp: It’s often dark and cramped under the sink, so good lighting is essential.
- Pliers (optional): May be helpful for gripping or holding certain parts.
- Penetrating oil (optional): For stubborn nuts that are difficult to loosen.
- Rags or paper towels: For cleaning up spills.
- New faucet mounting hardware (if replacing): Often comes with the new faucet, but it’s good to be prepared.
Step 1: Shut Off the Water Supply
This is the most critical first step. You must shut off the water supply to your kitchen faucet before you begin any work. Failure to do so will result in a flooded kitchen!
Locating the Shut-Off Valves
Most modern kitchens have dedicated shut-off valves for the hot and cold water lines that lead directly to the faucet. These are usually found directly beneath the sink.
- Identify the Pipes: Look for two flexible hoses (typically braided stainless steel or plastic) running from the underside of the faucet down to the wall or floor. These are your hot and cold water supply lines.
- Find the Valves: Attached to each of these supply lines, close to where they connect to the house’s plumbing, you’ll find the shut-off valves. They usually have a small handle or knob.
- Turn Off the Water: Turn the handles of both the hot and cold water shut-off valves clockwise until they are fully closed.
Testing the Shut-Off
After you’ve turned off the valves, it’s a good practice to test that the water is indeed off.
- Turn on the Faucet: Go to your kitchen faucet and turn both the hot and cold handles on.
- Check for Flow: No water, or only a weak dribble that quickly stops, should come out. This confirms that your shut-off was successful.
- Leave Faucet On: It’s a good idea to leave the faucet handles in the “on” position. This helps release any remaining pressure in the lines and makes it easier to disconnect the supply hoses.
Step 2: Access Under the Sink
Now, it’s time to get comfortable (or as comfortable as you can be!) with the space under your sink. This is where most of the work will happen.
Clearing the Area
- Remove Contents: Take everything out of the cabinet beneath your sink. This includes cleaning supplies, trash cans, or anything else stored there. You need plenty of room to work.
- Place Bucket and Towels: Position your bucket directly under the area where the water supply lines connect to the faucet. Lay down towels to catch any drips.
Getting into Position
- Light It Up: Use your flashlight or headlamp to get a clear view of the faucet’s mounting hardware and supply lines.
- Get Down Low: You’ll likely need to lie on your back or kneel in the cabinet to get a good angle. A creeper or a thick mat can make this more comfortable.
Step 3: Disconnect the Sprayer Hose
Moen faucets with sprayers have a separate hose for the spray. This needs to be disconnected before you can fully remove the faucet.
Locating the Sprayer Connection
- Trace the Hose: Find the flexible hose that connects to the underside of your faucet body. This hose usually leads to the sprayer head.
- Identify the Connection Point: The sprayer hose typically connects to a diverter or directly to the faucet’s main body with a threaded fitting.
Detaching the Sprayer Hose
- Use Your Wrench: You’ll likely need your adjustable wrench to loosen this connection.
- Turn Counter-Clockwise: Turn the fitting counter-clockwise to loosen it. Be prepared for a small amount of water to drip out, even with the main water shut off. This is residual water in the sprayer line.
- If It’s Stuck: If the connection is tight, you might need to apply a little penetrating oil and let it sit for a few minutes. Another trick is to use pliers to hold the faucet body steady while you turn the nut with the wrench, but be careful not to damage the faucet.
Important Note: Some Moen sprayers have a quick-connect system. If yours does, there will be a plastic clip that you need to depress to release the hose. Refer to your faucet’s specific manual if you’re unsure.
Step 4: Disconnect the Water Supply Lines
With the sprayer hose detached, you can now disconnect the main water supply lines.
Loosening the Supply Line Nuts
- Identify the Nuts: You’ll see a nut on the end of each flexible supply hose where it connects to the shut-off valve.
- Use Your Wrench: Use your adjustable wrench to loosen these nuts. Turn them counter-clockwise.
- Catch the Drips: Have your bucket and towels ready, as more water will likely drain from these lines.
Disconnecting from the Faucet (if applicable)
In some installations, the supply lines might not connect directly to the shut-off valves but rather to a pipe or fitting that then connects to the valves. In this case, you would disconnect them at the faucet end first. However, typically, you disconnect them at the valve.
Step 5: Unscrew Mounting Nuts
This is often the trickiest part because these nuts are in a very tight space. This is where your basin wrench truly shines.
Locating the Mounting Hardware
- Look Upwards: Peer under the sink at the base of the faucet. You’ll see the threaded shanks of the faucet that pass through the sink or countertop.
- Identify the Nuts: Clamped onto these threaded shanks will be mounting nuts or a mounting bracket with nuts. Moen often uses large plastic or metal nuts.
Removing the Nuts
- Use the Basin Wrench: The basin wrench is designed to grip these nuts from below. Its long handle and pivoting head allow you to reach where your hand or a regular wrench cannot.
- Turn Counter-Clockwise: Slowly and carefully turn the mounting nuts counter-clockwise. It might require some force.
- Support the Faucet: As you loosen the nuts, it can be helpful for someone to hold the faucet steady from above, if possible. This prevents the faucet from spinning while you work, making it easier to loosen the nuts.
- Stubborn Nuts: If the nuts are corroded or very tight, a little penetrating oil can help. You might also need to carefully use pliers to grip the faucet shank from above while you turn the nut below.
Table: Common Mounting Nut Types for Moen Faucets
| Nut Type | Description | Removal Tool | Notes |
|---|---|---|---|
| Large Plastic Nut | Common on many Moen single-hole or widespread faucets. | Basin Wrench or Large Adjustable Wrench | Can sometimes be hand-tightened, but often needs tools. |
| Metal Lock Nut | Found on older models or specific faucet types. | Basin Wrench | May require more torque. |
| Mounting Bracket | A metal bracket secured with nuts to the underside of the sink or countertop. | Basin Wrench | Ensure you loosen all nuts holding the bracket. |
Step 6: Remove Faucet Handles (If Necessary)
On some faucet designs, especially older ones or those with separate hot and cold handles, you might need to remove the handles themselves to gain better access to the mounting hardware or to separate components.
Identifying Handle Fasteners
- Look for Set Screws: Many faucet handles are secured with a small set screw, often located on the back or underside of the handle.
- Look for Decorative Caps: Some handles have a decorative cap that pops off to reveal a screw underneath.
Removing the Handles
- Use an Allen Wrench: If there’s a set screw, you’ll likely need a small Allen wrench (hex key) to loosen it. Turn the screw counter-clockwise.
- Pry Off Caps: If there’s a decorative cap, use a thin, flat-head screwdriver or a putty knife to gently pry it off. Be careful not to scratch the finish. Once the cap is off, you’ll see a screw that you can remove with a screwdriver.
- Lift Off Handles: Once the set screw or main screw is removed, the handle should lift straight off the faucet stem.
Step 7: Detach Sprayer Head and Hose from Faucet Body
While you’ve already disconnected the sprayer hose from its connection point under the sink, you might need to detach the hose from the sprayer head itself or remove the sprayer base from the faucet body depending on your faucet’s design.
Detaching Sprayer Head from Hose
- Unscrew the Head: Most sprayer heads unscrew from their hoses. Hold the hose firmly and twist the sprayer head counter-clockwise.
- Check for O-rings: Be aware that there might be an O-ring or washer inside the connection that could fall out.
Detaching Sprayer Base (if applicable)
- Separate the Unit: On some models, the sprayer head and hose assembly are a single unit that connects to the main faucet body. If you’ve already disconnected the hose from below, this unit might already be free.
- Look for Additional Fasteners: In rare cases, the sprayer base might have an additional nut or clip holding it to the faucet body.
Step 8: Lift Out the Faucet
With all the connections severed and mounting nuts removed, your old Moen kitchen faucet should now be free.
Gently Pull Upwards
- Wiggle and Lift: Gently wiggle the faucet from above to loosen it from the sink or countertop.
- Pull it Free: Once it feels loose, lift the entire faucet assembly straight up and out of the mounting holes.
Clean the Mounting Surface
- Wipe Away Debris: Use a rag to clean any old putty, sealant, or grime from the sink or countertop surface where the faucet was mounted. This ensures a good seal for your new faucet.
Congratulations! You’ve Removed Your Moen Kitchen Faucet
You’ve successfully completed the Moen faucet removal process! This is a significant step towards upgrading your kitchen. Now you’re ready to install your new kitchen faucet.
What’s Next?
- Clean the Area: Take this opportunity to thoroughly clean the area around the faucet mounting holes and under the sink.
- Prepare for New Faucet: Gather the installation instructions and parts for your new faucet.
- Installation: Follow the manufacturer’s instructions carefully for installing your new faucet. This usually involves reversing the removal steps.
Frequently Asked Questions About Moen Faucet Removal
Q1: How long does it usually take to remove a Moen kitchen faucet with a sprayer?
A1: For someone doing it for the first time, it can take anywhere from 30 minutes to 2 hours, depending on the complexity of the faucet design, how easily parts loosen, and how much space you have to work.
Q2: What if the mounting nuts are corroded and won’t budge?
A2: If mounting nuts are severely corroded, you might need to use a penetrating oil like WD-40 and let it soak for a while. If that doesn’t work, you may need to carefully cut the nuts off using a small hacksaw blade or a reciprocating saw with a metal-cutting blade. Be extremely careful not to damage the sink or countertop.
Q3: Do I need to replace the supply lines when I replace my faucet?
A3: It’s highly recommended. Supply lines can degrade over time, and it’s best practice to install new ones with a new faucet to prevent leaks and ensure reliable performance.
Q4: My Moen faucet has a pull-out or pull-down sprayer. Is the removal process different?
A4: The general process is the same. You’ll still need to shut off the water, disconnect supply lines, and remove mounting nuts. The main difference is how the sprayer hose connects. For pull-out/pull-down sprayers, the hose typically connects to a diverter valve or directly to the faucet body, and you’ll need to disconnect it there.
Q5: What is a diverter for a kitchen faucet sprayer?
A5: A diverter is a component that directs water flow either to the main faucet spout or to the sprayer hose when you activate the sprayer. It’s usually located underneath the sink, connected to the hot and cold water supply lines and the faucet body.
Q6: Can I remove a Moen faucet if the shut-off valves under the sink are leaking or won’t turn off?
A6: If your shut-off valves are faulty, the safest approach is to shut off the main water supply to your entire house before you start. This is usually located in your basement, crawl space, or utility closet. Once the main water is off, you can proceed with disconnecting the supply lines.
Q7: My Moen faucet has a single hole. How does that affect removal?
A7: Single-hole faucets typically have a single threaded shank and a large mounting nut or bracket underneath. The process is generally simpler than with widespread faucets as there are fewer mounting points.
By following these detailed steps, you can confidently remove your Moen kitchen faucet with a sprayer and prepare your sink for a new, functional, and stylish fixture.