
Wondering how to measure for a kitchen faucet? You’ll need to measure your sink’s hole configuration and the available space around it. This ensures your new faucet fits and functions perfectly. This guide will walk you through everything you need to know.
Replacing your kitchen faucet can breathe new life into your cooking space. It’s a project many homeowners tackle, and with good reason. A new faucet can improve functionality, aesthetics, and even water efficiency. But before you even think about shiny new models, the crucial first step is getting the measurements right. Mess this up, and your dream faucet might become an expensive paperweight.
This in-depth guide will equip you with the knowledge to measure for a kitchen faucet like a pro. We’ll cover everything from the number of holes in your sink to the practicalities of faucet height and reach.
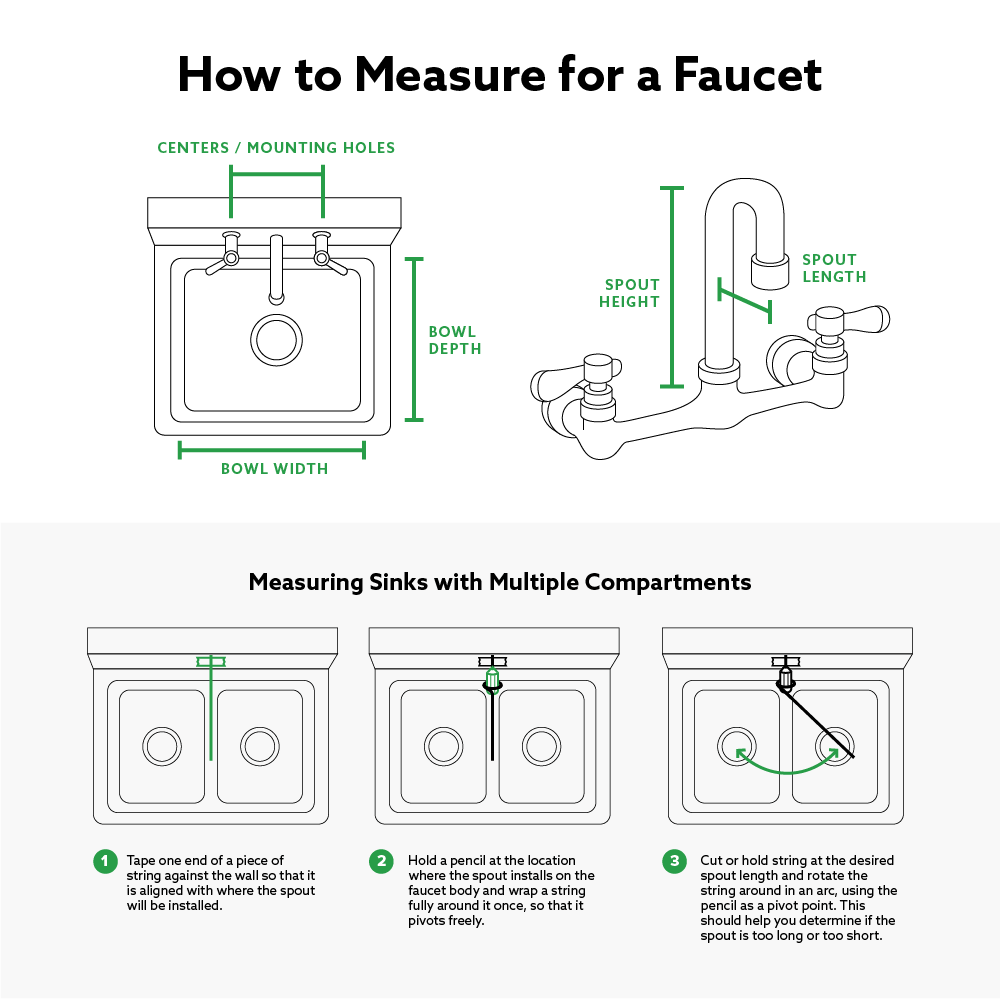
Image Source: lirp.cdn-website.com
Deciphering Your Sink’s Hole Configuration
The most critical measurement for choosing a new kitchen faucet is the number of holes drilled into your sink or countertop. This is the foundation upon which all other decisions rest.
How Many Holes Does My Sink Have?
To find this, look at your current faucet. Count the number of handles and any separate sprayers or soap dispensers. Each of these components typically requires a separate hole.
- Single-hole faucets: These have one handle and no separate sprayer. They are common in modern kitchens.
- Two-hole faucets: Less common for kitchen sinks, but might include a faucet and a separate sprayer or handle.
- Three-hole faucets: These usually feature a faucet with two handles (hot and cold).
- Four-hole faucets: These often include a faucet with two handles, a separate sprayer, and a soap dispenser or additional accessory.
- Five-hole faucets: These are less frequent but might accommodate a faucet with two handles, a sprayer, a soap dispenser, and another accessory like a hot/cold water dispenser.
Important Note: Sometimes, a single-hole faucet can be mounted in a three-hole configuration using a decorative deck plate or escutcheon. Conversely, if your sink has multiple holes and you want to install a single-hole faucet, you might need a deck plate to cover the unused holes.
What is Faucet Hole Spacing?
Once you know the number of holes, you need to measure the distance between them. This is especially important if you have a sink with multiple holes.
- Standard Spacing: Most sinks are designed with standard hole spacing. The most common is 8 inches on center for three-hole configurations. If you have a single-hole sink, there’s no spacing to measure between holes, but the hole itself has a standard diameter.
- Measuring for Standard Spacing: For an 8-inch spread, the center of the first hole to the center of the third hole (skipping the middle one) will be 8 inches.
- Non-Standard Spacing: Some sinks, particularly older models or custom installations, might have different spacing. Measure from the center of one hole to the center of the next.
Tip: If you’re unsure about your hole spacing, it’s best to measure yourself. Place a ruler across the sink or countertop, aligning the zero mark with the center of the first hole and noting the measurement to the center of the subsequent hole(s).
Sink Measurements: Beyond the Holes
While hole configuration is paramount, other sink measurements are crucial for ensuring your new faucet not only fits but also looks and functions well.
Sink Measurements: Depth, Width, and Thickness
- Sink Depth: This refers to how deep your sink basin is. A very deep sink might limit the faucet height you can comfortably use, potentially causing splashing or making it difficult to reach the bottom of the sink. A shallow sink might require a faucet with a lower profile to avoid splashing water out.
- Sink Width: The overall width of your sink bowl affects how far the faucet reach can extend. A very wide sink might benefit from a faucet with a longer spout.
- Countertop Thickness: Most faucets come with mounting hardware designed for standard countertop thicknesses (typically around 1.5 to 2 inches). If you have a very thick countertop (e.g., granite slab over a certain thickness, or a custom-built island), you may need to purchase longer mounting bolts or a specific mounting kit. Always check the faucet specifications.
Sink Rim and Edge Considerations
- Sink Rim Width: Some faucets have large bases or require ample space around the mounting holes. Ensure there’s enough clearance between the edge of the sink rim and the faucet base.
- Backsplash Clearance: If your sink is installed directly against a backsplash (the wall behind the sink), you need to consider the faucet clearance and how the faucet will tilt or operate. Some faucets have high arcs that might hit the backsplash.
Faucet Dimensions: What to Measure and Why
Beyond your sink, the faucet itself has several key dimensions that dictate its fit and functionality in your kitchen.
Faucet Height: The Arc of Your Choice
- What is Faucet Height? This is the measurement from the base of the faucet (where it meets the sink or countertop) to the very top of the arc or spout.
- Why it Matters:
- Clearance: As mentioned, a high-arc faucet needs to clear any cabinets or shelves above your sink. Measure the distance from your sink to the underside of any obstructions. You don’t want your new faucet to bump into things when you lift it or operate it.
- Usability: Taller faucets make it easier to fill large pots and pans. They also provide more comfortable reach for washing larger items.
- Aesthetics: The visual proportion of the faucet height to your sink and surrounding cabinetry is important.
Faucet Reach: Spanning the Sink
- What is Faucet Reach? This is the horizontal distance from the center of the faucet base to the tip of the spout.
- Why it Matters:
- Sink Coverage: You want the spout to extend far enough to comfortably reach the center of your sink basin. This prevents water from splashing outside the sink when you’re washing dishes or filling pots.
- Ergonomics: A faucet with adequate reach makes it easier to maneuver pots and pans under the water stream.
Faucet Clearance: Room to Maneuver
- What is Faucet Clearance? This refers to the space needed around the faucet for its operation and for you to use it comfortably. This includes:
- Height Clearance: The vertical space from the sink to any overhead obstructions (cabinets, shelves).
- Swing Clearance: If your faucet has a swivel spout, ensure it can rotate freely without hitting the backsplash, walls, or any nearby appliances.
- Handle Clearance: For faucets with separate handles, make sure there’s enough space to turn them on and off without obstruction.
Faucet Functionality: Beyond Dimensions
While precise measurements are essential, you also need to consider the faucet’s functional features.
Faucet Flow Rate: Water Wisdom
- What is Faucet Flow Rate? This is measured in gallons per minute (GPM) and indicates how much water the faucet dispenses.
- Why it Matters:
- Water Conservation: Federal regulations limit kitchen faucet flow rates to 2.2 GPM. Many newer, water-efficient models are available with lower flow rates (e.g., 1.8 GPM).
- Performance: While lower flow rates save water, some users worry about reduced performance. Look for faucets with good aerators that create a strong, forceful stream even at lower GPMs.
Faucet Spray Pattern: The Power of the Spray
- What is Faucet Spray Pattern? This describes the different water spray options a faucet offers, such as stream, spray, pause, or boost.
- Why it Matters:
- Versatility: Different spray patterns are useful for various tasks. A wide spray is great for rinsing vegetables, while a strong stream is good for cleaning tough messes.
- Ease of Use: Most modern faucets allow you to switch between spray patterns with the touch of a button.
Faucet Handle Type: Control and Convenience
- What is Faucet Handle Type? This refers to the design and operation of the faucet handles. Common types include:
- Single Handle: Controls both temperature and flow with one lever. Very common and easy to use, especially with dirty hands.
- Double Handle: Separate handles for hot and cold water. Offers more precise temperature control but requires two hands.
- Touch-On/Touchless: Activated by touch or motion. Offers ultimate convenience and hygiene but often requires a power source and can be more expensive.
- Why it Matters:
- Ergonomics: Consider who will be using the faucet. Single-handle faucets are generally easier for children and those with limited mobility.
- Aesthetics: Handle style significantly impacts the overall look of your faucet.
Faucet Mounting: Securing Your New Fixture
The method by which your faucet attaches to the sink or countertop is also a key consideration.
Faucet Mounting: Undermount vs. Top Mount
- What is Faucet Mounting? This refers to how the faucet is secured to the sink or countertop.
- Common Types:
- Deck Mounted: The faucet is mounted directly through the holes in the sink or countertop. This is the most common method.
- Wall Mounted: The faucet is installed directly onto the wall behind the sink. This requires specific plumbing rough-ins and is often chosen for aesthetic reasons or when dealing with certain types of sinks. If you have a wall-mounted faucet, ensure your wall has the necessary mounting support and that the rough-in valves are at the correct height and distance.
Mounting Kits and Gaskets
- What to Look For: Most faucets come with a mounting kit. This usually includes screws, washers, and a gasket to seal the faucet base against the sink or countertop.
- Ensuring a Good Seal: The gasket is crucial for preventing water from seeping under the faucet and damaging your countertop or cabinetry. Ensure it’s properly seated and that the mounting hardware is tightened securely, but not so much that you crack the sink or countertop.
Putting it All Together: A Step-by-Step Measurement Guide
Let’s consolidate this into a practical checklist for measuring.
Step 1: Identify Your Sink’s Hole Configuration
- Action: Count the holes in your sink or countertop.
- Record: Number of holes (e.g., 1, 3, 4).
Step 2: Measure Faucet Hole Spacing (If Applicable)
- Action: If you have more than one hole, measure from the center of one hole to the center of the next.
- Record: The distance in inches (e.g., 8 inches is standard for three holes). If it’s a single hole, note its diameter.
Step 3: Assess Space Around the Sink
- Action:
- Measure the distance from the back of the sink to the wall or backsplash.
- Measure the width of the sink basin.
- Measure the thickness of your countertop.
- Record: These measurements will help determine suitable faucet height and reach.
Step 4: Measure for Faucet Height and Reach
- Action:
- Height: Measure the vertical clearance from the sink surface to any overhead cabinets or shelves.
- Reach: Imagine the center point of your sink. Measure the distance from where the faucet base will be mounted to the center of the sink basin.
- Record: Your available height clearance and approximate reach needed.
Step 5: Check for Obstructions
- Action:
- Ensure there’s enough space for the faucet handle(s) to operate freely.
- If it’s a swivel spout, check if it can turn 180 degrees without hitting anything.
- Record: Any potential clearance issues.
Step 6: Consider Faucet Style and Features
- Action: Think about your needs. Do you want a single handle? A pull-down sprayer? A specific finish?
- Record: Your desired features.
Common Measurement Mistakes to Avoid
Even with the best intentions, miscalculations can happen. Here are common pitfalls:
- Assuming Standard Spacing: Don’t assume your sink has standard 8-inch spacing. Always measure.
- Forgetting Overhead Clearance: A beautiful high-arc faucet is useless if it hits your cabinets. Measure vertically.
- Ignoring Sink Depth: A very deep or very shallow sink can affect the practical usability of certain faucet heights.
- Not Accounting for Deck Plates: If you’re downsizing from a 3-hole to a 1-hole faucet, remember you’ll likely need a deck plate to cover the extra holes.
- Over-Tightening Mounting Hardware: This can damage your sink or countertop. Tighten firmly but avoid excessive force.
- Forgetting Wall-Mounted Faucet Details: If you’re going for a wall-mounted faucet, ensure the wall has adequate support and that the plumbing rough-ins are correctly positioned.
Faucet Installation Considerations (Briefly)
While this guide focuses on measuring, a quick note on installation:
- DIY vs. Professional: Many homeowners opt for DIY kitchen faucet installation. If you’re comfortable with basic plumbing, it’s a manageable project.
- Tools Needed: Typically, you’ll need an adjustable wrench, basin wrench (essential for tight spaces), pliers, screwdrivers, plumber’s putty or silicone sealant, and rags.
- Shutting Off Water: Always shut off the hot and cold water supply lines before starting any work.
- Mounting: Follow the manufacturer’s instructions carefully for faucet mounting. Proper mounting ensures a stable and leak-free installation.
Frequently Asked Questions (FAQ)
Q1: My sink has 3 holes, but I want a single-handle faucet. What do I do?
A1: You’ll need a single-hole faucet with an optional deck plate (also called an escutcheon). The deck plate covers the two unused holes in your sink.
Q2: How do I measure faucet hole spacing if the holes are far apart?
A2: Measure from the center of the first hole to the center of the next hole. For a standard 8-inch spread on a 3-hole sink, the distance between the left and middle holes is usually 4 inches, and the distance between the middle and right holes is also 4 inches, making the center-to-center distance between the outer two holes 8 inches.
Q3: Can I install a faucet with a high arc if I have low cabinets?
A3: Yes, but you must measure your vertical clearance carefully. If the faucet height exceeds the available space, you’ll need to choose a faucet with a lower profile or a gooseneck design that arcs lower.
Q4: What if my faucet spout doesn’t reach the center of my sink?
A4: This means your faucet’s faucet reach is too short. When selecting a new faucet, measure your sink width and choose a spout with a longer reach to ensure it covers the entire sink basin.
Q5: How do I know if my countertop is too thick for a standard faucet mounting kit?
A5: Most standard faucet mounting kits are designed for countertops up to 2 inches thick. Check the faucet’s specifications. If your countertop is thicker, you may need to purchase a longer mounting kit or specialized hardware.
Q6: What’s the difference between faucet flow rate and water pressure?
A6: Faucet flow rate is the volume of water dispensed per minute (GPM). Water pressure is the force of the water coming from your pipes. A faucet can have a low flow rate but still feel powerful if your home has good water pressure and the faucet has a well-designed aerator.
By carefully measuring your sink and considering the available space, you can confidently select a kitchen faucet that fits perfectly and enhances your kitchen’s functionality and style. Happy renovating!