
Can you paint over painted kitchen cabinets? Yes, you absolutely can. Painting already painted kitchen cabinets is a smart way to update your space without buying new ones. What is the best way to paint already painted cabinets? It involves careful cleaning, proper sanding, using a good primer, and choosing the right paint. Who can paint kitchen cabinets? Anyone with patience and the correct tools can do it. What steps are involved? The process includes preparing the area, cleaning the cabinets, sanding them down, fixing any flaws, priming, painting, and then adding a topcoat if needed. This guide will walk you through each step. You will learn how to get a smooth, durable finish that lasts for years.
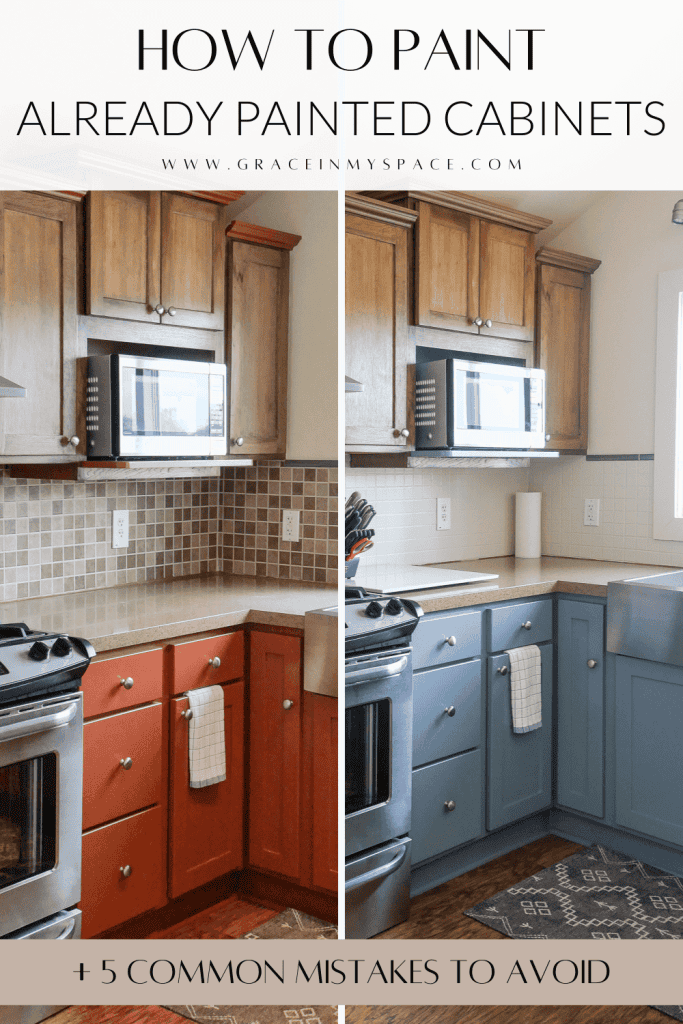
Image Source: graceinmyspace.com
Why Refresh Your Already Painted Cabinets?
Your kitchen is the heart of your home. Cabinets get a lot of use. Over time, paint can chip, fade, or just look old. Painting them again is a great idea. It can save you money. New cabinets cost a lot. Painting is much cheaper. It also lets you change your kitchen’s look. You can use new colors. This can make your whole home feel fresh. It is a big project but offers a big reward. You get a “new” kitchen look at a low cost.
Gathering Your Tools: Essential Cabinet Painting Supplies
Having the right tools makes a big difference. Good tools help you get a great result. They make the job easier too. Do not skip this step. Make sure you have all you need before you start.
Here is a list of cabinet painting supplies you will need:
- Screwdriver: For taking off cabinet doors and hardware.
- Painter’s tape: To protect areas you do not want to paint.
- Drop cloths or plastic sheeting: To cover floors and counters.
- Safety glasses and gloves: Protect your eyes and hands.
- Respirator mask: Essential for sanding and painting fumes.
- Bucket and sponges: For cleaning.
- Cabinet degreaser: A must-have for cleaning grease.
- Sandpaper: In different grits (e.g., 120, 180, 220).
- Sanding block or orbital sander: For easier sanding kitchen cabinets.
- Wood filler or spackle: For repairs.
- Putty knife: To apply filler.
- Tack cloths: To pick up dust.
- High-quality primer: Look for the best bonding primer.
- Paint: Durable cabinet paint, like water-based enamel for cabinets.
- Paintbrushes: Angled brush for details.
- Foam rollers or fine-finish rollers: For smooth surfaces.
- Paint trays: For holding paint.
- Paint sprayer (optional): For spray painting kitchen cabinets.
- Rags or paper towels: For spills and clean-up.
- Clean cloths: For final wiping.
The Vital First Step: Preparing Your Cabinets
Preparation is key to a lasting paint job. This part takes the most time. But it is worth every minute. Skipping steps here leads to poor results. Paint will not stick well. It might peel later.
Cleaning Is Key: Removing Grease and Grime
Kitchen cabinets get dirty fast. They collect grease and food splatters. This grime must go. Paint will not stick to a greasy surface. Use a strong cabinet degreaser. Mix it with water as directed. Wipe down all surfaces. Clean the fronts, sides, and edges. Do not forget the inside edges of doors. Rinse with clean water. Then wipe dry with a clean cloth. Let the cabinets air dry fully. This step is vital for preventing paint peeling on cabinets.
Prepping the Surface: Sanding Kitchen Cabinets Right
After cleaning, it is time to sand. Sanding helps the new paint stick. It smooths out old paint. You do not need to remove all old paint. You just need to rough up the surface. This creates “tooth” for the primer.
- Remove Hardware: Take off all knobs, pulls, and hinges. Label them. Put them in bags. This makes reassembly easy.
- Remove Doors and Drawers: Take all doors off their hinges. Pull out all drawers. This lets you paint everything flat. Painting flat helps achieve a smooth finish.
- First Sanding Pass: Start with 120-grit sandpaper. Use a sanding block. Or use an orbital sander for large, flat areas. Sand all surfaces. Move with the wood grain. Do not press too hard. You are just dulling the old finish. You are not trying to sand through it.
- Second Sanding Pass: Switch to 180 or 220-grit sandpaper. This finer grit smooths out scratches from the first sanding. Go over all areas again.
- Clean Dust: Sanding creates a lot of dust. Use a vacuum with a brush attachment. Get all dust off surfaces. Then wipe down with a damp cloth. Finish with a tack cloth. This removes all fine dust. Dust makes paint bumpy.
Repairing Blemishes: Filling and Patching
Check your cabinets closely. Look for dents, nicks, or holes. Now is the time to fix them. Use wood filler or spackle.
- Fill Holes: If you want new hardware, fill the old holes. Use a putty knife. Press the filler into the hole.
- Fix Dents and Nicks: Apply a thin layer of filler over any damage.
- Smooth: Use the putty knife to make it flat.
- Dry: Let the filler dry completely. Drying times vary. Check the product label.
- Sand Smooth: Once dry, sand the filled areas. Use 220-grit sandpaper. Make them flush with the cabinet surface.
- Clean Dust: Wipe away all dust again.
Priming for Success: Picking the Best Bonding Primer
Primer is your paint’s best friend. It helps the new paint stick. It blocks stains from showing through. It also gives a smooth, even base for the paint. Do not skip primer, especially when painting over old paint.
- Why Primer Matters: Old paint can have oils or stains. Primer seals these in. It also makes sure your new paint color looks true. It helps your paint bond to the cabinet. This is crucial for preventing paint peeling on cabinets.
- Choosing the Best Bonding Primer:
- Oil-based primers: These are very good at blocking stains. They stick well to shiny surfaces. They can be smelly. They need mineral spirits for cleanup.
- Shellac-based primers: These are great for very difficult stains. They dry fast. They stick very well. They are also smelly. They clean up with denatured alcohol.
- Water-based primers (acrylic/latex): Many modern water-based primers offer great bonding. They are low odor. They clean up with water. Look for “high-adhesion” or “bonding” on the label. They are often a good choice for already painted surfaces.
For most already painted cabinets, a good quality water-based bonding primer will work well. If your old paint is glossy, or you think stains might bleed through, an oil or shellac-based primer might be safer. Read the label carefully to pick the best bonding primer for your specific cabinet.
How to Apply Primer:
- Stir Well: Mix the primer thoroughly.
- Tape Off: Use painter’s tape to protect walls and hinges.
- Apply Thin Coats: Apply a thin, even coat. Use an angled brush for edges. Use a foam roller for flat areas. Do not apply too much. Thin coats are better than one thick one.
- Dry Time: Let the first coat dry completely. Check the primer can for drying times.
- Light Sand (Optional but Recommended): After the first coat dries, do a very light sanding. Use 220 or 320-grit sandpaper. This makes the surface super smooth. It helps the next coat stick even better. Wipe off all dust with a tack cloth.
- Second Coat: Apply a second thin coat of primer if needed. Especially if the old color is very dark. Or if you used a very light primer. Let it dry fully.
Painting Techniques: Achieving Smooth Finish
Now for the fun part: painting! The goal is an even, smooth finish. Avoid brush marks and drips.
Brushing and Rolling: Traditional Methods
This method is popular for DIYers. It gives good results with patience.
- Set Up: Lay doors flat on sawhorses or covered tables. This helps prevent drips.
- Stir Paint: Mix your durable cabinet paint very well.
- Edge First: Use a high-quality angled brush. Paint the recessed areas and edges first. Use light, even strokes.
- Roll Flat Areas: Immediately after brushing, use a foam or fine-finish roller. Roll over the flat surfaces. Roll in the direction of the wood grain. Overlap your passes slightly. This helps achieve a smooth finish.
- Avoid Overworking: Do not keep going over wet paint. This creates brush marks. Apply paint smoothly and move on.
- Thin Coats: Apply several thin coats instead of one thick one. Thin coats dry faster. They are less likely to drip. They also give a smoother, harder finish.
- Drying Between Coats: Allow each coat to dry completely. Check the paint can for dry times. It could be several hours.
- Light Sand Between Coats (Optional but Recommended): For a super smooth finish, lightly sand between paint coats. Use 220 or 320-grit sandpaper. This knocks down any small bumps. Wipe off all dust with a tack cloth.
- Multiple Coats: Most cabinets need two or three coats of paint. Sometimes even four, especially if going from dark to light.
Spray Painting Kitchen Cabinets: For a Factory Look
Spray painting gives the smoothest, most professional finish. It looks like a factory job. But it requires more setup and practice.
- Ventilation: This is vital. Spray painting creates a lot of fumes and overspray. Work in a well-ventilated area. Use a good respirator.
- Masking: Cover everything you do not want to paint. This means walls, floors, windows. Use painter’s plastic sheeting. The overspray goes everywhere.
- Hanging Doors: Hang cabinet doors. You can use screws in old hinge holes. Or use special drying racks. This lets you spray all sides at once.
- Thinner Paint: You might need to thin your paint. Check the paint sprayer instructions. Or the paint can.
- Practice: Practice on scrap wood first. Get a feel for the sprayer. Learn how far to hold it. Learn how fast to move it.
- Even Passes: Spray in even, overlapping passes. Keep the sprayer moving. Do not stop in one spot. This causes drips.
- Thin Coats: Apply very thin coats. Build up coverage slowly. This helps achieve smooth finish and prevents drips.
- Dry Time: Let each coat dry completely.
- Sanding: Lightly sand between coats with fine grit (320+). This is especially important for spray painting. It creates a super smooth surface.
| Painting Method | Pros | Cons |
|---|---|---|
| Brush/Roll | Easy to learn, less setup, good for small jobs | Can leave brush marks/roller texture, slower |
| Spray Paint | Ultra smooth, factory-like finish, fast application | More setup, practice needed, requires good ventilation, more overspray |
Choosing the Right Paint: Durable Cabinet Paint Options
The type of paint you choose matters a lot. You need a paint that can handle daily use. It should be easy to clean. It needs to resist scuffs and chips. Look for durable cabinet paint.
The Rise of Water-Based Enamel for Cabinets
For many years, oil-based paints were the go-to for cabinets. They were very durable. But they had strong smells. They took a long time to dry. Cleanup was messy.
Today, water-based enamel for cabinets is very popular. These paints have many benefits:
- Low VOCs: Less smell. Better for your health.
- Easy Cleanup: Just use soap and water.
- Faster Drying: You can apply coats more quickly.
- Excellent Durability: Modern water-based enamels are very tough. They resist chips and scuffs well.
- Smooth Finish: They often self-level. This helps achieve a smooth finish.
When choosing water-based enamel for cabinets, look for terms like “acrylic enamel,” “cabinet paint,” or “urethane modified acrylic.” These paints are designed for high-traffic areas. They offer great hardness and washability.
Sheen Level:
* Satin or Semi-Gloss: These are the best choices for cabinets. They are easy to clean. They offer good durability. They have a slight shine that looks nice.
* Matte or Flat: These are harder to clean. They show marks easily. Avoid them for cabinets.
* High-Gloss: Very durable and easy to clean. But they show every flaw. Unless you are a pro, avoid high-gloss.
Top Tips for Preventing Paint Peeling on Cabinets
Paint peeling is a common problem. It happens when paint does not stick well. Here are ways to prevent it:
- Clean Thoroughly: Use a strong cabinet degreaser. Get all grease and dirt off. This is the first defense against peeling.
- Sand Properly: Always sand to give the surface “tooth.” This helps the primer and paint stick.
- Use a Bonding Primer: A high-quality best bonding primer creates a strong bond. It makes the topcoat stick better.
- Thin Coats: Apply many thin coats instead of one thick one. Thick coats do not cure well. They are more likely to peel.
- Allow Full Dry Time: Let each coat dry fully. Do not rush the process. Rushing leads to weak adhesion.
- Choose Durable Paint: Pick a durable cabinet paint. Water-based enamel for cabinets is a good choice.
- Proper Curing: Paint needs time to harden fully. This is called curing. Even if paint feels dry, it might not be cured. Be gentle for a few weeks after painting.
Drying and Curing: Patience Pays Off
Your cabinets might feel dry to the touch in a few hours. But they are not fully hardened. This hardening process is called curing. It can take several weeks.
- Dry Time: The time between coats. This is when the paint is dry enough to touch. Or to add another coat.
- Cure Time: The time it takes for the paint to reach full hardness. During this time, the paint is still fragile.
Be very careful with your newly painted cabinets during the curing phase. Avoid bumping them. Do not wipe them hard. Wait a few weeks before putting heavy items inside. This patience ensures your durable cabinet paint lasts for a long time. It helps in preventing paint peeling on cabinets.
Final Touches: Reassembly and Hardware
Once your cabinets are fully cured, it is time to put them back together.
- Reattach Hardware: Put all the hinges, knobs, and pulls back on. Use your labeled bags to make it easy.
- Hang Doors: Rehang the cabinet doors. Put the drawers back in.
- Adjust: Make sure doors hang straight. Adjust hinges if needed.
- Clean Up: Clean up all your tools and supplies.
Stand back and enjoy your “new” kitchen!
Updating Old Kitchen Cabinets: Beyond Just Paint
Painting is a huge step in updating old kitchen cabinets. But you can do more. These extra steps can make an even bigger impact:
- New Hardware: Change knobs and pulls. This is a small change that makes a big difference. It is like jewelry for your cabinets.
- Add Crown Molding: If your cabinets do not reach the ceiling, add crown molding. This gives a custom, built-in look.
- Install Under-Cabinet Lighting: LED strip lights under cabinets make tasks easier. They also add a nice glow.
- Update Backsplash: A new tile backsplash can transform the whole kitchen. It adds color and texture.
- Change Countertops: This is a bigger project. But new countertops pair well with fresh cabinets.
- Add Glass Fronts: Swap out some solid door panels for glass. This shows off pretty dishes. It also makes the kitchen feel more open.
- Open Shelving: Remove a few upper cabinet doors. Sand and paint the inside. Add open shelves. This creates a modern look.
These ideas, combined with your newly painted cabinets, will truly update old kitchen cabinets. You will have a kitchen that looks brand new.
Frequently Asked Questions (FAQ)
Q1: How long does painting kitchen cabinets usually take?
A1: It depends on your kitchen size and speed. Expect 3-7 days for the active work (prep, prime, paint). Add 2-4 weeks for full paint curing.
Q2: Do I really need to sand if my old paint is in good shape?
A2: Yes, always sand. Even if the old paint looks good, it needs light sanding. This creates a rough surface for new paint to stick to. Skipping sanding leads to poor adhesion. It can cause paint peeling on cabinets.
Q3: Can I use regular wall paint on my cabinets?
A3: No, it is not recommended. Wall paint is not made to be durable. It will chip and scratch easily. Always use a durable cabinet paint. Water-based enamel for cabinets is a good choice.
Q4: How do I get rid of the strong paint smell?
A4: Use low VOC paints. Open windows and doors. Use fans to move air. The smell will go away faster. Modern water-based paints smell much less than older types.
Q5: What if I have really old, greasy cabinets?
A5: Spend extra time on cleaning. Use a strong cabinet degreaser. Clean twice if needed. This step is critical for success.
Q6: Should I remove cabinet doors to paint them?
A6: Yes, it is best to remove them. Painting doors flat helps achieve a smooth finish. It also makes it easier to paint all edges.
Q7: How many coats of paint do I need?
A7: Most projects need 2-3 coats of paint. Sometimes 4 if you are covering a very dark color with a light one. Always apply thin coats.