
Can you paint laminate kitchen cabinets? Yes, you absolutely can! It is a great way to give your kitchen a fresh, new look without spending a lot of money. The best way to paint laminate cabinets involves careful prep work, using the right primer and paint, and a bit of patience. This guide will walk you through each step. We will help you avoid common paint adhesion issues on laminate and achieve a durable finish.
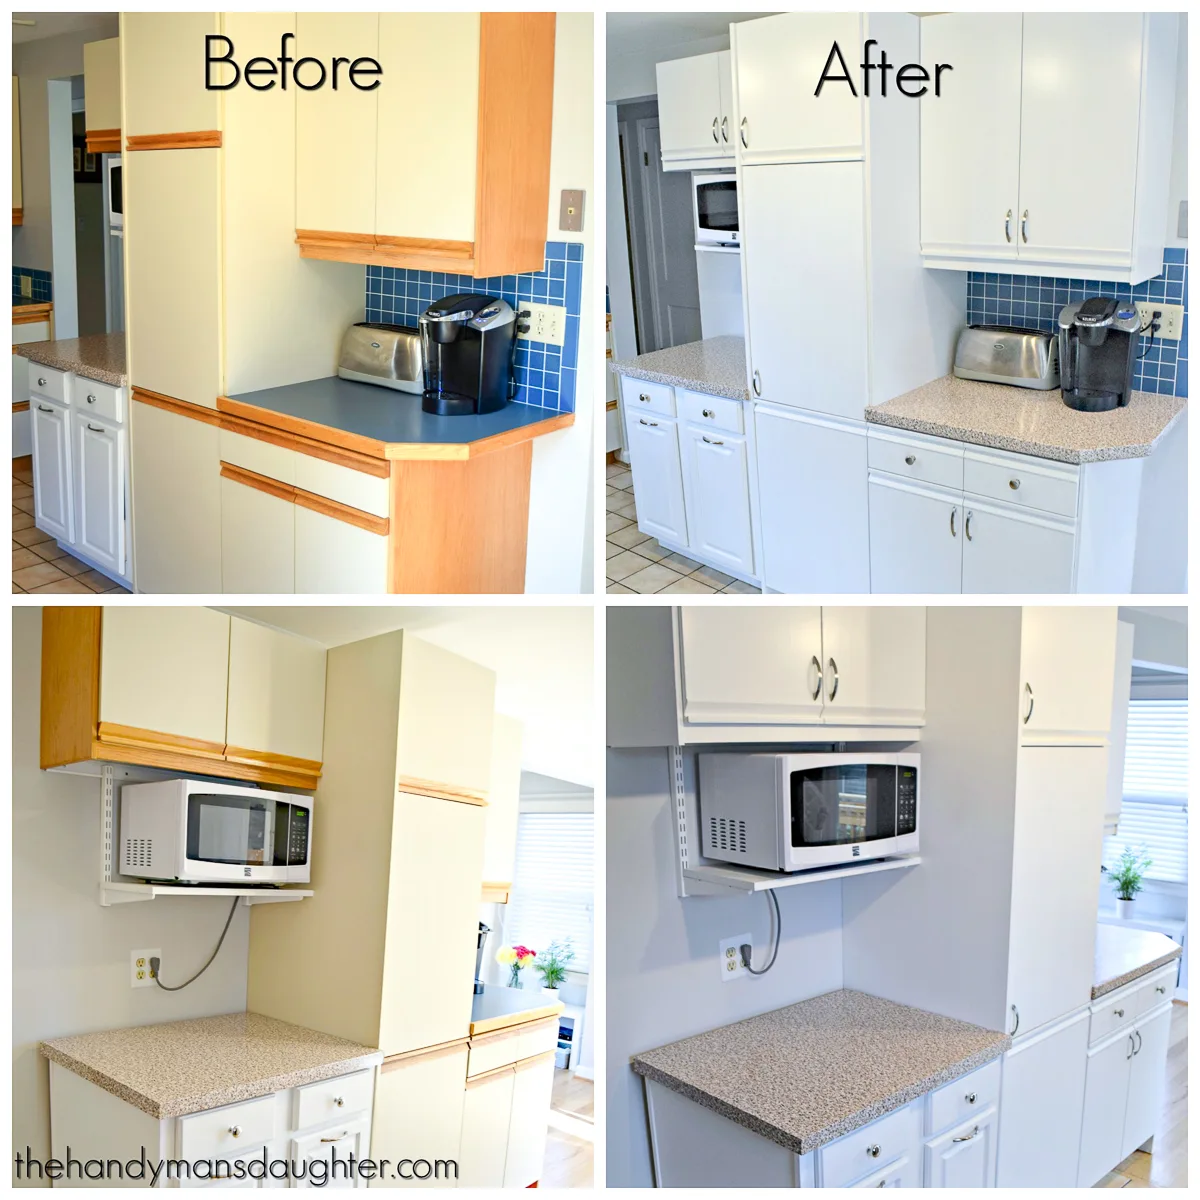
Image Source: www.thehandymansdaughter.com
Grasping Your Cabinets: Are They Paint-Ready?
Before you start, look at your cabinets. Are they true laminate? Laminate is a thin layer of plastic or paper. It covers a core of particle board or MDF. Some cabinets might be thermofoil. Thermofoil is PVC film heat-pressed onto MDF. Both can be painted, but thermofoil can peel more easily with heat. Check for any peeling laminate or big damage. Small flaws are okay; you can fix them. Large damage might mean you need new doors. Most laminate cabinets are good for painting.
Gathering Your Tools and Supplies
Having the right tools makes painting easier. It also helps you get a good finish. Here is what you will need for your DIY laminate cabinet painting process:
- Screwdrivers: For removing hinges and pulls.
- Drill (optional): Makes removing screws faster.
- Bucket and Sponge: For cleaning.
- Degreaser: A strong kitchen cabinet degreaser for laminate.
- Sandpaper: 180-220 grit for scuffing. Finer 320-grit for between coats (optional).
- Tack Cloths: To pick up sanding dust.
- Painter’s Tape: Low-tack for protecting surfaces.
- Drop Cloths or Plastic Sheeting: To cover floors and counters.
- Filler (Wood Putty or Bondo): For fixing small dents or chips.
- Putty Knife: To apply filler.
- Good Quality Brushes: Angle brushes for corners and details.
- High-Density Foam Rollers: For smooth, even paint coats on flat surfaces.
- Paint Trays: For rollers.
- Laminate Cabinet Primer: A bonding primer is a must.
- Best Paint for Laminate Cabinets: High-quality cabinet or furniture paint.
- Protective Topcoat (Optional but Recommended): For extra durability.
- Gloves and Safety Glasses: Protect your hands and eyes.
- Face Mask/Respirator: For sanding and painting in a well-aired space.
- Labels/Markers and Small Bags: To keep hardware organized.
Table: Essential Supplies for Painting Laminate Cabinets
| Category | Item | Purpose |
|---|---|---|
| Cleaning | Kitchen Cabinet Degreaser | Removes grease and grime for better adhesion |
| Sponge, Buckets, Rags | For cleaning and wiping | |
| Preparation | Screwdrivers, Drill | Removing hardware and doors |
| Sandpaper (180-220 grit) | Scuffing surface for primer grip | |
| Tack Cloths | Removing dust after sanding | |
| Painter’s Tape, Drop Cloths | Protecting surrounding areas | |
| Filler & Putty Knife | Fixing small imperfections | |
| Painting | Laminate Cabinet Primer | Essential for paint to stick |
| Best Paint for Laminate Cabinets | Durable, high-quality finish paint | |
| High-Density Foam Rollers | Smooth finish on flat parts | |
| Good Quality Brushes | For edges and detailed areas | |
| Paint Trays | Holding paint for rollers | |
| Protection | Protective Topcoat | Adds durability and prevents chipping |
| Gloves, Safety Glasses, Mask | Personal safety during work | |
| Organization | Labels, Bags | Keeping hardware organized |
Prepping Your Kitchen for Painting
Good prep work is key to a lasting finish. Do not skip this part. It takes time, but it saves trouble later.
Emptying Cabinets
First, take everything out of your cabinets. This includes dishes, food, and any items inside drawers. Store them safely away from dust and paint fumes.
Protecting Counters and Floors
Cover your countertops with plastic sheeting. Use painter’s tape to hold it down. Lay drop cloths or old sheets on the floor. This protects against drips and spills. If you have appliances you cannot move, cover them too.
Taking Apart Your Cabinets
This step helps you paint every part of the cabinet smoothly.
Removing Doors, Drawers, and Hardware
- Remove Doors: Unscrew the hinges from the cabinet frame. Keep the screws with their hinges.
- Remove Drawer Fronts: If your drawers have separate fronts, remove them. Some drawers are one piece.
- Remove Hardware: Take off all handles, pulls, and hinges from the doors and drawer fronts.
- Label Everything: This is very important! Use painter’s tape and a marker. Label each door and drawer front with its location. For example, “Upper Left Cabinet – Door 1.” Label the hardware bag for that door, too. This makes putting things back much easier.
The All-Important Cleaning Phase
This is where you make sure your paint sticks. Laminate surfaces can be slick. They also collect grease from cooking. A clean surface helps paint bond well. This prevents paint adhesion issues on laminate.
Why Cleaning is Vital
Kitchen cabinets get dirty. They gather grease, food splashes, and dirt over time. Paint will not stick to these dirty spots. It will peel or chip off. So, a deep clean is a must.
Using Kitchen Cabinet Degreaser for Laminate
- Mix Your Cleaner: Get a strong kitchen cabinet degreaser for laminate. Follow the directions on the bottle. Often, you mix it with warm water.
- Scrub Thoroughly: Dip a sponge or cloth into the degreaser mix. Scrub every part of the cabinet frames, doors, and drawer fronts. Pay extra attention to areas near the stove or sink. These areas get the most grease.
- Rinse Well: After scrubbing, wipe down all surfaces with a clean, damp cloth. Use plain water. You must remove all degreaser residue. If you leave any cleaner behind, the paint will not stick right.
- Dry Completely: Let all surfaces dry fully. You can use a clean towel to speed this up. Make sure there is no moisture left. Even small wet spots can cause problems.
Sanding for Success: Prepping the Surface
Sanding laminate cabinets before painting is not about removing the laminate. It is about creating a rough surface. This rough surface gives the primer something to grip onto. This is called “scuff sanding.”
What Grit Sandpaper to Use
Use fine-grit sandpaper, like 180-220 grit. This is coarse enough to scratch the surface but fine enough not to cause deep marks.
Light Scuffing, Not Removing Laminate
- Gentle Sanding: Lightly sand all surfaces you plan to paint. This includes cabinet frames, door fronts, and drawer fronts. Use a sanding block for flat areas. This helps keep pressure even.
- Focus on Corners and Edges: Make sure you sand into corners and along edges. These spots are often missed.
- Do Not Overdo It: You just want to dull the shine. You do not need to remove the laminate layer. If you see the particle board underneath, you have sanded too much.
- Clean Up Dust: After sanding, use a vacuum cleaner to get rid of most of the dust. Then, wipe all surfaces thoroughly with a tack cloth. A tack cloth is a sticky cloth that picks up fine dust. Do this twice to be sure all dust is gone. Dust is your enemy. It causes bumps and poor adhesion in your paint job.
The Primer Power: Setting the Foundation
Using the right laminate cabinet primer is the most important step for long-lasting results. Primer makes paint stick to slick surfaces like laminate. It also blocks stains. It ensures your topcoat color looks true.
Why a Good Laminate Cabinet Primer is Essential
Laminate is non-porous. This means paint does not soak into it. It just sits on top. A special bonding primer creates a sticky layer. This layer lets the paint grab on and stay put. Without it, your paint will chip and peel quickly. This leads to common paint adhesion issues on laminate.
Types of Primers
- Shellac-Based Primers: These are excellent for bonding to slick surfaces. They dry fast. They also block stains and odors well. Zinsser B-I-N is a popular choice. It is strong but has a strong smell. Use good ventilation.
- Oil-Based Bonding Primers: Also great for adhesion. They dry slower than shellac but offer a very durable bond. Kilz Adhesion is a good example. They also have a strong smell.
- Water-Based Bonding Primers: Some newer water-based primers are made for slick surfaces. They are low odor and easy to clean up. But they might not bond as strongly as shellac or oil for very high-traffic areas. Check the label to ensure it is a “bonding” or “adhesion” primer.
For laminate, a shellac-based or oil-based bonding primer is usually best.
Applying Thin, Even Coats
- Ventilate: Open windows. Use fans. Wear your mask.
- Stir Well: Mix your primer thoroughly.
- First Coat: Apply a thin, even coat of primer to all surfaces. Use a good brush for edges and details. Use a foam roller for flat areas. Foam rollers leave a smooth finish.
- Avoid Puddles: Do not put on too much primer. Thick primer can cause drips or crack. Thin coats are better.
- Dry Times: Let the first coat dry completely. Check the primer can for dry times. This usually takes 1-2 hours for shellac, longer for oil-based.
- Second Coat (Optional but Recommended): For better coverage and adhesion, apply a second thin coat of primer. Let it dry fully.
- Light Sanding (Optional): If the primer feels rough, you can very lightly sand it with 320-grit sandpaper. Then, clean with a tack cloth. This makes the surface extra smooth for paint.
Choosing the Best Paint for Laminate Cabinets
The type of paint you choose impacts how well your cabinets look and last. You want a paint that is tough and durable. This helps create a durable finish for painted laminate cabinets.
Discussing Different Paint Types
-
Acrylic-Latex Enamels (Water-Based):
- Pros: Easy to clean up with water. Low odor. Dries fairly quickly. Many brands now offer very durable options.
- Cons: Some older versions may not be as hard as oil-based paints. Can take longer to fully cure (harden).
- Best Use: Good for most DIYers. Look for “cabinet,” “trim,” or “door” paint. They are made to be harder.
-
Alkyd Enamels (Oil-Based):
- Pros: Very durable and hard finish. Resists chipping well. Great for high-traffic areas.
- Cons: Strong odor. Clean up with mineral spirits. Dries slower. Can yellow over time, especially light colors.
- Best Use: If you want the absolute toughest finish and do not mind the smell and cleanup.
-
Hybrid Enamels (Waterborne Alkyd/Oil-Modified Water-Based):
- Pros: Get the best of both worlds. They clean up with water but dry to a hard, durable finish like oil paint. Low odor.
- Cons: Can be more expensive.
- Best Use: Often the best paint for laminate cabinets. They offer great durability with easier use. Brands like Benjamin Moore Advance, Sherwin-Williams Emerald Urethane Trim Enamel, and Behr Alkyd Enamel are popular choices.
Finish Options
- Satin or Eggshell: These finishes are popular for cabinets. They have a slight sheen. This makes them easy to clean. They also hide small flaws better than high-gloss.
- Semi-Gloss: A bit shinier than satin. Very easy to clean. Shows more imperfections.
- Matte/Flat: Not recommended for cabinets. They are hard to clean and can show marks easily.
Recommendation: For the best paint for laminate cabinets, choose a high-quality hybrid enamel in a satin or semi-gloss finish. This will give you a durable and beautiful result.
The Painting Process: Coats and Curing
This is the fun part, but take your time. Thin coats are always better than thick ones.
Applying Thin Coats of Paint
- Stir Your Paint: Mix the paint well before you start and during painting.
- First Coat: Apply a thin, even coat of your chosen paint.
- For Doors and Drawers: Lay them flat on a protected surface. Use your foam roller for flat areas. Use a brush for edges and recessed parts. Paint one side at a time. Let it dry completely before flipping.
- For Cabinet Frames: Use a brush for corners and trim. Use a mini foam roller for larger flat sides.
- Avoid Drips: Do not overload your brush or roller. If you see drips or runs, smooth them out with your brush immediately. This is easier than trying to fix them later.
- Dry Time Between Coats: Check the paint can for recommended drying times. This is usually a few hours. Do not rush this. If the paint is not dry, it can pull up when you apply the next coat.
- Light Sanding Between Coats (Optional but Recommended): After the first paint coat is dry, lightly sand the surfaces with 320-grit sandpaper. This smooths any small bumps or dust nibs. It also helps the next coat stick better. Wipe away dust with a tack cloth.
- Second and Third Coats: Apply a second thin coat of paint. Most projects need two coats for full coverage. Dark colors might need three. Always let each coat dry fully before adding the next.
How to Prevent Paint Chipping Laminate
- Proper Prep: This is number one. Clean and sand well.
- Good Primer: Use a high-quality bonding laminate cabinet primer.
- Thin Coats: Thick coats are more likely to chip or scratch. Thin, even coats are stronger.
- Quality Paint: Use a durable, high-quality cabinet or furniture paint.
- Full Curing: This is key!
Curing Time vs. Dry Time
- Dry Time: This means the paint is dry to the touch. You can apply another coat.
- Curing Time: This is when the paint fully hardens and reaches its maximum durability. This can take much longer – days, even weeks (7-30 days, depending on the paint). Your cabinets will be usable before they are fully cured, but be gentle with them. Avoid hard bumps or heavy scrubbing during this time. This helps prevent paint chipping laminate.
Achieving a Durable Finish for Painted Laminate Cabinets
For extra protection and a super durable finish for painted laminate cabinets, consider adding a topcoat. This is especially good for high-use areas like kitchen cabinets.
Topcoats and Sealers
-
Polycrylic (Water-Based):
- Pros: Dries clear, does not yellow. Easy to clean up with water. Low odor.
- Cons: Not as heat-resistant as polyurethane. Can be scratched if not fully cured.
- Best Use: Good for light-colored cabinets.
-
Polyurethane (Oil-Based):
- Pros: Very durable and heat-resistant.
- Cons: Can yellow over time, especially with white or light paints. Strong odor. Clean up with mineral spirits.
- Best Use: If extreme durability is needed and yellowing is not a concern for your paint color.
Note: Always make sure your topcoat is compatible with your paint. Water-based topcoats usually work best over water-based paints.
Why They Are Important
A topcoat adds a clear, hard layer over your paint. This layer protects the paint from scratches, chips, water, and daily wear. It makes your refinishing laminate kitchen cupboards last much longer. It is a vital step to prevent paint chipping laminate.
Application
- Ensure Paint is Dry: Make sure your final paint coat is completely dry. Let it dry for at least 24 hours, or longer if your paint instructions suggest it.
- Apply Thin Coats: Apply 1-3 thin coats of your chosen topcoat. Use a high-density foam roller for smooth results. Use a brush for edges.
- Light Sanding (Optional): You can lightly sand with 320 or 400-grit sandpaper between topcoats. This creates a smoother finish and better adhesion between layers. Wipe with a tack cloth after sanding.
- Full Cure: Allow the topcoat to cure fully before heavy use. This can take several days to a few weeks.
Reassembly and Final Touches
You are almost done! Now it is time to put your beautiful cabinets back together.
Putting Hardware Back
- Reattach Hardware: Use the labels you made earlier. Attach the hinges back onto the doors and drawer fronts. Then, put the handles or pulls back on.
- New Hardware (Optional): This is a great time to update your kitchen’s look. New hardware can make a big difference. If you are changing the hole spacing, you might need to fill old holes and drill new ones. Do this before your final paint or topcoat.
Rehanging Doors
- Careful Hanging: Reattach the doors to the cabinet frames. Work slowly and carefully. This avoids scratching your new paint. It helps to have another person help you.
- Adjust Hinges: If your hinges are adjustable, make sure the doors line up perfectly.
Caring for Your Newly Painted Laminate Cabinets
To keep your newly refinished laminate kitchen cupboards looking great, proper care is important.
Cleaning Tips
- Gentle Cleaning: For daily cleaning, use a soft cloth with mild dish soap and water.
- Avoid Harsh Chemicals: Do not use abrasive cleaners, scouring pads, or harsh chemical cleaners. These can dull or damage your new finish.
- Wipe Spills Fast: Wipe up spills and splatters as soon as they happen. This stops stains.
Troubleshooting Common Issues
Even with careful work, problems can happen. Here are some common paint adhesion issues on laminate and how to fix them.
Paint Adhesion Issues on Laminate
- Peeling/Chipping: This is usually due to poor surface prep.
- Fix: Scrape off the peeling paint. Clean the area well. Re-sand to scuff the surface. Re-prime with a bonding primer. Then, repaint.
- Fishtips (Small Craters): This happens when there is grease, oil, or silicone on the surface.
- Fix: If dry, sand down the area. Clean with denatured alcohol or more degreaser. Re-prime and repaint.
- Bubbling: Can be caused by applying paint too thick, painting in high humidity, or trapped moisture.
- Fix: Let the paint dry fully. Scrape off bubbles. Sand smooth. Clean. Repaint with thin coats.
How to Fix Drips, Runs
- While Wet: If you see a drip or run while the paint is wet, gently smooth it out with your brush or roller.
- When Dry: Let the paint dry completely. Then, use a fine-grit sandpaper (220-320 grit) or a sanding block to carefully sand down the drip until it is smooth. Wipe away dust. Then, apply another thin coat of paint.
Dealing with Chips Later
Accidents happen. If you get a small chip:
* Clean: Clean the chipped area.
* Light Sand: Lightly sand the edges of the chip to make them smooth.
* Touch Up: Use a small artist’s brush to dab a tiny bit of your original paint onto the chip. Build it up in thin layers.
* Topcoat (Optional): If you used a topcoat, dab a tiny bit of that on too after the paint dries.
Refinishing Laminate Kitchen Cupboards: A Long-Term View
Refinishing laminate kitchen cupboards is a big project. But it offers a huge reward. Your newly painted cabinets can last for many years. How long? If you prepped well, used good materials, and care for them, they can look great for 5-10 years or more.
What to Expect Over Time
Like any painted surface, your cabinets will show some wear over time. Corners and edges might show minor scuffs. That is normal. The good news is touch-ups are easy.
Touch-Ups
Keep a small amount of your leftover paint and topcoat. If a small area gets damaged, you can clean it, lightly sand it, and touch it up. This saves you from repainting the whole kitchen.
Thermofoil Cabinet Painting Guide
Thermofoil cabinets can also be painted using a very similar process. The key differences are:
* Peeling: Thermofoil is more prone to peeling from heat (like near an oven). If your thermofoil is already peeling badly, you might need to remove the entire thermofoil layer first. This can be a lot of work.
* Sanding: Be very gentle with sanding. You only need to scuff the surface lightly.
* Primer: A strong bonding primer is even more critical for thermofoil.
The DIY laminate cabinet painting process described here works well for both. Just be extra careful with thermofoil that shows heat damage.
Frequently Asked Questions (FAQ)
Q: Do I really need to sand laminate cabinets before painting?
A: Yes, you must sand. It is not about removing the laminate. It is about creating a “tooth” or rough surface. This helps the primer and paint stick better. This prevents peeling.
Q: What is the best primer for laminate cabinets?
A: A shellac-based bonding primer or an oil-based bonding primer works best. Brands like Zinsser B-I-N (shellac) or Kilz Adhesion (oil-based) are top choices. They offer the best grip on slick laminate.
Q: What is the best paint for laminate cabinets?
A: High-quality hybrid enamel paints are often best. They offer the durability of oil paint with the easy cleanup of water-based paint. Look for paints labeled for cabinets, trim, or doors.
Q: How do I prevent paint chipping on my laminate cabinets?
A: The best ways are thorough cleaning, proper light sanding, using a bonding primer, applying thin coats of high-quality paint, and letting the paint fully cure. A durable topcoat can add extra protection.
Q: Can I skip the degreasing step?
A: No, you should not skip degreasing. Kitchen cabinets collect a lot of grease and grime. Paint will not stick well to dirty, oily surfaces. This will lead to paint adhesion issues. A good kitchen cabinet degreaser for laminate is essential.
Q: How long does it take for painted laminate cabinets to fully cure?
A: Paint can be dry to the touch in hours. But full curing (hardening) can take 7 to 30 days. Be gentle with your cabinets during this time. Avoid heavy scrubbing or bumping them until they are fully cured.
Q: What if my laminate cabinets are peeling already?
A: If the laminate itself is peeling, you might need to remove the loose parts. Use a sharp knife or scraper. Then, fill any gaps with wood filler. Sand smooth. Then proceed with priming and painting. If it is widespread, new doors might be a better choice.