
Want to give your kitchen a fresh look? Painting your cabinets can make a huge change. Using a paint sprayer gives a smooth, factory-like finish. This guide will show you how.
A HVLP sprayer for cabinets is a great tool for this job. It stands for High Volume Low Pressure. It uses a lot of air at low pressure. This lets you put on paint in a fine, even mist. This means less overspray and a very smooth look. You can also use an airless paint sprayer for cabinets. It works by pushing paint out at very high pressure. This makes it spray very fast. Both types can give good results, but HVLP is often better for detail work like cabinets. So, what is the best paint for spraying kitchen cabinets? For a strong finish, use a good quality acrylic enamel. It is durable and cleans up with water. You can also use oil-based paints for a very hard surface, but they need mineral spirits to clean.
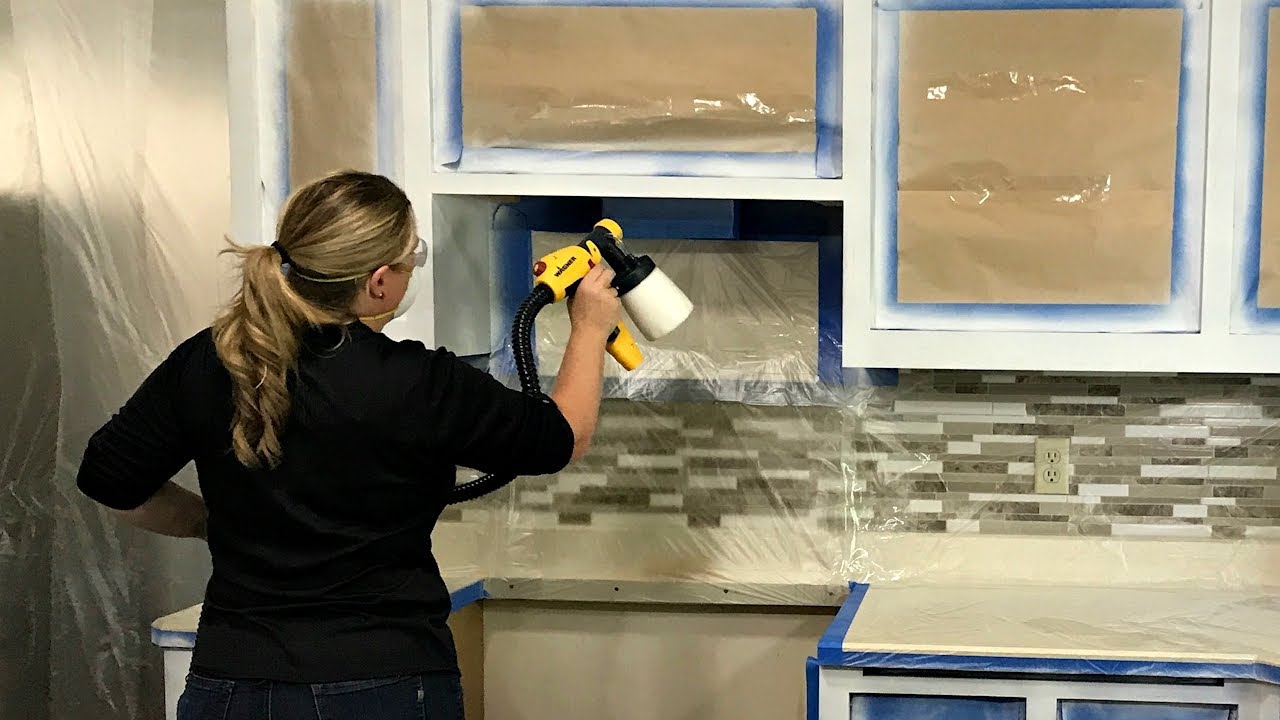
Image Source: i.ytimg.com
Why Use a Paint Sprayer?
Painting kitchen cabinets by hand can be hard. Brushes and rollers can leave marks. A paint sprayer makes the job easier and better.
Advantages of Using a Sprayer
- Smooth Finish: A sprayer gives a very smooth look. No brush strokes or roller marks appear. This makes cabinets look like new.
- Faster Work: Spraying paint is much quicker than painting by hand. You can cover large areas fast.
- Even Coats: A sprayer puts on paint in thin, even layers. This helps stop drips and runs. It makes the color look solid.
- Better Detail: Sprayers can get into small areas. They paint trim and corners well.
Choosing Your Paint Sprayer
You have two main choices for spraying cabinets: HVLP and airless. Each has good points and bad points.
HVLP Sprayer for Cabinets
An HVLP sprayer is a top pick for cabinets. It uses a lot of air. It sprays paint gently.
Pros of HVLP:
- Very Smooth Finish: It puts on very fine paint coats. This makes surfaces super smooth.
- Less Paint Waste: It has less overspray. This means more paint goes on your cabinets, not in the air.
- Good for Details: It is easy to control. This helps with small parts and edges.
- Easier Cleanup: Many models are simple to clean.
Cons of HVLP:
- Slower: It sprays paint slower than airless types.
- Needs Thinner Paint: You often need to thin your paint. This takes time.
- Smaller Paint Cup: You might need to refill often.
Airless Paint Sprayer for Cabinets
An airless sprayer pushes paint out very fast. It is good for big jobs.
Pros of Airless:
- Very Fast: It covers large areas quickly.
- No Thinning Needed: Most paints work without thinning.
- Good for Thick Paints: It handles thicker paints well.
Cons of Airless:
- More Overspray: A lot of paint can go into the air. This means more waste and more cleanup.
- Less Control: It can be harder to control. This might cause drips or uneven spots on small parts.
- Harder to Clean: Cleanup can take longer.
- Higher Cost: Airless sprayers are often more expensive to buy.
Which Sprayer Is Best For You?
| Feature | HVLP Sprayer | Airless Sprayer |
|---|---|---|
| Finish Quality | Excellent (very smooth) | Good (can be very smooth with skill) |
| Speed | Slower | Very Fast |
| Overspray | Low (less waste) | High (more waste) |
| Paint Thinning | Often Required | Rarely Required |
| Control | High (good for detail) | Lower (good for large areas) |
| Cleanup | Easier | Harder |
| Cost | Mid-range | Higher |
For kitchen cabinets, an HVLP sprayer is often the best choice for DIYers. It helps you get an achieving smooth finish on painted cabinets with less fuss.
Getting Ready: Prepping Cabinets for Paint Sprayer
Good prep work is key to a great paint job. This is the most important step for a durable cabinet paint sprayer finish. Do not skip any of these steps.
Hiding Everything
Paint spray can go everywhere. You must cover everything you do not want painted.
Step-by-Step Masking:
- Empty Your Kitchen: Take everything out of your kitchen. Remove all items from inside cabinets and drawers.
- Protect Floors: Lay down drop cloths. Use plastic sheeting over them. Tape the edges down tight.
- Cover Counters: Use plastic sheeting to cover all countertops. Tape it firmly to the walls and cabinets.
- Protect Appliances: Cover your stove, fridge, and dishwasher with plastic. Tape them shut.
- Mask Walls: Use painter’s tape and plastic or paper to cover all walls next to cabinets. Make sure no gaps appear.
- Seal Off Other Rooms: Hang plastic sheets over doorways. This stops paint dust from spreading.
- Open Windows: Make sure you have good airflow. Use fans if needed.
Taking Cabinets Apart
You need to take your cabinets apart to paint them well.
How to Disassemble:
- Remove Doors and Drawers: Take off all cabinet doors. Take out all drawer fronts and drawers. Label each piece. Use numbers or letters on tape. Stick the tape on the piece and inside the cabinet box. This helps you put them back in the right spot.
- Remove Hardware: Take off hinges, knobs, and pulls. Put them in labeled bags. This way, you will not lose small screws.
- Clean Surfaces: Wipe all cabinet parts. Use a strong degreaser. A mix of water and TSP (Trisodium Phosphate) works well. Get rid of all grease, dirt, and grime. Rinse well with clean water. Let everything dry fully. This is vital for prepping cabinets for paint sprayer.
Fixing and Sanding
A smooth surface helps paint stick well.
Repair and Sanding Steps:
- Fill Holes: Fill any old hardware holes if you are changing knobs. Use wood filler. Fill any dents or nicks too.
- Let Dry: Let the wood filler dry completely. Read the product info for drying times.
- Sanding Smooth: Lightly sand all surfaces. Use 120-180 grit sandpaper. This creates a rough surface for paint to grab onto. Do not press too hard. You just want to scuff the old finish. Sanding well helps in achieving smooth finish on painted cabinets.
- Clean Dust: Use a vacuum or a shop vac to remove sanding dust. Then, wipe all surfaces with a tack cloth. This picks up any fine dust left behind.
Picking the Right Paint & Primer
Choosing the right products is key for a good finish.
Primer for Spray Painting Kitchen Cabinets
Primer helps paint stick. It also blocks stains. It makes your top coat look better.
Why Use Primer:
- Better Adhesion: Primer helps paint stick to tricky surfaces. It makes the top coat last longer.
- Even Color: It makes the surface one color. This helps the final paint color look true.
- Blocks Stains: It stops old stains or wood tannins from coming through the new paint.
Types of Primer:
- Shellac-Based Primer: This is a good choice. It dries fast. It blocks stains well. It sticks to almost any surface. It cleans with denatured alcohol.
- Oil-Based Primer: This also sticks well. It blocks stains. It takes longer to dry. It cleans with mineral spirits.
- Water-Based (Acrylic) Primer: These are easy to clean up with water. Some newer types offer good blocking power. Look for “stain-blocking” on the label.
Always use a high-quality primer. Choose one that works with your chosen top coat paint.
Best Paint for Spraying Kitchen Cabinets
The right paint makes your cabinets look good and last long.
Types of Paint:
- Acrylic Enamel (Water-Based):
- Pros: Dries fast, easy cleanup with water, low smell, very durable once cured. This is often the best paint for spraying kitchen cabinets for DIY.
- Cons: Can scratch more easily before fully cured (takes weeks).
- Tip: Look for brands made for cabinets. Many have self-leveling features for a smooth look.
- Alkyd Enamel (Oil-Based or Water-Based Alkyd Hybrid):
- Pros: Very hard, durable finish, good flow (less brush marks), good for heavy use.
- Cons (for oil-based): Slow drying, strong smell, hard cleanup (mineral spirits), can yellow over time.
- Hybrid Alkyds: These are water-based but act like oil-based paints. They clean with water but offer great hardness. This is a very popular choice.
- Lacquer:
- Pros: Dries very fast, very hard finish, smooth look.
- Cons: Very strong fumes (needs pro gear), not for beginners, highly flammable. Not a common DIY choice.
For most people doing DIY kitchen cabinet spraying, a good quality water-based acrylic enamel or a water-based alkyd hybrid is best. They give a great finish, are durable, and are easier to work with.
Cabinet Spraying Technique
This is where your work comes to life. Good technique is key for achieving smooth finish on painted cabinets.
Setting Up Your Spray Area
Create a good place to spray. You can use your garage or a spare room.
Setup Tips:
- Ventilation: Open windows. Use a strong fan to pull air out. Wear a good respirator.
- Hanging Doors: Use screws and eye hooks to hang cabinet doors. This lets you spray all sides at once. Or, lay them flat on sawhorses. Use painter’s pyramids to raise them up.
- Sprayer Setup: Read your sprayer’s manual. Set it up. Fill it with paint.
Preparing the Paint
Most paints need thinning for HVLP sprayers.
Thinning Guide:
- Check Paint Can: Look for “spray gun” or “sprayer” info. It might say if thinning is needed.
- Water or Paint Thinner: Use water for water-based paints. Use paint thinner or mineral spirits for oil-based paints.
- Start Slow: Add a little thinner at a time. Mix well.
- Test Spray: Spray a test piece of cardboard. The paint should come out in a fine mist. It should not spit or drip. If it looks like orange peel, it’s too thick. Add more thinner. If it runs, it’s too thin. Add a little more paint.
- Viscosity Cup: Some sprayers come with a cup to test paint thickness. Follow its guide.
The Spraying Process
This is the main part of the cabinet spraying technique.
How to Spray:
- Test First: Always test your spray pattern on cardboard. Adjust the spray tip and pressure. You want an oval shape.
- Distance: Hold the sprayer about 6-8 inches from the surface. Keep it at this distance.
- Movement: Move your arm steadily. Do not just use your wrist. Keep the sprayer moving at a constant speed.
- Overlap: Overlap each spray pass by 50%. This means half of your new spray pass covers the edge of the old one. This gives even coverage.
- Thin Coats: Apply many thin coats instead of one thick coat. This helps stop drips and runs. It gives a smoother finish.
- Edges First: For cabinet doors, spray the edges first. Then spray the flat surfaces.
- Corners and Details: Use careful, short bursts for tricky spots.
- Drying Between Coats: Let each coat dry fully before adding the next. Read your paint’s label for times. Lightly sand between coats with 220-320 grit sandpaper if needed. This makes the next coat stick better. Wipe dust off with a tack cloth.
- Multiple Coats: Most cabinets need 2-3 coats of primer. Then 2-3 coats of paint.
Kitchen Cabinet Spray Painting Tips
These tips will help you get pro results.
- Patience is Key: Do not rush. Take your time with each step.
- Wear Safety Gear: Always wear a good respirator mask. Wear safety glasses. Wear gloves.
- Good Lighting: Use bright lights. This helps you see drips or missed spots.
- Keep Sprayer Clean: Clean the sprayer often during your job. If it clogs, stop and clean it.
- Work in Batches: Paint a few doors at a time. Let them dry, then move to the next batch.
- Practice: If you are new to spraying, practice on scrap wood first.
- Temperature and Humidity: Spray in good conditions. Check your paint’s label. Usually, 60-80°F (15-27°C) and low humidity is best.
- Turn Pieces: If spraying doors flat, turn them when one side is dry. Paint the other side.
- Cabinet Boxes Last: Paint the cabinet boxes (the frames on the wall) after the doors and drawers are done. This helps avoid bumping wet doors.
Cleanup and Curing
You are almost done! Proper cleanup and curing are important.
Cleaning Your Sprayer
Clean your sprayer right after you finish painting. Paint can dry inside and ruin it.
Cleanup Steps:
- Empty Paint: Pour leftover paint back into its can.
- Rinse: Put water (for water-based paints) or cleaner (for oil-based paints) into the sprayer. Spray it out until clear. Do this in a bucket or outside away from drains.
- Disassemble: Take apart the spray gun. Clean all parts well. Use small brushes for tiny holes.
- Wipe Down: Wipe the outside of the sprayer.
- Store: Store your sprayer in a clean, dry place.
Curing the Paint
Your cabinets will feel dry in hours. But the paint is not fully hard yet. This is called curing.
Curing Tips:
- Soft Cure: Paint feels dry to the touch in a few hours. This is the soft cure. You can put doors back on.
- Hard Cure: It takes much longer for paint to get its full hardness. This can be 7 to 30 days. Read your paint’s label for exact times.
- Be Gentle: During the hard cure, be very careful with your cabinets. Do not scrub them hard. Do not put heavy items inside right away. Avoid hitting them. This helps ensure a durable cabinet paint sprayer finish.
- Return Hardware: Once fully dry to the touch, put hardware back on. Use care not to scratch the new paint.
DIY Kitchen Cabinet Spraying: Tips for Success
Doing this yourself can save you money. Here are some extra tips for DIY kitchen cabinet spraying.
Patience and Persistence
- Do Not Rush: Painting cabinets is a big job. It takes time. Give yourself many days to do it right.
- Breaks: Take breaks. This helps you stay focused and not get tired.
- Fix Mistakes: If you see a drip, let it dry. Then sand it down lightly and spray another thin coat. Do not try to wipe wet drips.
Choosing the Right Weather
- Avoid Extreme Heat or Cold: Paint needs certain temperatures to dry well. Too hot, it dries too fast and can look rough. Too cold, it dries too slow.
- Low Humidity: High humidity can make paint dry slowly. It can also cause problems like bubbling.
- Ideal Range: Aim for temperatures between 60-80°F (15-27°C) and lower humidity.
Practice Makes Perfect
- Test on Scrap: Always test your spray gun on spare wood or cardboard. Adjust settings until you get a perfect spray.
- Learn Your Sprayer: Get to know how your sprayer works. Each one is a bit different.
Lighting is Your Friend
- Bright Lights: Use bright, movable work lights. Shine them across the surfaces you are painting. This helps you see any wet spots, runs, or missed areas. This is especially true for kitchen cabinet spray painting tips related to quality.
Quality Materials
- Good Paint: Do not save money on paint. High-quality paint costs more, but it performs better and lasts longer. It flows better through the sprayer and gives a stronger finish.
- Good Primer: The primer sets the stage. A good primer will help your top coat stick and look even.
- Good Tape: Use painter’s tape that sticks well and comes off clean. Frog Tape or ScotchBlue are good brands.
Safety First
- Ventilation: Always make sure your workspace has plenty of fresh air.
- Respirator: Wear a high-quality respirator mask. It should protect you from paint fumes and tiny paint particles. A simple dust mask is not enough.
- Gloves and Eye Protection: Wear gloves to keep paint off your skin. Wear safety glasses to protect your eyes.
- No Smoking/Flames: Never smoke or have open flames near paint and thinners. They are flammable.
By following these steps and tips, you can give your kitchen cabinets a beautiful, durable, and professional-looking finish. DIY kitchen cabinet spraying is a big job, but the results are worth it.
Frequently Asked Questions (FAQ)
Q1: Can I use regular house paint in a sprayer?
A1: Maybe, but it is not ideal. Regular house paint is often too thick for a sprayer. It might need a lot of thinning. This can make the paint less durable. It’s better to use paint made for cabinets and spraying.
Q2: How long does it take for cabinet paint to fully cure?
A2: Paint feels dry in hours. But it can take 7 to 30 days to fully harden or “cure.” The paint can be delicate during this time. Read your paint can for exact times.
Q3: Do I really need to prime my cabinets?
A3: Yes, you should always prime cabinets. Primer helps the new paint stick better. It covers old stains or colors. It makes the final paint job look much better and last longer.
Q4: How do I clean my cabinets after painting?
A4: After the paint has fully cured, clean them gently. Use a soft cloth. Use mild soap and water. Avoid harsh cleaners or scrubbing pads. These can hurt the new paint.
Q5: What if I get a drip or run while spraying?
A5: Do not touch wet drips. Let them dry fully. Then, you can lightly sand the drip smooth. Use fine-grit sandpaper (220-320 grit). After sanding, clean the dust. Then, spray another light coat of paint over the area.
Q6: Can I spray cabinet boxes while they are still on the wall?
A6: Yes, you can. But you must mask off everything very well. This includes walls, ceilings, floors, and all appliances. It is a lot of masking work. Some people find it easier to spray doors and drawers in a separate area.