
Image Source: www.theharperhouse.com
How To Remove Kitchen Tiles Without Damage: A Step-by-Step Guide
Can you remove kitchen tiles yourself? Yes, with the right tools and techniques, you can successfully remove kitchen tiles yourself, whether it’s floor tiles, backsplash tiles, or wall tiles, minimizing damage to the underlying surface. This comprehensive guide will walk you through the entire process, from preparing your workspace to cleaning up the mess.
Preparing Your Workspace for Tile Removal
Before you start ripping up tiles, it’s crucial to set up your workspace correctly. This makes the job safer, cleaner, and much easier. Think of this as laying the groundwork for a smooth renovation.
Protecting Your Kitchen
Your kitchen is a busy place, and you want to keep it as functional as possible during the removal process. Protect any areas you don’t want to get damaged or dirty.
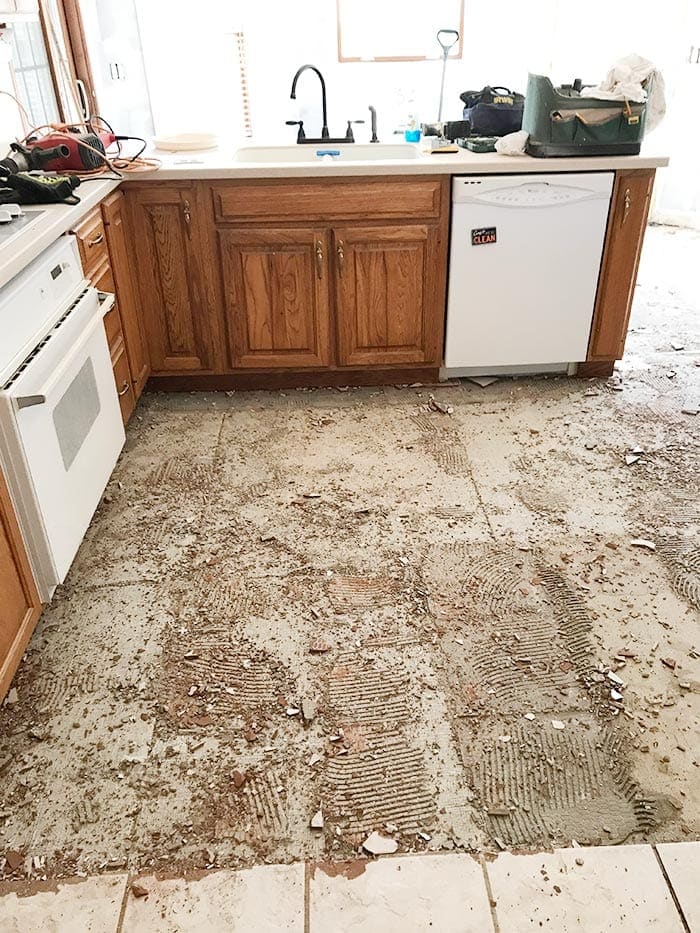
- Covering Appliances: Large appliances like refrigerators and stoves should be moved or thoroughly covered. Use heavy-duty plastic sheeting or old blankets to protect them from dust and debris. Secure the coverings with painter’s tape.
- Shielding Cabinets and Countertops: Your cabinets and countertops are likely more delicate than appliances. Use plastic sheeting or drop cloths to cover them completely. Again, painter’s tape is your friend for securing these coverings. It won’t leave sticky residue behind.
- Securing Flooring: If you’re removing floor tiles, you need to protect the flooring in adjacent areas. Lay down thick drop cloths or plywood sheets in walkways to prevent scratches and damage from dropped tools or tiles.
Essential Tools and Safety Gear
Having the right tools is key to efficient kitchen tile removal. Safety is paramount, so gather all your protective gear before you begin.
Safety Gear:
- Safety Glasses: Tile fragments can fly unexpectedly. Always wear sturdy safety glasses.
- Work Gloves: Protect your hands from sharp edges and splinters. Heavy-duty work gloves are best.
- Dust Mask or Respirator: Tile dust control is vital. As you break tiles and remove adhesive, dust will be generated. A good dust mask or, even better, a respirator will protect your lungs.
- Knee Pads: You’ll be spending a lot of time on your knees. Knee pads will save your joints.
- Closed-Toe Shoes: Sturdy, closed-toe shoes are a must for protecting your feet.
Tools for Removal:
- Putty Knife or Scraper: Useful for initial grout removal and scraping away loose debris.
- Grout Saw or Grout Removal Tool: Specifically designed to cut through grout lines, making tile removal much easier.
- Hammer: A standard claw hammer can be used for persuasion.
- Chisel: A cold chisel or a tile chisel is essential for prying and breaking tiles.
- Pry Bar for Tiles: A specialized pry bar for tiles or a flat pry bar is excellent for levering tiles loose. Look for one with a thin edge for getting under tiles.
- Utility Knife: For scoring tiles or cutting through any sealant.
- Heavy-Duty Trash Bags or a Dumpster: You’ll generate a lot of waste.
- Vacuum Cleaner with a HEPA Filter: For effective tile dust control and cleanup.
- Scraper Tool (for tile adhesive removal): A heavy-duty scraper is needed for stubborn tile adhesive removal.
- Optional: Oscillating Multi-Tool: This can be a lifesaver for grout removal and can also be used for scoring tiles.
Step-by-Step Guide to Removing Kitchen Tiles
Now that your workspace is prepped and you have your tools, it’s time to get to work. We’ll cover kitchen tile removal for both floors and walls.
Step 1: Grout Removal
The first step in kitchen tile removal is to get rid of the grout between the tiles. This weakens the bond of the tiles to the surface and makes them easier to pry up.
Methods for Grout Removal:
- Manual Grout Saw: This is a labor-intensive but effective method. You’ll use a tool with a carbide blade to saw back and forth along the grout lines. It offers good control.
- Oscillating Multi-Tool with Grout Blade: This is a much faster option. Use a grout removal blade designed for this purpose. Move the tool steadily along the grout lines. Be careful not to let the blade slip onto the tile surface itself, as it can scratch.
- Utility Knife: For very shallow grout lines or as a starting point, a sharp utility knife can score the grout, making it easier for other tools to work.
Tips for Grout Removal:
- Work in manageable sections.
- Focus on removing as much grout as possible, especially along the edges of the tiles.
- If you have a lot of grout to remove, consider renting a power tool specifically designed for this purpose.
Step 2: Scoring Tiles (If Necessary)
Sometimes, tiles are very well-adhered, or you’re concerned about breaking them in large, unwieldy pieces. Scoring tiles can help control how they break.
- Using a Scoring Tool: A carbide-tipped scoring tool or the edge of your chisel can be used to score a line across the surface of a tile.
- Making Multiple Scores: For larger tiles, you might make a few score lines to encourage breakage in smaller, more manageable pieces.
- Purpose of Scoring: Scoring creates a weak point. When you apply pressure with a hammer and chisel, the tile is more likely to break along these score lines, rather than shattering erratically. This is particularly useful when removing floor tiles to prevent damage to the subfloor.
Step 3: Prying and Chiseling Tiles
This is where the actual kitchen tile removal happens. You’ll be using your hammer, chisel, and pry bar to lift the tiles.
Techniques for Prying and Chiseling:
- Start with a Corner: Find a loose tile or a tile with a chipped corner to start.
- Insert the Chisel or Pry Bar: Gently tap your chisel or the edge of your pry bar for tiles into the grout line or under the edge of the tile.
- Leverage Carefully: Apply steady pressure to pry the tile upwards. You might need to work the tool along the edge to loosen it.
- Hammer and Chisel Combination: If a tile is stubborn, place the chisel flat against the tile surface, angled slightly towards the edge. Tap the chisel with your hammer. The goal is to break the tile into smaller pieces that you can then pry out.
- Work Methodically: Move from tile to tile, working in a systematic pattern. This ensures you don’t miss any spots and keeps the process organized.
- Protect the Subfloor: Be mindful of the surface beneath the tiles. If you’re removing backsplash tile removal from drywall, be extra careful not to gouge the wall. For removing floor tiles, take care not to damage the subfloor, especially if it’s concrete or plywood that you plan to reuse.
For Wall Tiles:
- Start at the Top: It’s often easier to start wall tile removal from the top row and work your way down. This prevents falling tiles from hitting already removed areas.
- Be Gentle with Drywall: Drywall is softer than concrete. Apply pressure carefully with your chisel or pry bar to avoid tearing large chunks of drywall.
For Floor Tiles:
- Breaking for Removal: For floor tiles, it’s often easier to break them into smaller pieces using the hammer and chisel. Aim to break them so they pop up more easily.
- Using a Floor Scraper: Once tiles are loosened, a floor scraper can be helpful to lift them off the subfloor.
Step 4: Tile Adhesive Removal
Once the tiles are off, you’ll likely have remnants of tile adhesive removal to deal with. This is crucial for preparing the surface for new flooring or a refinished look.
Methods for Adhesive Removal:
- Scraping: Use your putty knife or a heavy-duty floor scraper to scrape away as much adhesive as possible.
- Wire Brush: For stubborn adhesive, a wire brush attachment on a drill or angle grinder can be effective. Wear extra eye protection when using these tools.
- Heat Gun: A heat gun can soften old adhesive, making it easier to scrape. Use this with caution, as excessive heat can damage some subfloors.
- Chemical Removers: There are specific chemical adhesive removers available. Follow the manufacturer’s instructions carefully and ensure good ventilation. Always test in an inconspicuous area first.
Tips for Adhesive Removal:
- Work in sections.
- Keep your tools sharp for better scraping.
- If you’re dealing with vinyl-backed tiles, the adhesive might be easier to remove.
Step 5: Cleaning Up and Dust Control
Tile dust control is a significant aspect of this job. Dust from grout and old adhesive can be very fine and spread easily.
Cleanup Best Practices:
- Frequent Vacuuming: Vacuum your work area frequently as you go. Use a vacuum with a HEPA filter to trap fine dust particles.
- Wet Wiping: After scraping and vacuuming, wipe down surfaces with a damp cloth to pick up any remaining dust.
- Bagging Debris: Place all tile fragments and debris into heavy-duty trash bags. Seal them tightly before removing them from the work area to prevent dust from escaping.
- Final Vacuum and Wipe Down: Once all tiles and debris are removed, do a thorough final vacuum of the entire area, including walls and cabinets. Wipe down all surfaces again.
- Ventilation: Open windows and doors (weather permitting) during cleanup to air out the space.
Dealing with Different Tile Types and Surfaces
The best approach for kitchen tile removal can vary depending on the type of tile and the surface beneath it.
Backsplash Tile Removal
Backsplash tile removal is typically less strenuous than floor tile removal but requires extra care due to the proximity of cabinets and countertops, and often the surface being drywall.
- Grout: Use a grout saw or oscillating tool.
- Tile Removal: Start with a utility knife to score around the edges of the tile to break the seal. Then use a putty knife or a specialized tile pry tool. If using a hammer and chisel, be very gentle to avoid damaging the drywall. Work from the top down.
- Adhesive on Drywall: Old mastic or adhesive on drywall can sometimes pull off chunks of the paper facing. Be prepared for minor drywall repairs.
Floor Tile Removal
Removing floor tiles can be more physically demanding and requires attention to subfloor protection.
- Grout: Similar methods apply, but you might use a wider grout saw or an angle grinder with a diamond blade for very hard grout.
- Tile Removal: Breaking tiles into smaller pieces with a hammer and chisel is often more efficient. A heavy-duty floor scraper or a wide pry bar is useful here.
- Subfloor Types:
- Concrete: Generally robust, but still be careful with heavy impacts.
- Plywood: More susceptible to damage. Avoid excessive force that could gouge or crack the wood.
- Cement Board: Fairly durable, but sharp impacts can chip it.
Specialized Tiles
- Ceramic and Porcelain Tiles: These are the most common and are generally straightforward to remove with the methods described. Porcelain can be harder and more brittle.
- Natural Stone Tiles: Stone tiles can be more expensive and sometimes more delicate. Treat them with care. If you intend to reuse them, scoring might be less desirable.
- Glass Tiles: Glass tiles are very brittle. They will likely shatter easily. Scoring is less important, and careful prying is key.
Common Problems and Solutions
Even with the best preparation, you might encounter a few snags.
- Stubborn Adhesive: If the adhesive is incredibly hard to remove, consider using a floor scraper with an extension pole for better leverage or a chemical stripper specifically designed for tile adhesive. Always follow safety instructions.
- Damaged Drywall: Minor tears in drywall paper can be repaired with joint compound. For larger gouges, you might need to cut out the damaged section and patch it with new drywall.
- Uneven Subfloor: After removing tiles and adhesive, you might find an uneven subfloor. This will need to be addressed before installing new flooring. Grinding high spots or filling low spots might be necessary.
Frequently Asked Questions (FAQ)
Q: How long does it take to remove kitchen tiles?
A: The time it takes can vary greatly depending on the size of your kitchen, the type of tile, the adhesive used, and your experience level. A small backsplash might take a few hours, while a full kitchen floor could take a full day or more.
Q: Can I reuse my old kitchen tiles?
A: It’s possible, but challenging. You’ll need to be extremely careful during removal to avoid chipping or cracking the tiles. You’ll also need to meticulously clean off all old adhesive from the back of each tile. Many DIYers find it’s more practical to replace tiles than to reuse them, especially if they’ve been damaged during removal.
Q: What’s the best way to dispose of old tiles?
A: Check with your local waste management services. Many accept tile debris in regular household trash, but some may require special disposal, especially for large amounts. You might also consider a junk removal service or renting a small dumpster for renovation waste.
Q: Do I need to seal the subfloor after removing tiles?
A: It depends on the condition of the subfloor and the type of new flooring you plan to install. If the subfloor is clean and smooth, and you’re installing something like vinyl or laminate, you might not need to. However, if you’re installing tile again, or if the subfloor has imperfections, it’s often a good idea to apply a leveling compound or sealant.
Q: How do I manage tile dust in a rental property?
A: If you’re renting, tile dust control is even more critical. Seal off the work area with plastic sheeting and tape. Use a shop vacuum with a HEPA filter and consider renting a dust extractor. Be extra thorough with your cleaning before you leave to avoid losing your security deposit.
By following these steps and prioritizing safety and careful workmanship, you can successfully tackle kitchen tile removal and pave the way for your beautiful new kitchen update.