
Thinking about updating your kitchen and wondering, “Can I remove a tile backsplash myself?” Absolutely! DIY backsplash removal is a common and achievable project for most homeowners. This comprehensive guide will walk you through the entire process, from preparing your workspace to getting your walls ready for a new look. We’ll cover everything you need to know for a successful kitchen tile removal.
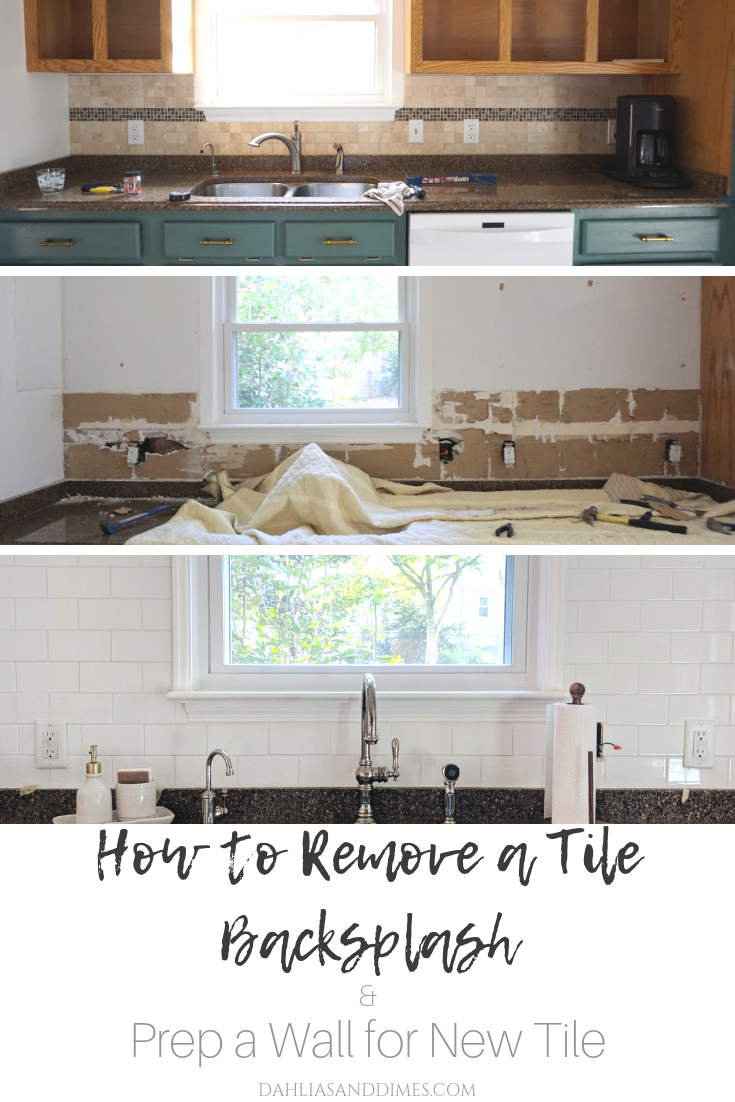
Image Source: forresterhome.com
Preparing for Kitchen Tile Removal
Before you start swinging a hammer, proper preparation is key to a smooth and safe kitchen tile removal. This step saves you headaches and protects your kitchen from unnecessary damage.
Gathering Your Tools and Supplies
Having the right tools on hand makes all the difference in tackling this project efficiently. Here’s a list of essentials for your backsplash demolition:
- Safety Gear:
- Safety glasses or goggles
- Heavy-duty work gloves
- Dust mask or respirator
- Long-sleeved shirt and pants
- Protection for Your Kitchen:
- Drop cloths or old sheets
- Painter’s tape
- Cardboard or plywood (for protecting countertops and flooring)
- Removal Tools:
- Putty knife or scraper
- Utility knife or scoring tool
- Pry bar (flat bar)
- Hammer
- Drywall saw or oscillating multi-tool (optional, for tougher sections)
- Screwdriver (if tiles are mounted on screws)
- Cleaning Supplies:
- Broom and dustpan
- Vacuum cleaner with a hose attachment
- Sponge or rags
- Bucket
- Scraper or putty knife for adhesive removal
- Sanding block or sandpaper (medium grit)
- Joint compound or spackle (for minor wall repairs)
- Primer and paint (if repainting the wall)
Protecting Your Kitchen Surfaces
Protecting your countertops, sink, and flooring is crucial. Tile fragments and adhesive can cause scratches and damage.
- Countertops and Sink:
- Cover your countertops and sink with thick drop cloths.
- Use painter’s tape to secure the edges of the drop cloths.
- For added protection, place pieces of cardboard or plywood over the countertop edges, especially near the backsplash.
- Flooring:
- Lay down drop cloths or old sheets along the base of the wall where you’ll be working.
- Secure the drop cloths with painter’s tape to prevent them from shifting.
- If you have delicate flooring, consider using a heavier protective layer like canvas drop cloths or masonite sheets.
Turning Off Utilities
For safety, it’s important to consider any utilities that might be near your backsplash.
- Electricity: If you have electrical outlets or light switches within the backsplash area, turn off the power to those circuits at your breaker box. Use a voltage tester to confirm the power is off before you start.
- Water: If your backsplash is behind a sink with plumbing, ensure there are no leaks that could be exacerbated by vibration or accidental damage.
The Step-by-Step Process of Old Backsplash Removal
Now that your workspace is prepped, it’s time to dive into the actual tile backing removal. This is where the backsplash demolition really begins.
Step 1: Grout Removal
The first step in effective kitchen tile removal is to remove the grout between the tiles. This loosens the tiles and makes them easier to pry off.
- Tools: You’ll need a grout saw, utility knife, or an oscillating multi-tool with a grout removal blade.
- Technique:
- Grout Saw/Utility Knife: Carefully run the tool along the grout lines, applying steady pressure. Work in a back-and-forth motion. Be mindful not to dig too deeply into the wall behind the tiles.
- Oscillating Multi-Tool: This is the most efficient option for grout removal. Use a grout removal blade and let the tool do the work. Keep it at a shallow angle to avoid damaging the wall.
- Objective: The goal is to remove as much of the grout as possible to create space for your pry bar.
Table: Grout Removal Tools Comparison
| Tool | Pros | Cons | Best For |
|---|---|---|---|
| Grout Saw | Inexpensive, precise control | Labor-intensive, slower | Small areas, delicate tiles |
| Utility Knife | Readily available, good for shallow grout | Can be time-consuming, blade can dull | Light grout removal, detailed work |
| Oscillating Multi-Tool | Fast, efficient, effective | Can be noisy, requires power, more expensive | Large areas, tough grout, faster removal |
Step 2: Loosening the Tiles
With the grout removed, it’s time to start prying off the tiles. This is the most satisfying part of the backsplash demolition.
- Tools: A putty knife, scraper, and a pry bar.
- Technique:
- Start with a Putty Knife: Slide a putty knife or scraper into the gap where the grout used to be, between the tile and the wall. Try to wedge it gently behind the tile.
- Use a Pry Bar: Once you have a bit of space, carefully insert the pry bar into the gap.
- Apply Gentle Pressure: Pry the tile away from the wall slowly and steadily. Avoid using excessive force, which can damage the drywall or plaster behind it.
- Work Around Edges: If a tile is stubborn, try working from different edges. Sometimes a tile is only loosely adhered on one side.
- Stubborn Tiles: For tiles that are really stuck, you might need to use the hammer in conjunction with the pry bar. Tap the end of the pry bar gently with the hammer to help it slide behind the tile.
- Key Tip: If you’re aiming to reuse tiles, be extra gentle. If not, you can afford to be a bit more aggressive, but still try to minimize damage to the underlying wall.
Step 3: Removing Adhesive and Remaining Grout
After the tiles are off, you’ll likely have residual adhesive and grout on the wall. This needs to be cleaned up for proper kitchen wall prep.
- Tools: Putty knife, scraper, wire brush, and a damp sponge.
- Technique:
- Scraping: Use your putty knife or scraper to chip away at any thick blobs of adhesive.
- Wire Brush: For smaller, more stubborn bits of adhesive or grout, a wire brush can be very effective.
- Damp Sponge: For the final clean-up, use a damp sponge to wipe away dust and smaller particles.
- Adhesive Type: The ease of adhesive removal depends on the type of adhesive used. Some adhesives are much stickier than others.
Step 4: Assessing Wall Damage
Once all the tiles are removed, it’s time to inspect the condition of your walls. This is a crucial part of your kitchen renovation backsplash project.
- Common Issues:
- Drywall Damage: You might find gouges, dents, or torn paper from the prying process.
- Plaster Damage: Plaster can crack or crumble if not handled carefully.
- Adhesive Residue: Even after scraping, some thin layers of adhesive might remain.
- Water Damage: Look for any signs of mold or water stains behind the tiles, which could indicate a leak.
- Decision Making: Based on the damage, you’ll decide whether minor repairs are sufficient or if more extensive work, like replacing sections of drywall, is needed.
Step 5: Repairing the Walls
After assessing the damage, you’ll need to repair the walls before proceeding with your kitchen renovation backsplash.
- Minor Damage (Gouges, Small Holes):
- Clean: Remove any loose debris from the damaged areas.
- Fill: Use joint compound or spackle to fill small holes and gouges. Apply it with a putty knife, smoothing it as much as possible.
- Sand: Once the compound is dry (follow product instructions), lightly sand the area smooth with a sanding block or medium-grit sandpaper.
- Repeat: You may need multiple thin coats of compound, sanding between each, for a perfectly smooth finish.
- More Significant Damage (Torn Drywall Paper):
- Trim: Carefully trim away any loose or torn drywall paper with a utility knife.
- Apply Compound: Apply joint compound, feathering the edges out onto the surrounding undamaged wall. This helps to blend the repair.
- Multiple Coats and Sanding: As with minor damage, multiple thin coats and sanding are usually required.
- Primer and Paint: Once repairs are complete and the wall is smooth, apply a coat of primer. After the primer dries, you can paint the wall to match the rest of your kitchen.
Table: Wall Repair Materials
| Material | Purpose | Application | Drying Time (Approx.) |
|---|---|---|---|
| Joint Compound | Filling larger holes, cracks, gouges | Apply with putty knife, multiple thin coats needed | 2-4 hours per coat |
| Spackle | Filling small holes and imperfections | Apply with putty knife, easy to sand | 30 mins – 1 hour |
| Sandpaper (Medium Grit) | Smoothing dried compound, rough patches | Use with sanding block for even pressure | N/A |
| Primer | Sealing repairs, creating a uniform surface for paint | Apply with roller or brush | 1-2 hours |
| Paint | Finishing the wall for aesthetic appeal | Apply with roller or brush | 2-4 hours |
Tips for a Successful DIY Backsplash Removal
Making the process of old backsplash removal smoother involves a few smart strategies.
Work in Sections
Instead of trying to pry off every tile at once, focus on removing one tile or a small section at a time. This makes the task more manageable and less overwhelming. It also helps prevent accidental damage to a larger area of the wall.
Be Patient with Stubborn Tiles
Some tiles will be more challenging to remove than others. Don’t get discouraged. If a tile isn’t budging, try a different approach or tool. Sometimes applying a little heat with a hairdryer (on a low setting) can help soften old adhesive, making removal easier. However, be cautious not to overheat the drywall.
Clean as You Go
As you remove tiles and grout, sweep or vacuum up the debris frequently. This keeps your workspace clean and safe and prevents you from tracking dust and fragments throughout your house. It also makes the final wall preparation much quicker.
Consider Tile Type and Adhesive
The type of tile and the adhesive used will greatly influence the difficulty of the job.
* Ceramic and Porcelain Tiles: These are generally harder and less prone to breaking than some other types. The adhesive might be stronger.
* Glass Tiles: These can be more delicate and may chip or shatter. Handle them with extra care.
* Adhesive Types: Mastic (a type of glue) is common and can sometimes be softened with heat. Thin-set mortar is a cement-based adhesive that is much harder to remove and may require more aggressive scraping.
When to Call a Professional
While DIY backsplash removal is often straightforward, there are times when professional help is advisable.
- Extensive Wall Damage: If you discover significant water damage, mold, or structural issues behind the tiles, it’s best to consult a professional contractor.
- Very Old Homes: Older homes might have different wall materials or lead paint, which require specialized handling.
- Lack of Time or Tools: If you’re short on time or don’t have the necessary tools, hiring a professional for the kitchen tile removal can save you stress.
Post-Removal: Kitchen Wall Prep for New Backsplash
Once your old backsplash is gone and the walls are repaired, you’re ready for the next stage of your kitchen renovation.
Final Cleaning and Surface Preparation
Before applying any new materials, ensure the walls are perfectly clean and smooth.
- Dust Removal: Thoroughly vacuum the walls and surrounding areas. Wipe down with a slightly damp cloth to pick up any remaining dust.
- Smoothness Check: Run your hand over the repaired areas. If you feel any rough spots, give them a light sanding and wipe them clean again.
- Degreasing: If the wall is near the stove, it might have accumulated grease. A mild degreasing cleaner can help ensure a clean surface for paint or adhesive.
Priming and Painting
A good primer coat seals the repaired areas and provides a uniform base for your new backsplash material or paint.
- Apply Primer: Use a quality primer designed for drywall. Apply it evenly with a roller or brush.
- Allow to Dry: Let the primer dry completely according to the manufacturer’s instructions.
- Paint (Optional): If you’re not installing a new tile backsplash immediately or if you plan to paint the wall a different color, apply your chosen paint. Allow it to dry thoroughly before proceeding.
Frequently Asked Questions (FAQ)
How long does it take to remove a tile backsplash?
The time it takes to remove a tile backsplash can vary significantly. For a standard-sized backsplash (e.g., 18-24 inches high and 8-10 feet long), it can take anywhere from 2 to 8 hours for DIY backsplash removal. Factors like the type of grout, the adhesive used, and the ease of tile removal will impact the duration. Grout removal is often the most time-consuming part if done manually.
Can I reuse the old tiles?
Yes, you can potentially reuse old tiles if they come off cleanly without significant chipping or breakage. This is more likely with ceramic tiles and requires careful prying. If you plan to reuse them, you’ll need to meticulously remove all old adhesive from the back of each tile, which can be a tedious process.
What if the tiles are glued directly to drywall without any backer board?
If tiles are adhered directly to drywall without a backer board, the drywall paper is very likely to be damaged during removal. Be prepared for more extensive wall repairs, including potentially replacing sections of drywall, as the adhesive will bond strongly to the paper. This is a common scenario, and thorough wall prep will be essential.
Do I need to remove all the grout?
It’s highly recommended to remove as much of the grout as possible. Removing grout creates space for your tools to get behind the tiles, making the prying process much easier and reducing the risk of damaging the wall behind the tiles. Leaving grout in place can also mean that pieces of the wall surface get pulled off with the tile.
What is the best tool for removing tile adhesive?
A stiff putty knife or a dedicated adhesive scraper is generally the best tool for removing tile adhesive. For very stubborn or thick adhesive, an oscillating multi-tool with a scraper attachment can be very effective, though it requires more care. A wire brush can also help with smaller, hardened bits.
This comprehensive guide provides all the steps and considerations for successfully tackling kitchen tile removal and preparing your walls for a beautiful new look. With patience and the right tools, this DIY backsplash removal project is well within your reach.