
Image Source: shop.moen.com
How To Repair Moen Kitchen Faucet: Step-by-Step DIY Guide
Can I repair my Moen kitchen faucet myself? Yes, you can! Many common Moen kitchen faucet issues, like leaks, drips, or a stiff handle, can be fixed with basic tools and a little patience. This guide will walk you through the process of Moen faucet repair, from diagnosing the problem to replacing parts and performing routine maintenance. We’ll cover everything you need to know about Moen kitchen faucet parts, common Moen faucet troubleshooting, and even basic Moen faucet installation if you’re starting from scratch.
Identifying Common Moen Faucet Problems
Before you can fix your Moen faucet, you need to know what’s wrong. A leaky Moen faucet is often the most common complaint, but a persistent Moen faucet drip or a difficult-to-move Moen faucet handle replacement might also be on your radar. Sometimes, the issue is with the Moen faucet spout repair, where water might leak from the base of the spout.
Here are some frequent problems and their likely causes:
- Leaky Moen faucet or Moen faucet drip from the spout: This usually points to a worn-out Moen faucet cartridge or damaged O-rings within the spout.
- Water leaking from the handle base: This often indicates a problem with the O-rings or seals around the cartridge.
- Low water pressure: This could be a clogged aerator, or sediment buildup within the faucet body or supply lines.
- Stiff or difficult-to-move handle: The cartridge might be mineralized or damaged, or the handle itself might be corroded.
- Water leaking from the base of the faucet: This can be due to loose mounting nuts underneath the sink or worn-out seals at the base.
Essential Tools for Moen Faucet Repair
Gathering the right tools before you start will make your Moen faucet repair much smoother. You don’t need a professional plumber’s toolkit, but a few basic items are essential.
- Adjustable Wrench: This is crucial for loosening and tightening various nuts and fittings.
- Phillips Head Screwdriver: For removing handle screws and escutcheons.
- Flathead Screwdriver: Useful for prying off decorative caps or gently loosening parts.
- Allen Wrench Set (Hex Keys): Many Moen faucets use small set screws that require Allen wrenches.
- Pliers (Slip-joint or Channel Locks): For gripping and turning stubborn parts.
- Utility Knife or Small Pry Tool: For carefully removing decorative caps or seals.
- Bucket or Towels: To catch any residual water when you disconnect supply lines or remove parts.
- Plumber’s Grease or Silicone Lubricant: To help with reassembly and ensure smooth operation of new parts.
- Replacement Parts: This is key! We’ll discuss how to identify and obtain the correct Moen kitchen faucet parts.
Step-by-Step Guide to Moen Faucet Repair
This section breaks down the most common Moen faucet repair tasks. Remember to always turn off the water supply before starting any work.
Step 1: Shutting Off the Water Supply
This is the absolute first step for any Moen faucet repair.
- Locate the Shut-Off Valves: Look under your kitchen sink for two small valves connected to the water supply lines that go up to the faucet. One is for hot water, and the other is for cold.
- Turn Off the Valves: Turn the handles of both valves clockwise until they are completely closed.
- Test: Turn on the faucet to drain any remaining water in the lines and to confirm that the water is indeed shut off. If water still flows, you may need to shut off the main water supply to your house.
Step 2: Removing the Faucet Handle
This is often the first obstacle in many Moen faucet repairs.
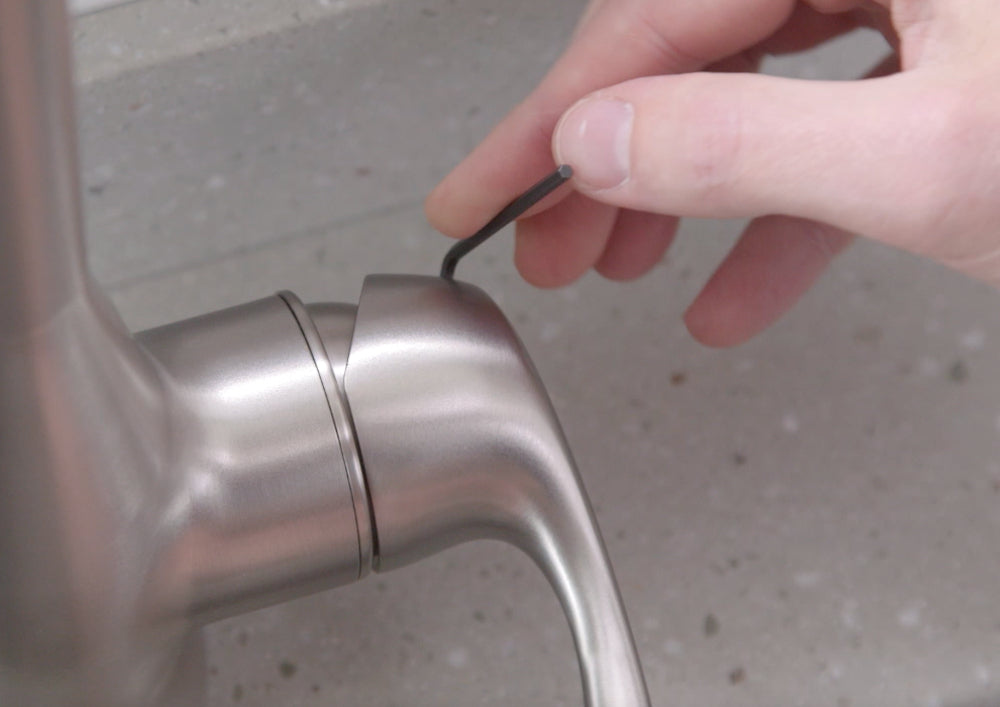
- Find the Set Screw: Most Moen faucet handles have a small set screw that secures them to the valve stem. This screw is usually hidden under a decorative cap or plug.
- Remove the Decorative Cap: Gently pry off the decorative cap (often marked with a blue or red dot) with a flathead screwdriver or a utility knife. Be careful not to scratch the faucet finish.
- Unscrew the Set Screw: Use the appropriate Allen wrench or screwdriver to loosen and remove the set screw. Keep track of this screw – it’s small and easy to lose!
- Lift Off the Handle: Once the set screw is removed, the handle should lift straight up and off the valve stem. If it’s stuck, try gently wiggling it or tapping it lightly. Avoid excessive force.
Step 3: Accessing and Replacing the Moen Faucet Cartridge
The Moen faucet cartridge is the heart of your faucet. If you have a leaky Moen faucet or a Moen faucet drip, this is often the culprit.
- Remove the Escutcheon/Bonnet Nut: After removing the handle, you’ll see a decorative escutcheon or a bonnet nut that covers the cartridge. You might need an adjustable wrench to unscrew this. Turn it counter-clockwise.
- Expose the Cartridge: Once the bonnet nut is off, the Moen faucet cartridge will be visible. It’s usually a cylindrical piece, often made of brass or plastic.
- Remove the Cartridge Retaining Clip (if applicable): Some Moen cartridges are held in place by a small retaining clip or nut. Use pliers to carefully pull out the clip or unscrew the nut.
- Remove the Cartridge: This is often the trickiest part of Moen faucet repair. The cartridge might be stuck due to mineral buildup.
- Moen Cartridge Puller Tool: For most modern Moen faucets, a Moen cartridge puller tool is highly recommended. This specialized tool makes removing a stubborn cartridge much easier. You can usually rent or purchase one from a hardware store.
- Without a Puller: If you don’t have a puller, you might be able to gently rock the cartridge back and forth while pulling upwards with pliers. Be extremely careful not to damage the faucet body. Some cartridges have notches you can grip with pliers.
- Identify the Old Cartridge: Take the old cartridge with you to the store to ensure you buy the exact correct Moen kitchen faucet parts for your model. Moen has many different cartridge types.
- Install the New Cartridge:
- Lubricate: Apply a thin layer of plumber’s grease or silicone lubricant to the O-rings of the new cartridge.
- Align: Ensure the new cartridge is oriented correctly. There are usually notches or tabs that need to line up with corresponding slots in the faucet body.
- Insert: Gently push the new cartridge into place. It should slide in smoothly.
- Secure: Reinstall the retaining clip or nut, if your model has one.
- Reassemble the Faucet:
- Screw the bonnet nut or escutcheon back on.
- Place the handle back onto the valve stem, aligning it correctly.
- Tighten the set screw.
- Snap the decorative cap back into place.
Step 4: Addressing a Leaky Moen Faucet Spout Repair or Spout Dripping
If your leak is specifically from the spout itself, or if water drips from the spout when the faucet is off, the issue might be with the spout O-rings or the cartridge again.
- Remove the Spout:
- Pry off Decorative Caps: Some spouts have a decorative cap at the base that hides a retaining screw.
- Unscrew Retaining Screw: Unscrew any visible screws at the base of the spout.
- Lift Spout: Gently wiggle and lift the spout straight up to remove it.
- Inspect and Replace O-rings:
- You’ll find one or more O-rings around the base of the spout where it connects to the faucet body.
- Carefully remove the old O-rings using a small screwdriver or utility knife.
- Clean the spout and the faucet body where the O-rings sit.
- Lubricate the new O-rings with plumber’s grease and slide them into place.
- Reinstall the Spout:
- Push the spout back down onto the faucet body, ensuring it’s seated properly.
- Reinstall any retaining screws or caps.
- Check the Cartridge: If replacing the O-rings doesn’t stop the spout drip, the problem might still be the Moen faucet cartridge, and you’ll need to follow the steps in Step 3.
Step 5: Fixing Low Water Pressure
This issue can be caused by several factors.
- Clean the Aerator:
- The aerator is the small screen at the tip of the spout.
- Unscrew the aerator by hand or with pliers (wrap the pliers with tape to avoid scratching).
- Disassemble the aerator components (usually a screen and a washer).
- Rinse all parts under running water to remove debris. You can use an old toothbrush to scrub the screen gently.
- For stubborn mineral deposits, soak the aerator parts in a bowl of white vinegar for a few hours.
- Reassemble and screw the aerator back onto the spout.
- Check Supply Lines:
- With the water shut off, disconnect the supply lines from the faucet inlets.
- Place a bucket underneath.
- Briefly turn on the shut-off valves to check the water flow from the supply lines. If the flow is weak, the issue is with the water supply or valves, not the faucet itself.
- If the supply lines appear clogged, they may need to be replaced.
- Flush the Faucet Body:
- With the faucet handle removed and the cartridge out, briefly turn on the water supply valves. This will flush out any debris that might be inside the faucet body. Be prepared for water to shoot out!
- Turn the water off again.
- Reinstall the cartridge and reassemble the faucet.
Step 6: Moen Faucet Handle Replacement Due to Stiffness or Damage
If your handle is loose, wobbly, or just doesn’t feel right, it might be time for a Moen faucet handle replacement or a more thorough inspection.
- Check for Looseness: First, ensure the handle’s set screw is tight. Sometimes, the handle can loosen over time.
- Inspect the Valve Stem: With the handle removed, check the valve stem itself. Is it corroded, bent, or damaged? If so, the cartridge and stem assembly may need to be replaced.
- Replace the Handle: If the handle itself is cracked or stripped where it attaches to the stem, you’ll need to find a replacement handle. Bring the old handle or its part number to a hardware store to match it. The process is the same as removing it: unscrew the set screw and lift it off. Then, slide the new handle on and tighten the set screw.
Moen Faucet Maintenance Tips
Regular Moen faucet maintenance can prevent many common problems and extend the life of your faucet.
- Clean Regularly: Wipe down your faucet with a soft, damp cloth after each use to prevent water spots and mineral buildup. Use a mild soap solution if necessary, but avoid abrasive cleaners or scouring pads that can damage the finish.
- Check for Leaks Periodically: Even if you don’t have a noticeable problem, take a moment every few months to check for any small drips or leaks around the handle, spout, or base.
- Address Minor Issues Promptly: Don’t let small drips turn into bigger problems. Fixing a minor leak early is much easier and cheaper than dealing with water damage later.
- Mineral Buildup: If you have hard water, you might notice mineral buildup. You can gently clean these areas with a soft brush and a solution of water and white vinegar.
Moen Faucet Installation: A Brief Overview
If you’re installing a new Moen kitchen faucet, the process generally involves:
- Shutting off water: Just like for repairs.
- Removing the old faucet: Disconnect water supply lines and mounting hardware under the sink.
- Preparing the sink area: Clean the sink surface.
- Assembling the new faucet: Follow the manufacturer’s instructions for your specific Moen model.
- Mounting the faucet: Secure the faucet to the sink from underneath.
- Connecting water supply lines: Attach hot and cold water supply lines to the faucet inlets and the shut-off valves.
- Turning on water and testing: Slowly turn the shut-off valves back on and check for leaks at all connections. Test the faucet’s operation.
Important Note: While this guide covers common Moen faucet repair tasks, some issues might require specialized knowledge or tools. If you’re uncomfortable at any point, it’s always best to call a qualified plumber.
Table: Common Moen Faucet Problems and Solutions
| Problem | Likely Cause | Solution |
|---|---|---|
| Leaky Moen faucet from spout | Worn cartridge O-rings or damaged cartridge | Replace Moen faucet cartridge; Replace spout O-rings. |
| Moen faucet drip from spout | Worn cartridge O-rings or damaged cartridge | Replace Moen faucet cartridge; Replace spout O-rings. |
| Water leaks from handle base | Worn O-rings around the cartridge | Replace O-rings under the handle or replace the Moen faucet cartridge. |
| Low water pressure | Clogged aerator or sediment in faucet body | Clean or replace the aerator; Flush the faucet body. |
| Stiff or hard-to-move handle | Mineral buildup or worn cartridge | Replace Moen faucet cartridge; Lubricate valve stem. |
| Leaks from faucet base | Loose mounting nuts or worn seals | Tighten mounting nuts underneath the sink; Replace base seals if needed. |
| Loose or wobbly handle | Loose handle set screw or worn handle connection | Tighten set screw; Replace handle if connection is stripped. |
| No hot or cold water | Closed shut-off valve or faulty cartridge | Ensure shut-off valves are fully open; Replace Moen faucet cartridge. |
Frequently Asked Questions (FAQ) about Moen Faucet Repair
Q1: How often should I replace my Moen faucet cartridge?
There’s no set schedule for replacing a Moen faucet cartridge. They are designed to last for many years. You typically only need to replace it when you experience problems like leaks or difficulty operating the handle.
Q2: Where can I find Moen kitchen faucet parts?
You can find Moen kitchen faucet parts at most major hardware stores (e.g., Home Depot, Lowe’s), plumbing supply stores, and online retailers. It’s best to have the model number of your faucet or the old part to ensure you get the correct replacement.
Q3: Can I use generic parts for my Moen faucet?
While some generic parts might fit, it’s highly recommended to use genuine Moen kitchen faucet parts. This ensures proper fit, function, and durability, and it will help you avoid further complications during Moen faucet repair.
Q4: My Moen faucet is old. Is it worth repairing or should I replace it?
If your faucet is very old and showing signs of significant wear or corrosion, it might be more cost-effective in the long run to replace the entire unit. However, for most common issues like a leaky Moen faucet or a faulty cartridge, repair is usually the best option.
Q5: What is the purpose of an aerator on a faucet?
An aerator mixes air into the water stream, creating a softer, more uniform flow and reducing splashing. It also helps conserve water and can prevent debris from entering the faucet.
Q6: How do I identify my Moen faucet model number?
The model number is often found on a sticker or plate located on the underside of the faucet body, beneath the sink, or on the original packaging. If you can’t find it, taking clear photos of your faucet to a hardware store can help them identify the correct Moen kitchen faucet parts.
By following these steps and tips, you’ll be well-equipped to handle most common Moen kitchen faucet repair needs, keeping your faucet working smoothly and efficiently.