
Do you want to stop your kitchen island from wobbling? Are you looking for ways to secure a freestanding island? Yes, you can bolt your kitchen island to a concrete floor for solid support. There are many ways to make your island stable. This guide will show you how to install a fixed kitchen island securely. It also covers how to secure an island to a tile floor. We will look at many kitchen island anchoring methods to help you find the best solution for your home.
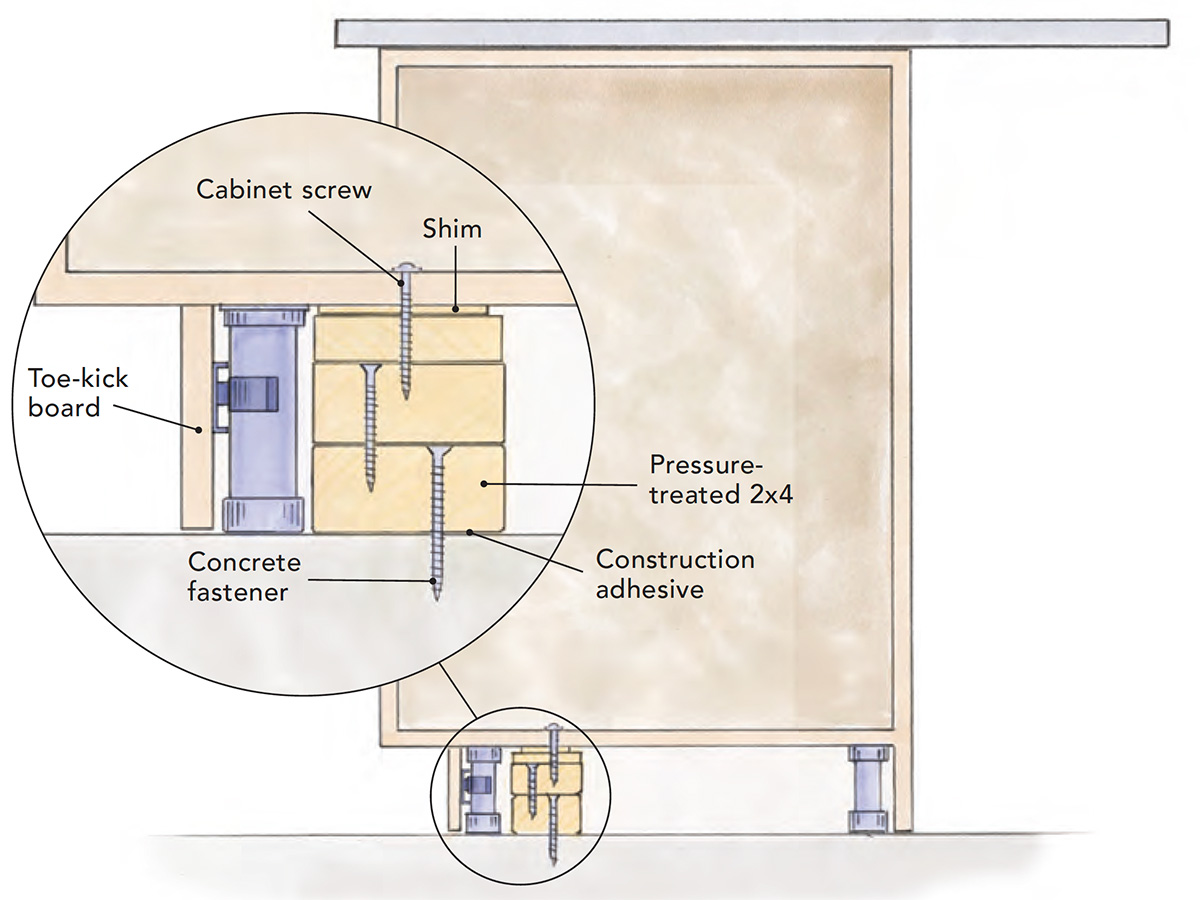
Image Source: images.finehomebuilding.com
Why Your Kitchen Island Needs To Be Secure
A kitchen island is often the heart of the home. It is a place for cooking, eating, and gathering. But an island that moves or tips can be very dangerous. It can cause injuries if it falls. It can also damage your floor or kitchen items. A secure island gives you peace of mind. It stays put, no matter how much activity happens around it.
A stable island also works better. You can chop food safely. You can lean on it without fear. Over time, an unsecured island can also damage itself. Joints can loosen. Its parts can break. Properly securing your island is a smart step. It keeps your kitchen safe and beautiful for many years. It also adds value to your home.
Planning Before You Secure Your Island
Before you start any work, you need a good plan. Think about your island and your floor. What kind of island do you have? What is your floor made of? Having the right tools and knowing the steps makes the job easier and safer.
Assessing Your Island Type
Kitchen islands come in different types. Knowing your type helps you choose the best way to secure it.
- Freestanding Islands: These islands are not built into your kitchen. You can move them around. They often have wheels or legs. They are easy to move, but they can also tip easily. You will want to use special methods to make a freestanding island secure.
- Fixed Islands: These islands are built into your kitchen design. They look like part of the house. They often have cabinets and a countertop. They are usually heavy. These islands need strong kitchen island anchoring methods. This is key for installing a fixed kitchen island.
- Mobile Islands: These are like freestanding islands but are made to be moved often. They usually have heavy-duty wheels. Securing them means adding locks to the wheels or using temporary anchors.
Checking Your Floor Type
The type of floor you have changes how you secure the island. Some floors are easy to work with. Others need special care.
- Concrete Floors: These are very strong. You can use strong bolts to secure the island. Bolting island concrete floor gives a very solid hold. This is good for heavy island fastening.
- Wood Subfloors: Many homes have wood floors under the finished layer. You can screw into the wood. If you can find the floor joists, that’s even better. Floor joist island attachment makes for a very strong connection.
- Tile Floors: Securing island to tile floor needs care. You must drill through the tile without cracking it. Then, you anchor into the material underneath. You cannot just drill into the tile itself. That will not hold.
- Hardwood Floors: Like tile, you drill through the finished wood. Then, you secure into the subfloor or joists below. Be careful not to damage the visible wood.
Tools and Materials You Will Need
Having the right tools is important for safety and success. Here is a list of common items:
- Drill: A powerful drill is needed. It should have a hammer drill setting for concrete.
- Drill Bits: You will need bits for wood, tile, or concrete. Make sure they are the right size for your anchors.
- Tape Measure: For finding the right spot.
- Level: To make sure your island is flat. This helps prevent kitchen island wobble.
- Pencil: To mark drilling spots.
- Stud Finder: To find wood joists under the floor. This is vital for floor joist island attachment.
- Safety Glasses: Protect your eyes from dust and debris.
- Gloves: Protect your hands.
- Anchors/Bolts: Specific types for your floor and island. These are part of your kitchen island anchoring methods.
- Washers and Nuts: To secure bolts tightly.
- L-Brackets or Other Brackets: Strong metal pieces for linking the island to the floor. Custom island mounting hardware might be needed for special designs.
- Shims: Small thin pieces of wood or plastic. Use them to make the island perfectly level.
- Caulk or Sealant: To seal holes, especially on tile floors, if needed.
Common Kitchen Island Anchoring Methods
There are several proven ways to secure a kitchen island. The best method depends on your island type and floor type. Each method offers good kitchen island stability solutions.
Method 1: Bolting to a Concrete Floor
This method provides the strongest hold. It is perfect for heavy island fastening and for installing a fixed kitchen island.
- Step 1: Mark the Spot. Place your island exactly where you want it. Use a pencil to mark the floor at each corner of the island’s base. You might mark inside the cabinet base where legs meet the floor.
- Step 2: Check for Obstacles. Use a pipe and wire detector if you have one. Make sure you will not drill into pipes or electrical lines in the concrete. This is very important for safety. If unsure, call a professional.
- Step 3: Drill Pilot Holes. Move the island out of the way. Use a hammer drill with a masonry bit. Drill holes into the concrete at your marks. The holes should be slightly deeper than your anchor bolts. Make sure the drill bit matches the size of your concrete anchors.
- Step 4: Clean the Holes. Use a shop vacuum to suck out all dust from the holes. Clean holes make for stronger anchors.
- Step 5: Insert Anchors. Place concrete wedge anchors or sleeve anchors into the holes. They should fit snugly.
- Step 6: Position the Island. Carefully slide the island back into place. Line up the marked spots on the island’s base with the anchors in the floor.
- Step 7: Attach the Island. From inside the island’s base, drill through the island’s bottom plate into the anchors. Use a drill bit slightly larger than your bolt. Then, push the bolts down through the island’s base and into the anchors. Use washers and nuts to tighten the bolts. Make them very snug. This completes the bolting island concrete floor process.
Method 2: Attaching to a Wood Subfloor or Joists
This method is common for homes with wood construction. It uses the strength of the wood framing. Floor joist island attachment gives excellent stability.
- Step 1: Find the Joists. Use a stud finder to locate floor joists. Joists are the strong wood beams under your floor. They are usually 16 or 24 inches apart. Mark their location with a pencil. Try to place your island so its attachment points line up with these joists. This is the best way for floor joist island attachment.
- Step 2: Mark Drilling Points. Position your island. Mark the spots on the island’s base where you want to secure it. Aim for spots that align with the joists if possible. If not, you will drill into the subfloor.
- Step 3: Drill Pilot Holes. Move the island. Drill pilot holes through the finished floor and into the subfloor or joists. Use a wood drill bit. The hole size depends on your screws or lag bolts. Make sure the holes are straight.
- Step 4: Secure the Island. Place the island back. Line up the holes. Use long, strong wood screws or lag bolts. Drive them through the island’s base and into the subfloor or joists. Make sure the screws are long enough to go deep into the wood. Use washers under the screw heads for a better grip. This is a great kitchen island stability solution.
Method 3: Securing an Island to a Tile Floor
Securing island to tile floor needs special care to avoid cracking the tiles. It is a two-step process: drilling through the tile, then anchoring into the subfloor or concrete below.
- Step 1: Mark and Mask. Place the island. Mark the drill spots on the tile surface. Put painter’s tape over these spots. This helps prevent the drill bit from slipping. It also reduces tile chipping.
- Step 2: Drill Through Tile. Use a specialized tile or diamond-tipped drill bit. Start drilling slowly. Do not use the hammer drill setting yet. Apply gentle pressure. Keep the drill bit wet with a little water to keep it cool and prevent cracking. Once you are through the tile, switch to a wood or masonry bit, depending on what is under the tile.
- Step 3: Drill Into Substrate. Continue drilling into the subfloor (wood) or concrete below. Follow the steps for “Bolting to a Concrete Floor” or “Attaching to a Wood Subfloor.”
- Step 4: Insert Anchors/Screws. Place the correct anchors (for concrete) or drive screws (for wood) into the substrate. Make sure they go through the tile cleanly.
- Step 5: Attach Island. Move the island back into place. Line up the holes. Drive screws or bolts through the island’s base and into the anchors or wood. Use washers to protect the island’s base. Tighten everything firmly. If you want, you can seal the gaps around the bolts with caulk for extra protection. This finishes securing island to tile floor.
Method 4: Using Brackets and L-Brackets
This method is very flexible. It works well for a freestanding island secure setup, or when you cannot drill directly through the island base. It often uses custom island mounting hardware.
- Step 1: Choose Brackets. Select strong L-brackets or flat metal plates. Choose brackets made from heavy-gauge steel. The size should fit well inside your island base. You might need custom island mounting hardware for unique islands.
- Step 2: Position Brackets. Place your island. Inside the island base, decide where the brackets will go. They usually go at the corners or along the sides. Make sure they are hidden from view.
- Step 3: Mark and Drill Island. Hold a bracket in place. Mark the screw holes on the island’s base. Drill pilot holes into the island. Screw the brackets securely to the inside of the island’s base. Use wood screws that are long enough to hold well, but not so long they go through the outside of the island.
- Step 4: Mark and Drill Floor. Once brackets are attached to the island, mark the floor through the remaining holes in the brackets. Move the island slightly. Drill pilot holes into the floor. Use the correct drill bit for your floor type (wood, concrete, or tile).
- Step 5: Secure to Floor. Place the island back. Line up the brackets with the floor holes. Drive screws or bolts through the brackets and into the floor. Use washers. Tighten everything firmly. This is a common way to make a freestanding island secure.
Method 5: Employing Cabinet Fasteners
If your island is made of standard kitchen cabinets, you can use cabinet fastening methods. This is often used for installing fixed kitchen island units that are made from modular cabinets.
- Step 1: Prepare Cabinets. Place the individual cabinet units that make up your island. Use cabinet clamps to hold them tightly together. Screw the cabinets to each other through their face frames. Use short, strong cabinet screws.
- Step 2: Attach to Floor. From inside the island cabinets, you will drill through the bottom panel or kick plate. Mark spots for screws or bolts. Make sure these spots are strong parts of the cabinet.
- Step 3: Drill and Secure. Follow the steps from Method 2 (Wood Subfloor) or Method 1 (Concrete Floor) to drill into your floor. Use screws or bolts through the bottom of the cabinet base. This method is part of basic kitchen island anchoring methods for pre-made islands.
Addressing Specific Challenges
Sometimes, securing an island presents unique problems. Here are some solutions for common issues.
Preventing Kitchen Island Wobble
A wobbly island is annoying and unsafe. Here’s how to prevent kitchen island wobble:
- Leveling: The first step to preventing wobble is making sure the island is perfectly level. Use a long level. Adjust the island’s feet or use shims under the base. Shims are small, thin pieces of wood or plastic. Put them under the low spots until the island is perfectly flat on the floor.
- Strong Connections: Make sure all screws and bolts are tightened well. Loose connections lead to wobble.
- Multiple Anchor Points: Use at least four anchor points, one near each corner. For very large islands, add more anchor points in the middle. More points mean more stability. This is key for kitchen island stability solutions.
- Reinforce the Base: If the island’s base itself feels weak, you might need to add extra wood blocks inside for the screws to bite into. This gives screws a stronger hold.
Securing Large or Heavy Islands
For very large or heavy island fastening, you need extra strong methods.
- More Anchors: Instead of just four, use six or eight anchor points. Space them evenly around the base.
- Larger Bolts/Screws: Use bigger diameter and longer bolts or lag screws. These can hold more weight.
- Epoxy Anchors (for Concrete): For extreme heavy island fastening on concrete, consider epoxy anchors. These involve filling the drilled hole with a strong epoxy glue before inserting a threaded rod. Once the epoxy cures, it forms an incredibly strong bond. This requires special care and tools.
- Double Joist Attachment: If attaching to wood, try to connect to two parallel joists if possible. Or, add blocking between joists for extra support.
Working with Custom Islands
Custom islands often have unique designs. This might mean you need custom island mounting hardware.
- Inspect the Design: Look closely at how your custom island is built. Where are the strongest points at the bottom? Where can you attach safely without showing screws?
- Special Brackets: Sometimes, standard L-brackets won’t work. You might need to have metal plates or custom brackets made. A metal fabricator can make custom island mounting hardware to fit your island perfectly.
- Consult the Builder: If a professional built your island, ask them for advice. They might have planned for securing it. They can tell you the best spots for attachment.
- Hidden Fasteners: For a clean look, try to use hidden fasteners. These can be screws driven from inside cabinets or special connectors that fit into grooves.
Step-by-Step Installation Guides (Summaries)
Here is a quick look at the main steps for each method.
For Bolting to Concrete Floor:
- Mark island position.
- Check for hidden lines.
- Drill holes in concrete (hammer drill, masonry bit).
- Clean holes.
- Insert concrete anchors.
- Position island.
- Drill through island base.
- Secure with bolts, washers, nuts.
For Attaching to Wood Subfloor/Joists:
- Find floor joists (stud finder).
- Mark island position.
- Drill pilot holes through floor into subfloor/joists.
- Position island.
- Secure with long wood screws or lag bolts.
For Securing to Tile Floor:
- Mark and tape tile.
- Drill slowly through tile (tile/diamond bit, water).
- Continue drilling into subfloor/concrete.
- Insert correct anchors/screws.
- Position island.
- Secure with screws/bolts.
- (Optional) Seal with caulk.
For Using Brackets:
- Choose strong L-brackets.
- Position brackets inside island base.
- Drill and screw brackets to island.
- Mark floor through brackets.
- Move island, drill floor holes.
- Position island, secure brackets to floor with screws/bolts.
For Cabinet Fasteners:
- Clamp and screw cabinet units together.
- Mark drill spots through cabinet base/kick plate.
- Drill into floor (wood/concrete method).
- Secure cabinets to floor with screws/bolts.
Post-Installation Checks and Maintenance
After you secure your island, do a few checks. This makes sure it is truly stable.
- Test for Wobble: Push against the island from all sides. Try to shake it. It should not move at all. If it does, find the loose spot and tighten it. This confirms you have good kitchen island stability solutions.
- Check All Fasteners: Go back and check all screws and bolts. Make sure they are still tight. Over time, things can loosen.
- Inspect for Damage: Look for any cracks in the floor around the anchor points, especially on tile. Address any issues quickly.
- Regular Checks: It is a good idea to check the island’s stability once a year. A quick push test can tell you if anything has loosened. Re-tighten anything that needs it.
Benefits of a Secure Island
A well-secured kitchen island brings many good things to your home:
- Enhanced Safety: This is the most important benefit. No more worries about the island tipping over. This keeps your family and guests safe.
- Increased Stability for Tasks: You can chop, knead dough, or use small appliances with full confidence. The island will not move.
- Longer Lifespan for Your Island: When an island is secure, its joints and materials are less stressed. This means it will last longer. You save money on repairs or replacements.
- Better Appearance: A stable island looks more professional and well-built. It shows good craftsmanship.
- Higher Home Value: A fixed, secure island is a sign of a well-maintained home. This can add to your home’s appeal and value if you ever sell.
- Peace of Mind: Knowing your island is safe and strong lets you enjoy your kitchen more.
Securing your kitchen island is a project that pays off in many ways. It may seem like a big job, but with the right steps and tools, it is a very doable DIY task. Your kitchen will be safer, more functional, and more enjoyable for everyone.
Frequently Asked Questions (FAQ)
How do I know if my kitchen island needs to be secured?
If your kitchen island rocks, wiggles, or shifts when you lean on it or push it, it needs to be secured. Any movement means it is not stable.
Can I secure an island without drilling into my floor?
It is very hard to secure an island firmly without drilling. Some very heavy islands might stay put due to their weight. But for true safety, especially with active families, drilling is almost always needed. Heavy island fastening usually involves drilling.
Is it difficult to secure an island to a tile floor?
It is not difficult, but it needs care. The main thing is using the correct drill bit for tile and drilling slowly. This prevents cracking the tile. After that, you drill into the subfloor or concrete below, just like other methods.
What type of anchors should I use for a concrete floor?
For concrete, use wedge anchors or sleeve anchors. These are designed to expand and grip the concrete tightly when a bolt is tightened into them.
How do I find the floor joists under my wood floor?
Use an electronic stud finder. Run it across the floor in the area where the island will sit. It will beep or light up when it detects a joist. Mark the joist’s edges.
What if my island has wheels?
If your island has wheels, make sure they have good locking mechanisms. For extra security, you can replace the wheels with fixed legs and then use one of the securing methods listed in this guide. Or, you can find special brackets that hold the wheels in place and attach to the floor.
Can I do this project myself, or should I hire a professional?
Many homeowners can do this project. If you are comfortable using a drill and following instructions, you can likely do it. However, if you have any doubts, or if your floor has hidden pipes/wires, it’s always best to hire a professional handyman or contractor. Safety comes first.