
Image Source: chefdepot.net
How To Sharpen A Kitchen Knife With Rod: Step-by-Step Guide
Can you sharpen a kitchen knife with a rod? Yes, absolutely! Using a sharpening steel, also known as a honing steel or a steel rod for knives, is a crucial part of kitchen knife maintenance. This guide will walk you through the best way to sharpen a knife with a rod, focusing on honing a chef’s knife and achieving professional knife honing results right in your own kitchen.
Why Honing is Essential for Your Knives
A dull knife is not just frustrating; it’s dangerous. When a knife’s edge loses its sharpness, it requires more force to cut. This increased pressure can cause the knife to slip, leading to accidental cuts. Beyond safety, a sharp knife makes food preparation more enjoyable and efficient. It slices cleanly, preserving the cellular structure of food for better taste and texture.
While sharpening actually removes a small amount of metal to create a new, sharp edge, honing, on the other hand, realigns and straightens the microscopic teeth of the blade’s edge. Over time, these teeth get bent and distorted through normal use. A honing steel, whether it’s a traditional steel rod for knives or a ceramic rod, works by smoothing out these imperfections, restoring the blade’s keenness without significant metal removal. This is why regular honing is a vital component of proper kitchen knife maintenance.
Types of Honing Rods
Before we dive into the sharpening steel technique, let’s look at the different types of rods you might encounter:
- Steel Honing Rods: These are the most common type. They are made of steel and are excellent for daily or frequent honing. They work by physically straightening the microscopic edge.
- Ceramic Honing Rods: Ceramic rods are harder than steel and can actually remove a small amount of metal. They are good for honing slightly duller knives or for those who prefer a finer edge. They are also non-metallic, meaning they won’t add steel particles to your food.
- Diamond Honing Rods: These are the hardest and most aggressive. They are coated with diamond particles and are best for re-sharpening moderately dull knives. They remove metal quickly, so they should be used sparingly. For daily honing, a steel rod is generally preferred.
For the purpose of this guide on how to sharpen a kitchen knife with a rod, we will primarily focus on the use of a traditional honing steel or steel rod for knives.
Preparing for the Honing Process
Proper preparation ensures a safe and effective honing session.
What You’ll Need
- Your Kitchen Knife: Ensure it’s clean and dry.
- A Honing Steel (Steel Rod for Knives): Make sure it’s clean.
- A Stable Surface: A cutting board or a damp cloth to prevent the rod from slipping.
- Good Lighting: So you can clearly see what you’re doing.
- Patience: Especially if you’re new to this.
Securing Your Honing Steel
This is a crucial safety step. Most honing steels have a guard or a ring at the base of the handle.
- Using the Guard: Place the guard firmly on your cutting board or a stable countertop. The rod should be pointing upwards.
- Using a Damp Cloth: If your rod doesn’t have a guard, wrap the handle end in a damp cloth and place it firmly against a stable surface. This prevents the rod from sliding out from under you during the honing process.
The Best Way to Sharpen a Knife with a Rod: Step-by-Step
Mastering the sharpening steel technique takes practice, but following these steps will help you achieve excellent results. The goal is to maintain a consistent angle between the knife and the rod.
Step 1: Grip Your Knife
Hold the knife firmly in your dominant hand. Place your thumb on the spine of the blade, just behind the bolster (the thick part where the blade meets the handle). Your index and middle fingers should wrap around the handle, providing a secure grip. Keep your fingers on the handle, not on the blade itself, for safety.
Step 2: Grip Your Honing Steel
Hold the honing steel in your non-dominant hand. Grip the handle securely. The rod should be pointing away from you, angled slightly downwards.
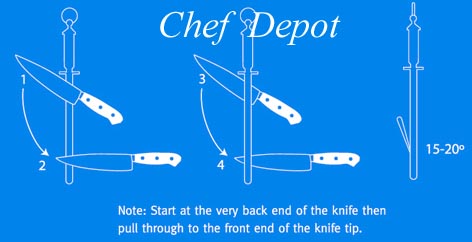
Step 3: Establish the Correct Angle
This is the most critical part of the sharpening steel technique. For most Western-style kitchen knives, an angle of around 15-20 degrees is ideal. For Japanese knives, it’s often a bit steeper, around 10-15 degrees.
- Visualizing the Angle: Imagine the rod is a clock face. You want the blade to meet the rod at roughly the 2 o’clock or 4 o’clock position if you were looking down on the rod. A good way to visualize this is to hold the knife parallel to the cutting board, then lift the spine up slightly.
- Using a Guide: If you’re unsure, you can place the rod flat on the cutting board and then lift the spine of the blade until it’s at the desired angle.
Step 4: The Honing Stroke
- Initial Contact: Bring the heel of the knife (the part closest to the handle) into contact with the tip of the honing steel. Ensure the edge of the blade is touching the steel.
- Smooth, Downward Motion: Apply gentle, even pressure. Draw the knife down the steel, moving from the heel to the tip in one smooth, continuous motion. As you draw the blade down, imagine you are trying to slice a thin layer off the steel.
- Maintain the Angle: Crucially, maintain the 15-20 degree angle throughout the entire stroke. Don’t let the spine of the knife dig into the steel or the edge lift away.
- Repeat on the Other Side: Once you’ve completed the stroke on one side of the blade, flip the knife over and repeat the same motion on the other side of the honing steel. Use the same number of strokes for each side to ensure even honing.
Step 5: Alternate Sides
For effective honing, you’ll alternate sides. A common approach is to do a set number of strokes on one side, then the same number on the other.
- Typical Stroke Count: Start with 5-10 strokes on each side. You can adjust this based on how dull your knife is and your personal preference. The key is consistency.
Step 6: Honing the Entire Blade
Ensure you are honing the entire length of the blade, from heel to tip. Sometimes, people only hone the middle section.
- Heel to Tip: Start with the heel of the knife at the top of the rod and finish with the tip of the knife at the bottom of the rod. This ensures the entire edge gets straightened.
Step 7: Checking for Sharpness
After completing your strokes, it’s time to test the edge.
- The Paper Test: The easiest way to check is with a piece of paper. Hold the paper vertically and try to slice through it with the knife. A sharp knife should slice through the paper cleanly with minimal effort, without snagging or tearing.
- The Tomato Test: Another classic test is to try slicing a ripe tomato. A sharp knife will glide through the skin without crushing the flesh.
Step 8: Cleaning Up
After honing, always wipe both the knife blade and the honing steel with a clean cloth to remove any microscopic metal particles or debris.
Common Pitfalls to Avoid
- Incorrect Angle: This is the most common mistake. Too steep an angle can damage the edge, while too shallow an angle won’t effectively hone it.
- Inconsistent Pressure: Applying too much pressure can bend or even break the edge. Too little pressure won’t straighten the microscopic teeth. Aim for a light, consistent pressure.
- Not Honing the Entire Blade: Ensure you’re moving from heel to tip on both sides.
- Using a Dull Honing Steel: Honing steels also wear down over time. If you notice your steel isn’t improving your knife’s edge, it might be time for a new one.
- Treating Honing as Sharpening: Remember, honing straightens; sharpening reshapes. If your knife is truly dull and won’t come back to life with honing, you’ll need a sharpening stone or system.
Tips for Mastering Knife Honing
- Practice Regularly: The more you hone, the more comfortable and proficient you’ll become. Make it a part of your routine, perhaps after every few uses or at the end of each cooking session.
- Focus on Feel: Over time, you’ll develop a feel for the correct angle and pressure.
- Listen: You should hear a faint “hissing” sound as the blade moves across the steel. If it’s a scraping sound, your angle is likely too steep.
- One Side at a Time: It can be easier to focus on perfecting the motion on one side of the blade before switching.
- Watch Professional Demonstrations: If possible, watch a chef or a knife professional demonstrate professional knife honing. Visual learning can be very effective.
Honing a Chef’s Knife: Specific Considerations
A chef’s knife is your workhorse in the kitchen, so keeping its edge in top condition is paramount. The general principles apply, but here are some points to keep in mind specifically for honing a chef’s knife:
- Blade Size: Chef’s knives are typically larger than other kitchen knives. This means you’ll need a honing steel that is at least as long as the blade. A 10-inch steel is a good all-around size for most chef’s knives.
- Weight Distribution: Be mindful of the knife’s weight as you move it across the steel. A heavier knife requires a slightly firmer grip, but still avoid excessive force.
- Heel and Tip: Pay extra attention to the heel and tip sections of a chef’s knife, as these areas are used frequently and can be prone to minor damage or dulling.
When Honing Isn’t Enough: The Difference Between Honing and Sharpening
It’s important to distinguish between honing and sharpening. While a honing steel is invaluable for maintaining an edge, it doesn’t actually sharpen a truly dull blade.
- Honing: Realigns the existing edge. It’s like straightening out bent teeth on a comb.
- Sharpening: Removes metal to create a new, sharp edge. It’s like creating new teeth on a comb.
Table: Honing vs. Sharpening
| Feature | Honing Steel | Sharpening Stone/System |
|---|---|---|
| Purpose | Realigns the blade’s edge | Removes metal to create a new edge |
| Metal Removal | Minimal to none | Significant (controlled removal) |
| Frequency | Frequent (after every few uses or regularly) | Less frequent (when knife is noticeably dull) |
| Result | Restores keenness, improves slicing ability | Restores sharpness to a dull or damaged edge |
| Rod Types | Steel, Ceramic (mild abrasive) | Whetstones (various grits), electric sharpeners, pull-through sharpeners |
If your knife feels noticeably dull and honing doesn’t bring it back to a keen edge, it’s time to sharpen it using a whetstone or another sharpening system. This is where a good knife honing guide can be helpful in understanding when to switch from honing to sharpening.
Frequency of Honing
How often should you hone your knives? This depends on several factors:
- Usage: If you use your knives daily, you should hone them more frequently.
- Knife Quality: Higher-quality knives with harder steel tend to hold an edge longer but can also be more prone to microscopic bending.
- Honing Steel Type: A steel rod is for frequent touch-ups. A ceramic rod can be used for slightly duller edges.
- Personal Preference: Some cooks prefer to hone before every significant use.
A good rule of thumb for kitchen knife maintenance is to hone your primary chef’s knife once a week, or more often if you use it heavily. For less frequently used knives, hone them before you intend to use them.
Professional Knife Honing at Home
Achieving professional knife honing results at home is entirely possible with the right technique and a bit of practice. The key lies in consistency: consistent angle, consistent pressure, and consistent strokes. Think of it as a ritual that enhances your cooking experience.
Frequently Asked Questions About Honing Rods
- What is the difference between a honing steel and a sharpening steel?
While the terms are often used interchangeably, “honing steel” typically refers to a rod that realigns the edge, whereas “sharpening steel” can sometimes refer to rods that also abrade or remove a small amount of metal, like ceramic or diamond rods. Traditional steel rods are primarily for honing. - Can I sharpen a serrated knife with a rod?
No, a honing steel is not suitable for sharpening serrated knives. Serrations require a specialized sharpening method, often using a ceramic rod or stone designed for serrations. - How do I know when my honing steel needs to be replaced?
If you find that your honing steel is no longer effective in restoring your knife’s sharpness, or if it has significant nicks or damage, it’s likely time for a replacement. - What is the best way to clean a honing steel?
Most steel rods can be cleaned with warm water and a mild detergent. Dry it thoroughly after washing to prevent rust. Avoid abrasive cleaners that could damage the steel’s surface. - Is it better to hone before or after using a knife?
Honing before use is generally recommended to ensure the knife is in optimal condition for cutting. However, regular honing throughout use or after a few uses is also beneficial.
By incorporating regular honing into your kitchen knife maintenance routine, you’ll not only extend the life of your knives but also significantly improve your cooking experience. Mastering the sharpening steel technique is a skill that pays dividends in both safety and culinary enjoyment.