
Image Source: guide-images.cdn.ifixit.com
How To Take Apart A KitchenAid Mixer: Full Tutorial for Easy Repair
Can you take apart a KitchenAid mixer for repair? Yes, you can take apart a KitchenAid mixer for repair, and this guide will show you how. Whether your trusty KitchenAid stand mixer is making unusual noises, has lost power, or you suspect a worn-out part, knowing how to safely disassemble it is the first step towards a successful KitchenAid mixer repair. This comprehensive tutorial will guide you through the process of KitchenAid mixer disassembly, focusing on common issues and how to access vital KitchenAid mixer parts. We’ll cover everything from basic KitchenAid bowl removal to more in-depth procedures like accessing the KitchenAid motor housing and potential KitchenAid gear replacement.
KitchenAid stand mixers are iconic for their durability and performance. However, like any mechanical device, they can occasionally require maintenance or repair. Attempting a repair yourself can save you money and give you a deeper appreciation for the engineering behind your appliance. This guide is designed for those who are comfortable with basic tools and enjoy a hands-on approach to appliance care.
Before you begin, it’s essential to gather the right tools and prepare your workspace. A clean, well-lit area will make the process smoother and prevent the loss of small parts. Safety is paramount, so always ensure your mixer is unplugged from the power source before starting any disassembly.
Gathering Your Tools and Supplies
To successfully perform KitchenAid mixer disassembly, you’ll need a specific set of tools. Having these ready before you start will prevent interruptions and ensure you have what you need for each step of the KitchenAid stand mixer service.
Here’s a list of recommended tools and supplies:
- Screwdriver Set: You’ll need Phillips head screwdrivers of various sizes, and potentially flathead screwdrivers for prying.
- Socket Set or Nut Drivers: Metric sizes are common for KitchenAid mixers. A 1/4-inch and 5/16-inch socket or nut driver are frequently used.
- Pliers: Needle-nose pliers are useful for gripping small screws and clips.
- Allen Wrenches (Hex Keys): Some models use Allen screws. A set of metric Allen wrenches is advisable.
- Plastic Pry Tools or Spudgers: These are invaluable for gently separating plastic housings without causing damage.
- Small Container or Magnetic Tray: To keep screws and small parts organized. Labeling them as you remove them is highly recommended.
- Soft Cloth or Towels: For cleaning parts and protecting surfaces.
- Degreaser or Citrus-Based Cleaner: For cleaning greasy components.
- Lubricant: Food-grade grease is necessary if you are replacing gears or lubricating moving parts.
- Replacement Parts (if known): If you’re undertaking a specific repair, have your KitchenAid mixer parts ready.
Having a digital copy or printout of your specific KitchenAid mixer model’s service manual is also incredibly helpful. While this guide covers general disassembly, model-specific instructions can provide crucial details.
Initial Steps: Preparing Your Mixer
Before diving into the internal workings, some preliminary steps ensure a safe and organized disassembly process. These initial actions set the stage for a successful repair.
- Unplug the Mixer: This is the most critical safety step. Ensure the power cord is completely disconnected from the wall outlet. Never attempt disassembly while the mixer is plugged in.
- Remove Accessories and Bowl:
- KitchenAid Bowl Removal: For most models, the bowl is attached by twisting it onto the lift arm or placing it on the base and twisting it to lock. Check your model’s specifics, but generally, it involves a counter-clockwise twist.
- Remove any attachments, like the whisk, beater, or dough hook, from the mixer shaft.
- Clean the Exterior: Wipe down the exterior of your mixer with a damp cloth to remove dust and grime. This makes the overall process cleaner and helps you see any fasteners you might have missed.
- Document Your Progress: As you begin to remove parts, take pictures or short videos with your phone. This visual record is invaluable when it comes time to reassemble your mixer.
Accessing the KitchenAid Motor Housing: The First Layer of Disassembly
The KitchenAid motor housing is where the primary power and drive mechanisms are located. Accessing this area typically involves removing the base cover.
Step 1: Removing the Base Cover Screws
Many KitchenAid mixers have screws located on the underside of the base. These screws secure the bottom cover to the main body.
- Locate the Screws: Flip the mixer upside down carefully. Look for screws around the perimeter of the base. Some models might have rubber feet that need to be gently pried off to reveal hidden screws.
- Use the Correct Screwdriver: Select the appropriate screwdriver bit (usually Phillips) and unscrew each fastener. Keep these screws together in your organized container.
Step 2: Detaching the Base Cover
Once the screws are removed, the base cover should detach.
- Gentle Leverage: Sometimes, the cover can be a bit stiff due to dried grease or tight clips. Use your plastic pry tools to gently work around the seam between the base cover and the mixer body. Avoid using excessive force, which can crack the plastic.
- Separate the Cover: Once loosened, lift the base cover away from the mixer. You might need to maneuver it slightly to clear the power cord entry point.
At this stage, you’ll have your first glimpse into the internal components, likely including the motor, drive shaft, and some gearing.
Deeper Disassembly: Reaching the KitchenAid Gear Replacement Area
If your repair involves the gears, you’ll need to go further into the mixer’s assembly. This often means accessing the head of the mixer.
Step 3: Removing the Head Cover Screws
The head of the mixer, which houses the planetary gear system and the attachment hub, is typically secured by screws.
- Locate Head Screws: These are usually found at the back of the mixer head or sometimes on the sides, near where the tilt-lock mechanism is.
- Remove Screws: Unscrew these fasteners, again, keeping them organized.
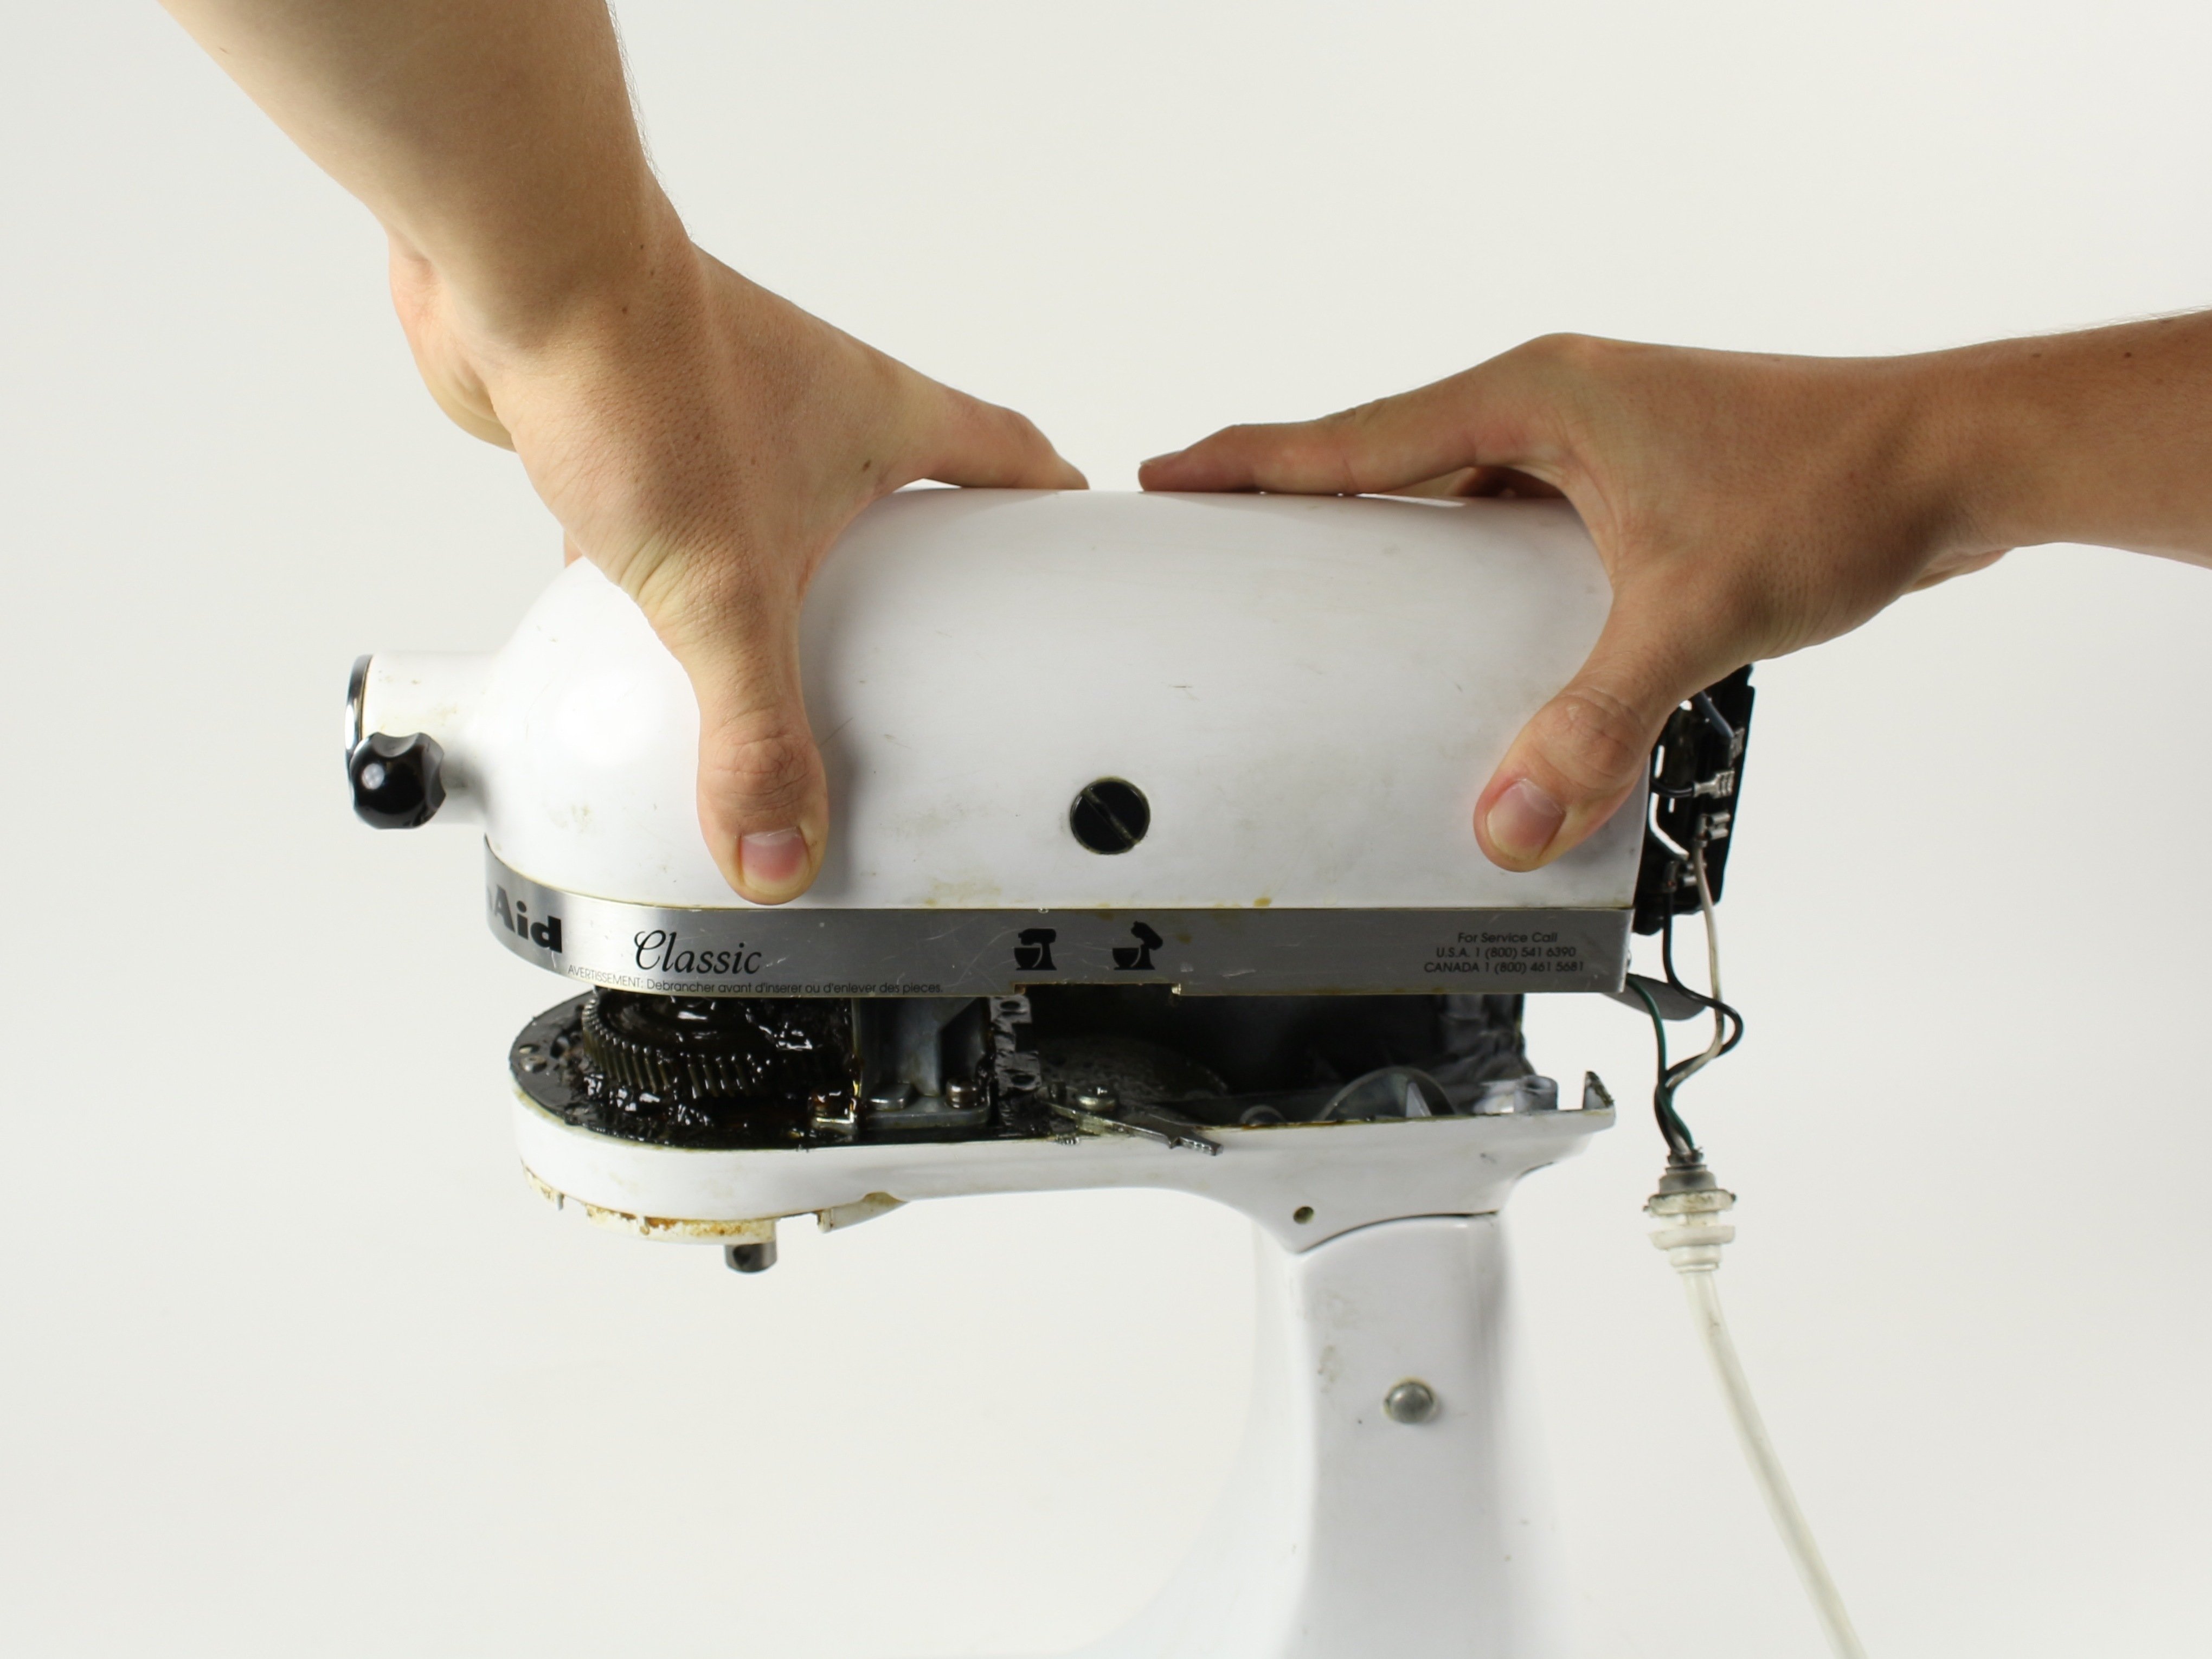
Step 4: Separating the Mixer Head Cover
Similar to the base cover, the head cover might require gentle prying.
- Pry Gently: Use your plastic pry tools to carefully separate the head cover from the main mixer body. There might be clips integrated into the plastic. Work your way around the seam, applying gentle pressure.
- Identify the Attachment Hub: Once the cover is off, you’ll clearly see the KitchenAid attachment hub – the area where you connect things like the pasta maker or meat grinder.
Accessing the KitchenAid Planetary Gear System
The planetary gear system is the heart of your stand mixer, responsible for the beater’s orbital motion. Issues like grinding noises or a mixer that runs but the beater doesn’t move often point to problems here.
Step 5: Removing the Top Housing and Control Panel
To access the planetary gear housing, you often need to remove the top section of the mixer head.
- Unscrew Top Housing: Look for screws securing the top housing, often located on the back or sides of the tilt-head section.
- Disconnect Wiring (if necessary): Some models may have wires connecting the speed control or power switch to the motor. If the top housing is attached by wires, you may need to carefully disconnect them. Note the wire colors and connections if you do this. Many have simple push-on connectors that can be gently pulled apart.
- Lift Off Top Housing: Once free of screws and any wiring, lift the top housing away.
Step 6: Detaching the Planetary Gear Housing
The planetary gear assembly is usually contained within a separate metal housing.
- Locate Housing Screws: This housing is typically held in place by several screws. These are often larger than the ones you’ve removed so far.
- Remove Screws: Unscrew these fasteners.
- Carefully Lift the Housing: Once the screws are out, the planetary gear housing should lift off. Be prepared for small gears and spacers to potentially fall out if not handled carefully. It’s a good idea to have your camera ready to capture the orientation of these parts before you remove the housing.
This is where you’ll most likely be looking if you suspect a KitchenAid gear replacement is needed. You might find damaged teeth on the gears, worn-out bearings, or issues with the grease.
KitchenAid Belt Replacement and Motor Access
The drive belt connects the motor to the gear system. A broken or slipping belt can cause a loss of power or unusual sounds.
Step 7: Accessing the Motor and Belt Assembly
To get to the motor and belt, you’ll typically need to remove more of the mixer’s internal structure.
- Further Base Disassembly: You might need to remove additional components from the base, such as the power cord strain relief or mounting brackets for the motor.
- Motor Mounting Screws: The motor itself is usually secured by mounting screws to the mixer’s frame. Locate and remove these.
- Belt Tension: Note how the belt is tensioned. Sometimes there’s an idler pulley, other times the motor itself can be shifted slightly to allow belt removal.
Step 8: Replacing the Belt
With the motor accessible, replacing the belt is usually straightforward.
- Remove Old Belt: Slip the old belt off the pulleys.
- Install New Belt: Loop the new belt around the motor pulley and the main drive pulley.
- Re-tension and Secure Motor: Ensure the belt is properly seated on both pulleys. If the motor can be shifted for tension, align it and retighten the mounting screws.
Other Potential KitchenAid Mixer Parts to Check
During disassembly for KitchenAid mixer repair, you might encounter other components that could be the source of a problem.
- Control Board/Electronics: For models with electronic speed control, the circuit board is often located in the head or the base. Look for any signs of burnt components or loose connections.
- Motor Brushes: Many older KitchenAid mixers use carbon brushes in the motor. These wear down over time and can cause the motor to stop working or run poorly. Accessing these usually involves removing small covers on the motor itself.
- Speed Control Potentiometer: The dial that controls your mixer’s speed might become worn or faulty. This is often connected to the control board.
- Overtravel Clutch: This mechanism protects the gears from damage if the mixer is overloaded. It can sometimes slip or fail.
Reassembly: Putting it All Back Together
Reassembly is the reverse of disassembly, but requires just as much care.
- Reverse the Steps: Follow your photos and notes to put everything back in the order it came apart.
- Connect Wires: Ensure all electrical connections are secure.
- Align Parts: Make sure gears, shafts, and housings are properly aligned before tightening screws.
- Lubricate: If you replaced gears or found dry bearings, apply a small amount of appropriate lubricant (usually food-grade grease for gears).
- Tighten Screws: Don’t overtighten screws, especially in plastic housings, as this can strip the threads. Snug is usually sufficient.
- Test Functionality: Before plugging it in, manually turn some of the shafts to ensure everything moves freely and without binding.
- Plug In and Test: Once fully assembled, plug in your mixer and test it at various speeds. Listen for unusual noises and check for smooth operation.
Common KitchenAid Mixer Issues and Their Fixes
Here’s a quick guide to common problems and what KitchenAid mixer parts you might need to address:
| Problem | Potential Cause | KitchenAid Mixer Parts Involved |
|---|---|---|
| Mixer won’t turn on | Blown fuse, faulty power cord, worn motor brushes, faulty speed control switch/board. | Power cord, motor brushes, speed control switch, control board. |
| Mixer runs but beater doesn’t spin | Broken drive belt, stripped drive gear (in the planetary system), sheared output shaft pin. | Drive belt, planetary gears, output shaft. |
| Grinding or noisy operation | Worn or damaged planetary gears, lack of lubrication, worn bearings, loose components. | Planetary gears, bearings, lubrication grease. |
| Beater wobbles excessively | Worn splines on the beater shaft or in the mixer head, worn planetary gears. | Planetary gears, mixer head spline. |
| Mixer smells like burning | Overheated motor, worn motor bearings, faulty wiring, slipping belt causing friction. | Motor, motor bearings, wiring, drive belt. |
| Speed control erratic or not working | Faulty speed control potentiometer/switch, issues with the electronic control board. | Speed control potentiometer, control board. |
| Attachment hub seems loose or stripped | Internal splines in the hub assembly or on the attachment drive shaft are worn. | Attachment hub assembly, attachment drive shaft. |
Troubleshooting Tips for KitchenAid Mixer Disassembly
- Patience is Key: Don’t rush the process. Take your time and work methodically.
- Organize, Organize, Organize: Use labeled containers for screws. This is the most common pitfall leading to frustration during reassembly.
- Consult Your Model: If you have a specific model number, search online for its service manual or repair videos. KitchenAid mixer disassembly can vary slightly between models (e.g., Artisan vs. Classic, tilt-head vs. bowl-lift).
- Don’t Force It: If a part feels stuck, there’s likely a hidden screw, clip, or a bit of dried grease holding it. Use your pry tools gently and look for fasteners you might have missed.
- Take Pictures: Seriously, take pictures at every step. It’s better to have too many photos than not enough.
- Know When to Stop: If you find yourself in over your head or dealing with complex electronics you’re not comfortable with, it’s okay to seek professional KitchenAid stand mixer service.
Frequently Asked Questions (FAQ)
Q1: How often should I service my KitchenAid mixer?
A: Most KitchenAid mixers don’t require regular scheduled servicing unless you use them very heavily. However, if you notice unusual noises, slower performance, or loss of power, it’s a good time to inspect and potentially perform KitchenAid mixer repair. For heavy users, a check of lubrication and internal components every few years is advisable.
Q2: Where can I buy KitchenAid mixer parts?
A: You can purchase genuine KitchenAid mixer parts directly from the official KitchenAid website. Many authorized appliance parts retailers online and some local appliance repair shops also stock a wide range of KitchenAid mixer parts. Ensure you have your mixer’s model number to order the correct components.
Q3: My KitchenAid mixer is leaking grease. What does this mean?
A: Grease leakage often indicates that the internal lubrication grease has broken down or has been over-applied, or that a seal has failed. This typically means the planetary gear housing or motor housing needs to be opened for cleaning and re-greasing, potentially involving KitchenAid gear replacement if the gears themselves are damaged.
Q4: Can I lubricate my mixer without taking it apart?
A: For most internal components requiring lubrication, such as the planetary gears or motor, you cannot adequately lubricate them without some level of KitchenAid mixer disassembly. Lubricating the attachment hub itself might be possible with specific lubricants, but for internal mechanisms, opening the mixer is necessary.
Q5: Is it worth repairing an old KitchenAid mixer?
A: Generally, yes. KitchenAid stand mixers are built to last, and often the cost of repair is significantly less than buying a new one, especially for older, well-built models. If the motor is still strong and the main housing is in good condition, replacing worn-out KitchenAid mixer parts like gears or belts can give your mixer many more years of service.
By following this detailed guide, you should feel more confident in performing your own KitchenAid mixer disassembly for inspection and repair. Remember to work carefully, stay organized, and enjoy the process of maintaining your valuable kitchen appliance.