
How do you measure a kitchen sink? You measure a kitchen sink by determining its overall length, width, and depth, as well as the specific dimensions for the cutout in your countertop, faucet hole spacing, and drain size. Knowing these measurements is key to a successful sink installation.
Choosing a new kitchen sink can be exciting. It’s a central piece of your kitchen, impacting both style and function. But before you fall in love with a particular design, you absolutely must get your measurements right. A sink that doesn’t fit your countertop or cabinet space is a costly mistake. This guide will walk you through every step of measuring your kitchen sink, ensuring a smooth replacement or installation process.
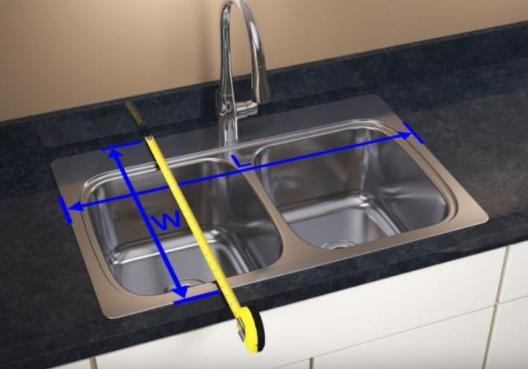
Image Source: blog.myhomeware.com.au
Fathoming Kitchen Sink Dimensions
When you’re looking at new sinks or replacing an old one, kitchen sink dimensions are the first thing you need to nail down. These numbers tell you if the sink will physically fit into your existing cabinetry and countertop. It’s not just about the sink itself, but how it interacts with its surroundings.
Essential Measurements for Your Sink
Here are the core measurements you’ll need to take:
- Overall Length: This is the longest side of the sink.
- Overall Width: This is the shorter side of the sink.
- Sink Depth Measurement: This is how deep the basin(s) go from the top rim to the bottom.
These three measurements are your starting point. They are crucial for understanding the basic footprint of the sink and whether it’s a viable option for your kitchen.
Deciphering Sink Installation Measurements
Beyond the sink’s own measurements, you need to consider the space it will occupy. Sink installation measurements are all about how the sink integrates with your countertop and cabinets.
Measuring Your Countertop Cutout
The cutout in your countertop is a critical area. If you’re replacing an existing sink, you’ll likely need to match the current cutout. If you’re installing a new sink in a new countertop, you’ll be creating this cutout.
Measuring a Sink Cutout
For an existing countertop, carefully measure the opening where your current sink sits.
- Length of Cutout: Measure the longer side of the opening.
- Width of Cutout: Measure the shorter side of the opening.
- Distance from Edge: Measure how far the cutout is from the front and back edges of your countertop. This is important for clearance.
If you are replacing a sink, it’s often best to measure the existing cutout. Many new sinks are designed to fit standard cutout sizes. However, always double-check the new sink’s specifications against your cutout measurements.
Drop-in Sink Measurements and Cutouts
Drop-in sink measurements are typically the same as overall sink measurements. The lip or rim of the sink rests on top of the countertop. The cutout needs to be slightly smaller than the sink’s overall dimensions to allow the rim to hang over the edge.
- How to Measure for a Drop-in Sink: Measure the exact dimensions of the existing hole in your countertop. Then, measure the sink’s outer rim. The sink’s outer rim should be larger than the cutout by at least an inch or two on all sides to provide support.
Undermount Sink Measurements and Cutouts
Undermount sink measurements are a bit different. These sinks are installed under the countertop. This means the cutout must be precisely sized to the sink’s rim, and the countertop edge needs to be finished to receive the sink.
- How to Measure for an Undermount Sink: Measure the sink’s outer dimensions. Then, you need to measure the desired position of the sink relative to the countertop’s front and back edges and any side splashes or backsplashes. The cutout will be slightly smaller than the sink’s outer rim to allow for mounting clips.
Important Note: For undermount sinks, it’s crucial to have the sink on hand before cutting the countertop. This allows for exact template creation and precise measurement of the cutout.
Cabinet Base Measurement
Your sink also needs to fit within your cabinet base.
- Cabinet Width: Measure the interior width of the cabinet that will house the sink. Most sinks are designed to fit standard cabinet widths like 30 inches, 33 inches, or 36 inches.
- Cabinet Depth: Measure the depth of your cabinet. This is usually less critical unless you have unusually shallow or deep cabinets.
Tip: Always check the sink manufacturer’s recommended minimum cabinet size. A sink that’s too large for its cabinet can cause installation issues and may not be adequately supported.
Grasping Sink Depth Measurement
The sink depth measurement is a vital consideration for functionality. Deeper sinks are great for washing large pots and pans, while shallower sinks can be easier to clean and offer a more ergonomic experience.
How to Measure Sink Depth
To measure the depth of a sink:
- Place a straight edge (like a ruler or level) across the top of the sink, resting on the rim.
- Measure from the bottom of the straight edge down to the deepest point of the sink basin.
- If the sink has multiple basins, measure the depth of each.
Considerations for Sink Depth:
- Ergonomics: Very deep sinks can be hard on your back and arms, especially if you are of shorter stature.
- Plumbing Clearance: Deeper sinks might interfere with plumbing or the garbage disposal if your cabinet height is limited.
- Dishwasher Access: Ensure the sink depth doesn’t prevent your dishwasher from opening fully.
Fathoming Sink Width Measurement
The sink width measurement dictates how much counter space the sink will occupy side-to-side.
How to Measure Sink Width
To measure the width of a sink:
- Measure the sink from one side wall to the opposite side wall, across its shorter dimension.
- If the sink has multiple basins, measure the width of each basin.
Considerations for Sink Width:
- Countertop Space: A wider sink might leave less counter space for prep work.
- Cabinet Fit: Ensure the sink’s width fits comfortably within your cabinet base, allowing for mounting hardware and any necessary clearances.
Measuring Sink Length Measurement
The sink length measurement refers to the longest dimension of the sink.
How to Measure Sink Length
To measure the length of a sink:
- Measure the sink from the front edge to the back edge, along its longest dimension.
- For double-basin sinks, this measurement typically covers both basins and any divider.
Considerations for Sink Length:
- Countertop Depth: Ensure the sink’s length doesn’t extend too far forward or backward, potentially interfering with countertop overhang or a backsplash.
- Faucet Placement: The length can influence where you can position your faucet.
Interpreting Sink Faucet Hole Spacing
The placement and number of holes for your faucet are critical. Sink faucet hole spacing dictates the type of faucet you can install.
How to Measure Faucet Hole Spacing
- Count the Holes: First, count how many holes are drilled in your sink or countertop. Common configurations are 1, 2, 3, or 4 holes.
- Measure Center-to-Center: If you have multiple holes, measure the distance from the center of one hole to the center of the next.
- For a standard 3-hole sink (faucet, sprayer, soap dispenser), measure from the center of the faucet hole to the center of the next closest hole.
- For single-hole faucets, the measurement is simply where that single hole is located.
Common Spacing:
- A common spacing for a 3-hole configuration is 8 inches center-to-center.
- Some sinks are designed with flexible hole placement or come with decorative covers (escutcheons) to adapt to different configurations.
Why it Matters: You must match your faucet’s hole requirements to the sink’s pre-drilled holes or your countertop’s existing holes.
Fathoming Sink Drain Size
The sink drain size is important for water flow and compatibility with strainers and disposals.
How to Measure Sink Drain Size
- Measure the Diameter: The most common drain size for kitchen sinks is 3.5 inches in diameter. Measure the diameter of the drain opening at its widest point.
- Check Existing Plumbing: If you’re replacing a sink, you might already have plumbing (like a P-trap and tailpiece) installed. Ensure the new sink’s drain location and size are compatible with your existing plumbing setup.
Standard Drain Sizes:
- 3.5 inches: The most common size for kitchen sinks.
- 2.5 inches: More common in bathroom sinks but sometimes found in smaller kitchen sinks.
Universal Drains: Many drain assemblies are designed to fit the standard 3.5-inch opening and can accommodate various strainer and garbage disposal types.
Measuring Sink Styles: Drop-in vs. Undermount
The style of sink significantly impacts how you measure and install it.
Drop-in Sink Installation Measurements
A drop-in sink, also known as a top-mount or self-rimming sink, is designed to sit on top of the countertop. The rim of the sink supports it, and the cutout in the countertop must be slightly smaller than the sink’s overall dimensions to allow the rim to hang over.
Key Measurements for Drop-in Sinks:
- Sink Overall Length and Width: These are the external dimensions of the sink.
- Countertop Cutout Length and Width: Measure the existing hole in your countertop. This cutout should be approximately 0.5 to 1 inch smaller than the sink’s overall length and width, depending on the sink’s rim thickness. Always check the manufacturer’s specifications for the precise cutout size.
- Faucet Hole Spacing: As discussed, ensure this matches your chosen faucet.
- Drain Size: Ensure compatibility with your plumbing.
Undermount Sink Installation Measurements
An undermount sink is installed directly beneath the countertop, creating a seamless look. This means the countertop edge needs to be finished, and the cutout dimensions are critical and must be precise.
Key Measurements for Undermount Sinks:
- Sink Overall Length and Width: These are the external dimensions of the sink.
- Countertop Cutout Length and Width: This is the most critical measurement. The cutout is typically sized to the sink’s inner dimensions, or slightly larger to accommodate mounting clips. Crucially, always use the sink’s template (if provided) or measure the sink itself precisely for the cutout. Allow for any mounting brackets that will attach to the underside of the countertop.
- Clearance to Backsplash/Wall: Ensure there’s enough space between the sink’s rear edge and any backsplash or wall.
- Clearance to Front Edge: Measure the distance from the front of the sink to the edge of the countertop. This is important for aesthetics and structural integrity.
- Faucet Hole Spacing: Even though the faucet is mounted to the sink or countertop, the hole placement is still vital.
- Drain Size: Essential for plumbing compatibility.
Pro Tip for Undermount Sinks: Have the sink on hand before the countertop is cut. Fabricators often require the sink to be present to create a perfectly fitting template for the cutout.
Measuring for Specialty Sinks
Some kitchens feature specialized sinks that require a few extra measurement considerations.
Farmhouse (Apron-Front) Sinks
Farmhouse sinks have a distinctive “apron” that extends down the front of the cabinet.
Specific Measurements for Farmhouse Sinks:
- Overall Sink Dimensions: Length, width, and depth.
- Apron Front Width: The width of the exposed apron.
- Apron Front Height: How far the apron extends down.
- Cabinet Modifications: Many farmhouse sinks require a special base cabinet or modifications to an existing one to accommodate the apron. Measure your cabinet’s face frame and interior to ensure compatibility.
- Countertop Cutout: This will be slightly smaller than the sink’s top dimensions to allow the rim to sit flush or slightly proud of the countertop.
Integrated Sinks
These sinks are made from the same material as the countertop (e.g., quartz, solid surface).
Specific Measurements for Integrated Sinks:
- The sink’s dimensions will be designed as part of the countertop slab.
- The key is ensuring the basin dimensions and depth are as desired.
- Faucet hole placement is also critical.
Putting It All Together: A Measurement Checklist
To make the process easier, use this checklist:
For Replacing an Existing Sink:
- [ ] Overall Length: Measure your current sink’s longest side.
- [ ] Overall Width: Measure your current sink’s shortest side.
- [ ] Sink Depth: Measure from the rim to the bottom of the basin.
- [ ] Countertop Cutout Length: Measure the existing hole’s longest dimension.
- [ ] Countertop Cutout Width: Measure the existing hole’s shortest dimension.
- [ ] Faucet Hole Configuration: Count and measure spacing if applicable.
- [ ] Drain Size: Measure the existing drain opening.
- [ ] Cabinet Width: Measure the interior width of the cabinet base.
For a New Installation/Renovation:
- [ ] Desired Sink Length and Width: Based on aesthetic and functional needs.
- [ ] Desired Sink Depth: Consider ergonomics and usage.
- [ ] Countertop Material and Thickness: This affects cutout methods and support.
- [ ] Cabinet Base Dimensions: Ensure sufficient width and depth.
- [ ] Faucet Style and Requirements: To match faucet hole spacing.
- [ ] Plumbing Layout: Confirm drain and supply line compatibility.
- [ ] Sink Mounting Style: Drop-in, undermount, farmhouse, etc. (This dictates cutout specifics).
Frequently Asked Questions (FAQ)
Q1: What is the most important measurement when replacing a sink?
A1: The most critical measurements when replacing a sink are the countertop cutout dimensions (length and width) and the cabinet base width. These determine if the new sink will physically fit the existing space.
Q2: Can I use a larger sink if my cutout is slightly smaller?
A2: Generally, no. For drop-in sinks, the cutout must be smaller than the sink’s overall dimensions. For undermount sinks, the cutout is usually sized to the sink’s inner rim or slightly larger. If your cutout is significantly smaller than the sink you desire, you’ll need to have the countertop professionally modified or replaced.
Q3: Who should I ask if I’m unsure about measurements?
A3: If you’re unsure, consult a professional plumber, a kitchen designer, or the countertop fabricator. They have experience with sink installations and can provide accurate measurements and advice.
Q4: Do I need to measure the sink bowls separately?
A4: For double or triple-basin sinks, it’s a good idea to measure the individual bowl dimensions, especially their length and width, and the width of any dividers. This helps you gauge the usable space within each basin for washing dishes.
Q5: What is the standard faucet hole spacing for kitchen sinks?
A5: The most common spacing for a 3-hole sink configuration is 8 inches from the center of one hole to the center of the next. However, sinks with single holes or 4 holes are also common, and spacing can vary. Always check the specifications of both the sink and the faucet.
Q6: How much clearance do I need around a sink cutout for a drop-in sink?
A6: Typically, you want about 0.5 to 1 inch of countertop lip around the edge of the sink cutout for a drop-in sink. This lip supports the sink. Always refer to the sink manufacturer’s installation guide for precise recommendations.
Q7: Can I measure the sink from the box it comes in?
A7: While the box might give general dimensions, it’s always best to measure the actual sink itself. Packaging can sometimes be misleading or provide outer shipping dimensions rather than precise installation dimensions.
By carefully following these measurement guidelines, you can confidently select and install a new kitchen sink that perfectly complements your kitchen’s design and functionality. Happy measuring!