
Can you paint kitchen cabinets? Yes, you absolutely can paint kitchen cabinets, and it’s one of the most effective ways to dramatically update your kitchen’s look without a complete renovation. This guide will walk you through the best methods to achieve a stunning kitchen cabinet makeover.
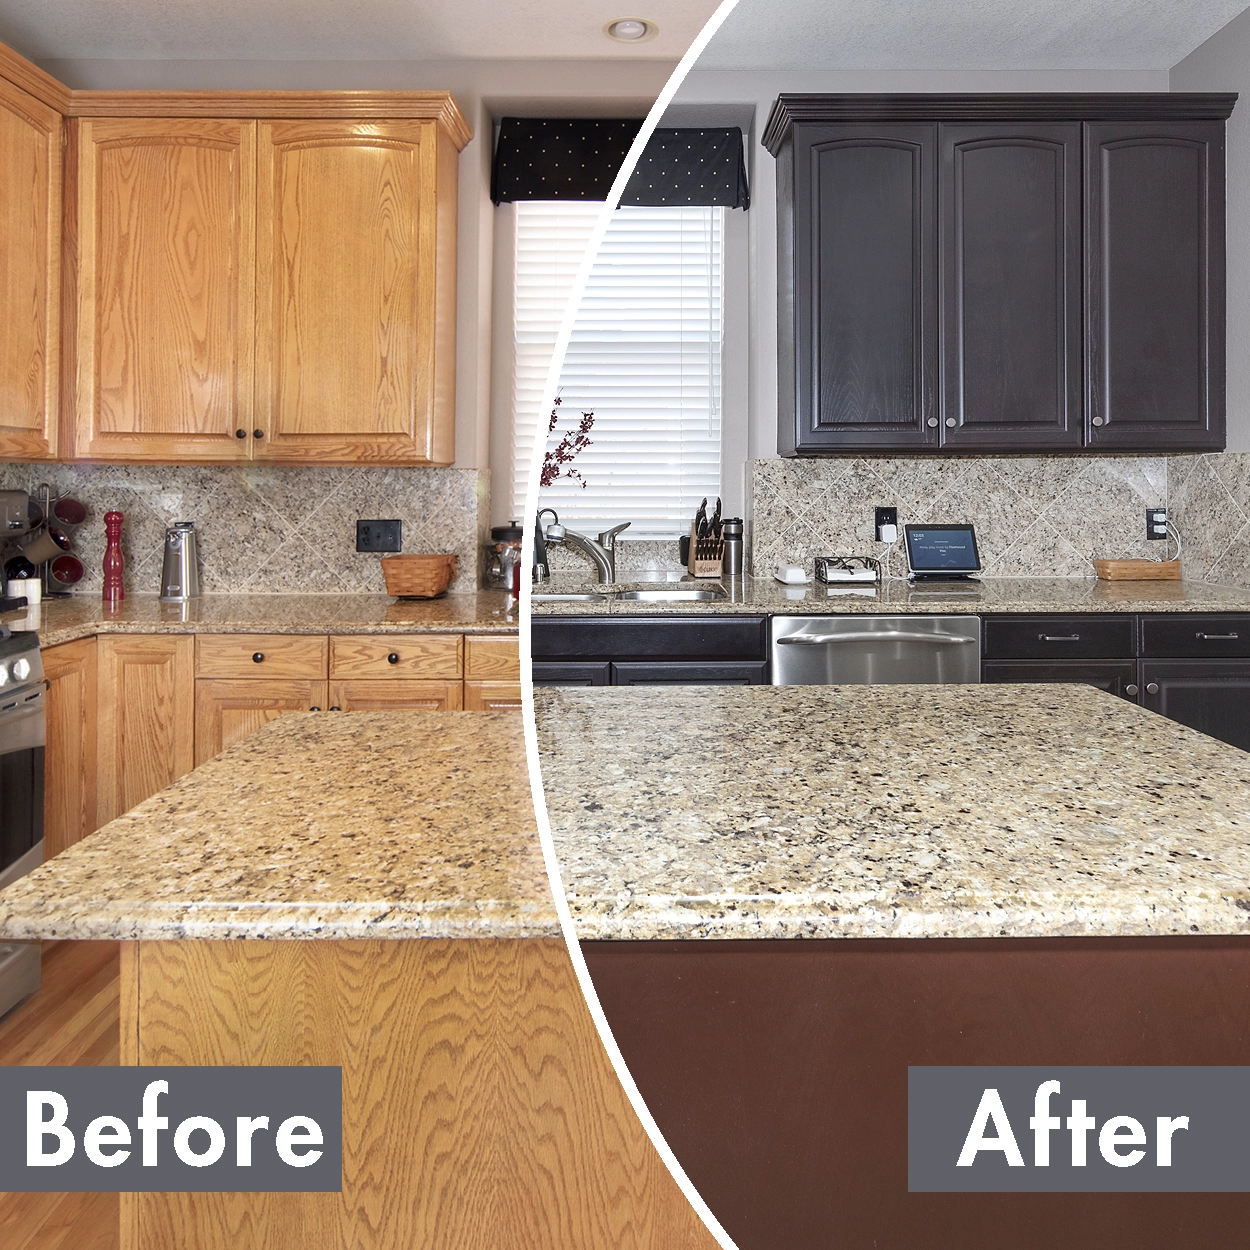
Image Source: www.nhance.com
Revitalizing Your Kitchen: A Cabinet Color Transformation
Tired of your kitchen’s current look? A kitchen cabinet update can work wonders. Changing the color of your kitchen cabinets is a popular and impactful DIY project. Whether you want a bold new look or a subtle refresh, transforming your cabinet colors can breathe new life into your entire kitchen. This article explores the most effective methods for achieving beautiful, durable results, covering everything from choosing the right paint to the final coat.
Deciphering the Best Approach for Your Cabinets
Before you grab a paintbrush, it’s essential to figure out the best method for your specific cabinets. Different materials require different treatments.
Paint kitchen cabinets: The Most Popular Choice
Paint kitchen cabinets for a smooth, uniform finish. This is ideal for cabinets with a smooth surface or for covering up older, worn finishes. It offers a vast spectrum of kitchen cabinet color ideas, allowing for complete personalization.
Refinish kitchen cabinets: Restoring or Changing the Wood Tone
Refinish kitchen cabinets when you want to preserve or alter the natural wood grain. This typically involves stripping old finishes, sanding, and applying new stain or a clear protective coat. It’s a great option if you like the look of wood but want a different hue.
Kitchen cabinet staining: Embracing Wood’s Natural Beauty
Kitchen cabinet staining allows the wood’s natural grain to show through. This method enhances the wood’s character and can deepen or change its color. It’s a beautiful choice for cabinets made of solid wood.
Preparing Your Cabinets: The Foundation for Success
No matter which method you choose, proper preparation is crucial. Skipping this step is a common mistake that leads to peeling paint or an uneven finish.
Step 1: Remove Cabinet Doors and Hardware
- Take it all off: Carefully remove all cabinet doors, drawer fronts, and any visible hardware like knobs and handles. This allows for a more even application of paint or stain and makes working with the pieces much easier.
- Label everything: Use masking tape and a pen to label each door and drawer front with its location. This will save you a lot of headaches when it’s time to reassemble.
Step 2: Clean Thoroughly
- Grease be gone: Kitchen cabinets are notorious for accumulating grease and grime. Use a degreaser specifically designed for cabinets or a solution of warm water and a few drops of dish soap.
- Rinse and dry: Wipe down all surfaces with a damp cloth to remove any cleaning residue, and then dry thoroughly with a clean towel.
Step 3: Sanding for Adhesion
- Light scuff sand: For most finishes, a light scuff sand is all you need to create a surface for the new paint or stain to adhere to. Use fine-grit sandpaper (150-220 grit).
- Special case: How to paint laminate cabinets: Laminate can be tricky. While sanding laminate is possible, ensure you don’t sand through the laminate layer. A specific primer for laminate is often more important than heavy sanding. A light scuff is usually sufficient.
- Dust removal: After sanding, wipe all surfaces down with a tack cloth or a slightly damp microfiber cloth to remove all dust.
Step 4: Priming for Durability and Color
- The importance of primer: A good quality primer is essential, especially when painting kitchen cabinets. It helps paint adhere better, blocks stains, and ensures a more even color finish.
- Choosing the right primer:
- For most surfaces: A high-adhesion, oil-based or shellac-based primer is excellent for blocking wood tannins and providing a solid base.
- For laminate: Look for a primer specifically designed for laminate or slick surfaces.
- For wood cabinets: If you have pine or oak, which are prone to tannins bleeding through, a good stain-blocking primer is a must.
- Application: Apply one to two thin, even coats of primer, allowing each coat to dry completely according to the manufacturer’s instructions. Lightly sand with very fine-grit sandpaper (220-320 grit) between coats if recommended by the primer manufacturer.
Method 1: Painting Your Kitchen Cabinets – The DIY Route
DIY cabinet painting is a rewarding project. Here’s how to do it well.
Choosing the Best Paint for Kitchen Cabinets
This is a critical decision for a durable and beautiful finish.
- Types of Paint:
- Alkyd (Oil-Based) Enamels: These offer a hard, durable finish that is resistant to moisture and scrubbing. However, they have strong odors, require mineral spirits for cleanup, and can yellow over time, especially in lighter colors.
- Water-Based (Latex/Acrylic) Enamels: Modern water-based enamels have improved significantly. Look for acrylic latex enamel paints specifically formulated for cabinets and trim. They are easier to clean up, have less odor, and dry faster. They offer excellent durability when properly applied.
- Sheen:
- Satin: A popular choice for cabinets. It offers a subtle sheen, is easy to clean, and hides minor imperfections well.
- Semi-Gloss: More durable and easier to clean than satin, but it highlights imperfections more.
- Gloss: Very durable and easy to clean, but it will show every little flaw in the surface. Best for very smooth, perfectly prepped surfaces.
- Top Picks: Brands like Sherwin-Williams (ProClassic, Emerald Urethane Trim Enamel), Benjamin Moore (Advance, Aura), and Behr (Urethane Alkyd Enamel) are highly recommended for cabinet painting due to their durability and finish.
Application Techniques for a Professional Finish
- Brush and Roller: This is the most common method for DIYers.
- High-quality brushes: Invest in good quality synthetic or natural bristle brushes for a smooth, streak-free finish.
- Foam rollers: Use dense foam rollers designed for smooth surfaces to apply paint evenly and minimize brush strokes.
- Technique: Apply paint in thin, even coats. Work in one direction, maintaining a wet edge to avoid lap marks. For doors, paint the back first, let it dry, then paint the front.
- Spray Painting Kitchen Cabinets: This method offers the smoothest, most professional-looking finish but requires more specialized equipment and practice.
- Equipment: You’ll need a paint sprayer (HVLP – High Volume Low Pressure – sprayers are best for cabinets). Renting is an option if you don’t want to buy.
- Preparation is Key: You must mask off everything you don’t want painted. This includes countertops, walls, appliances, and floors. Use plastic sheeting and painter’s tape.
- Practice: Practice on scrap wood or cardboard before spraying your cabinets.
- Technique: Hold the sprayer at a consistent distance (around 8-12 inches) from the surface, moving at a steady pace. Overlap each pass by about 50%. Apply thin, even coats.
- Ventilation: Ensure good ventilation when spray painting.
Applying the Paint: Step-by-Step
- Apply First Coat: Apply your chosen paint in thin, even coats using your preferred method (brush, roller, or sprayer).
- Drying Time: Allow each coat to dry completely. This is crucial for durability. Check the paint can for recommended drying times.
- Light Sanding (Optional but Recommended): After the first or second coat, you can lightly sand the surface with very fine-grit sandpaper (320-400 grit) to smooth out any imperfections and improve adhesion for the next coat. Clean off dust thoroughly.
- Apply Subsequent Coats: Apply 2-3 coats of paint in total for best coverage and durability. For very dark colors over a lighter primer, you might need an extra coat.
- Curing Time: Remember that paint often takes 30 days to fully cure and reach its maximum hardness. Be gentle with your cabinets during this period.
Method 2: Refinishing Cabinets – For a Natural or New Wood Look
If you love the look of wood or want to change its tone, refinish kitchen cabinets is the way to go.
Cabinet Staining: Enhancing the Wood’s Natural Beauty
Kitchen cabinet staining can transform the look of your wooden cabinets.
- Choosing Your Stain:
- Types: Oil-based stains penetrate wood well and offer rich color. Water-based stains are easier to clean up but can raise the grain more. Gel stains are thicker and sit more on the surface, making them great for darker colors or over existing finishes.
- Color Selection: Consider your kitchen’s overall palette. From light oak tones to deep walnut or even painted-look stains, the options are vast. Test colors on scrap wood or an inconspicuous area.
- Applying Stain:
- Apply Stain: Apply the stain evenly with a brush or rag, working in the direction of the wood grain.
- Wipe Off Excess: Let the stain penetrate for the time recommended by the manufacturer, then wipe off the excess with a clean, lint-free cloth. The longer you leave it, the darker the color.
- Multiple Coats: Apply additional coats for a deeper color, allowing proper drying time between applications.
Applying a Protective Top Coat
- Polyurethane: This is the most common and durable top coat.
- Types: Oil-based polyurethane is very durable but yellows over time. Water-based polyurethane is clearer, dries faster, and is less prone to yellowing.
- Sheen: Available in matte, satin, semi-gloss, and gloss. Satin is a good choice for cabinets.
- Application:
- Apply Top Coat: Apply thin, even coats of polyurethane using a high-quality brush or foam applicator.
- Sand Between Coats: Lightly sand between coats with very fine-grit sandpaper (220-320 grit) for a smooth finish. Clean off dust thoroughly.
- Number of Coats: Apply 2-3 coats for good protection.
Method 3: How to Paint Laminate Cabinets – A Specific Approach
How to paint laminate cabinets requires special attention to surface preparation and primer selection.
- The Challenge of Laminate: Laminate has a slick, non-porous surface, making it difficult for paint to adhere.
- The Solution:
- Clean and Degrease: Thoroughly clean the laminate surfaces to remove all grease and dirt.
- Scuff Sand: Lightly scuff sand the laminate with a fine-grit sandpaper (around 150-220 grit) to create a slightly rougher surface for adhesion. Do NOT sand through the laminate layer.
- Specialty Primer: This is the most critical step. Use a high-adhesion primer designed for laminate or slick surfaces. Look for primers labeled “bonding primer” or those specifically mentioning laminate or melamine. Allow the primer to dry fully.
- Paint: Once primed, you can use high-quality cabinet paint (as discussed in the painting section) and apply thin, even coats. You may still need 2-3 coats for full coverage.
Kitchen Cabinet Makeover: Beyond Just Color
A kitchen cabinet makeover isn’t limited to just changing the color. Consider these additional updates:
Hardware Upgrade
- New Knobs and Pulls: Swapping out old hardware for new knobs and pulls can instantly modernize your cabinets.
- Placement: Consider the style and size of your cabinets when choosing hardware.
Adding Details
- Molding and Trim: Adding decorative molding or trim can give your cabinets a more custom, high-end look.
- Glass Inserts: Replacing solid center panels with glass can add visual interest and create display space.
Kitchen Cabinet Color Ideas to Inspire Your Project
Choosing the right color is key to a successful kitchen cabinet update.
Popular Color Palettes
- Classic White: Timeless, bright, and makes any kitchen feel larger. Works with almost any decor.
- Soft Grays: Offers a sophisticated and neutral backdrop.
- Navy Blue: A bold yet classic choice that adds depth and character.
- Sage Green/Muted Greens: Brings a touch of nature and a calming feel.
- Two-Tone Cabinets: Painting upper cabinets white and lower cabinets a darker color (like gray or navy) or vice versa creates visual interest.
Factors to Consider When Choosing Colors
- Kitchen Size: Lighter colors can make a small kitchen feel more spacious.
- Natural Light: How much natural light does your kitchen receive? This will affect how a color appears.
- Existing Elements: Consider your countertops, backsplash, flooring, and appliances. The new cabinet color should complement these.
- Your Personal Style: Ultimately, choose colors you love and that reflect your taste.
Tools and Materials Checklist
Here’s a handy list of what you’ll likely need for your cabinet transformation:
| Tool/Material | Purpose |
|---|---|
| Screwdriver Set | Removing hardware |
| Putty Knife/Scraper | Removing old finish or loose paint |
| Sandpaper (various grits) | Preparing surfaces for paint/stain |
| Tack Cloth/Microfiber Cloth | Removing dust after sanding |
| Degreaser/Cleaner | Cleaning cabinets thoroughly |
| Painter’s Tape | Masking off areas not to be painted |
| Drop Cloths/Plastic Sheeting | Protecting floors and surrounding areas |
| Primer (appropriate type) | Ensuring paint adhesion and coverage |
| Paint or Stain | The chosen color and finish |
| High-Quality Brushes | Applying paint/stain for detail work |
| Foam Rollers | Applying paint for smooth finishes |
| Paint Tray | Holding paint for rollers |
| Paint Sprayer (optional) | For a professional, smooth finish |
| Safety Glasses | Eye protection |
| Respirator Mask | Protection from fumes and dust |
| Gloves | Protecting hands |
| Wood Filler (if needed) | Filling holes or imperfections |
| Top Coat/Sealer (if needed) | Protection and durability for stained cabinets |
Frequently Asked Questions (FAQ)
Q1: How long does it take to paint kitchen cabinets?
A1: This depends on the size of your kitchen, the method you use, and how many coats are applied. A typical DIY project can take anywhere from a weekend to a week or more, factoring in drying and curing times.
Q2: Can I paint over stained cabinets?
A2: Yes, you can paint over stained cabinets, but proper preparation is key. You’ll need to clean them, lightly sand them to create a surface for adhesion, and then use a good quality primer designed to block stains before applying your paint.
Q3: What is the best finish for kitchen cabinets?
A3: For painted cabinets, a satin or semi-gloss finish is generally recommended. They offer good durability and are easier to clean than a matte finish, while also being less prone to showing imperfections than a full gloss.
Q4: Do I need to remove my cabinet doors to paint them?
A4: It is highly recommended. Painting doors and drawer fronts while they are off the cabinets allows for a much smoother, more even finish and makes it easier to get into all the nooks and crannies without drips or streaks.
Q5: How many coats of paint do I need for kitchen cabinets?
A5: Typically, 2-3 coats of paint are sufficient for good coverage and durability. Ensure each coat is dry before applying the next.
Q6: Is spray painting kitchen cabinets worth it for a DIYer?
A6: Spray painting kitchen cabinets can yield the most professional finish, but it requires more practice and meticulous masking. If you’re aiming for a perfectly smooth, factory-like finish and are willing to invest the time and effort in prep and practice, it can be very rewarding. For many DIYers, a high-quality brush and roller combination is a more accessible and still excellent option.
By following these detailed methods and tips, you can successfully transform your kitchen cabinets, creating a beautiful and updated space that you’ll love. Happy renovating!