
Does your kitchen faucet head look dull, grimy, or perhaps like it’s struggling to spray water evenly? Yes, you can clean your kitchen faucet head to make it sparkle and flow better. This guide will show you the easiest ways to achieve a gleaming faucet, tackle stubborn buildup, and ensure your kitchen tap works like new. We’ll cover everything from basic wiping to deep cleaning the aerator.
Your kitchen faucet is a high-traffic fixture, constantly in use for washing dishes, rinsing food, and filling pots. Over time, this leads to water spots, mineral deposits, and sometimes even a decrease in water pressure. Sink faucet head maintenance is key to keeping it looking good and functioning efficiently. This isn’t just about aesthetics; a clean faucet is a more hygienic faucet.
This article will dive deep into kitchen faucet cleaning, providing simple DIY solutions and essential kitchen sink fixture upkeep tips. We’ll explore how to combat limescale, remove blockages, and restore that showroom shine.
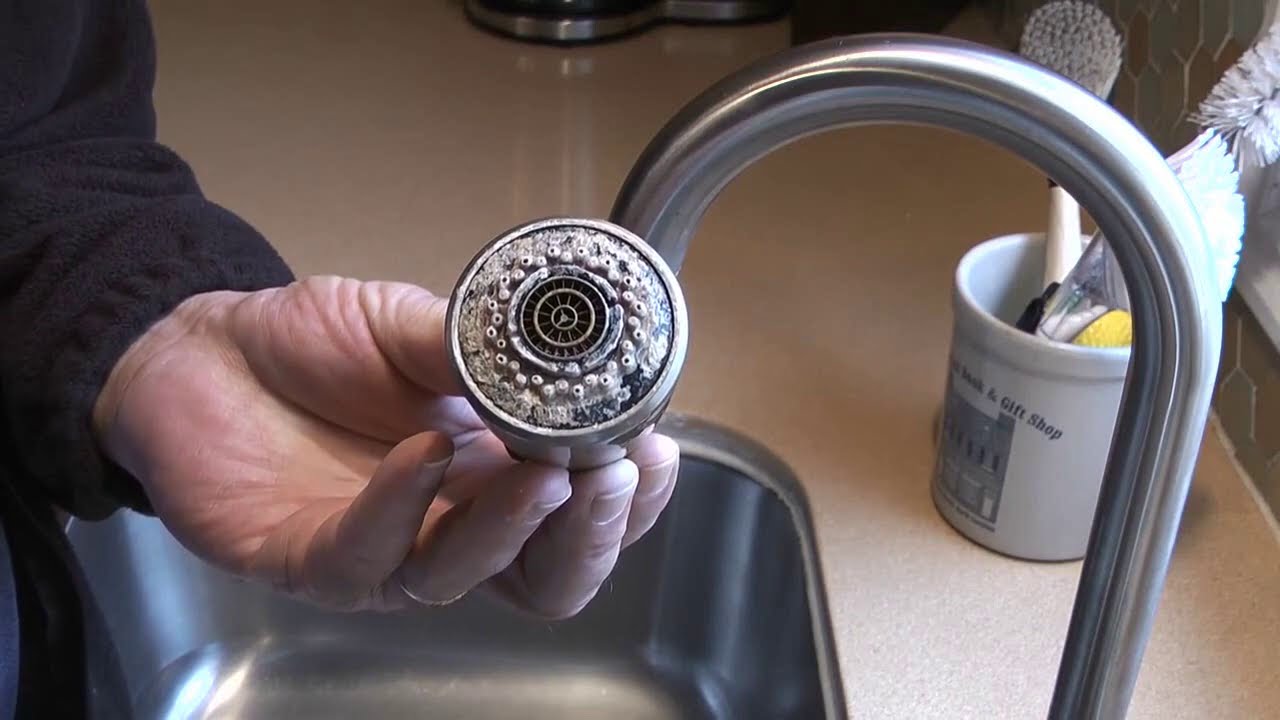
Image Source: i.ytimg.com
Why Your Kitchen Faucet Needs Regular Cleaning
Let’s face it, the kitchen sink is the workhorse of the kitchen. Your faucet, in particular, is used countless times a day. This constant use can lead to a few common problems:
- Water Spots and Stains: Hard water minerals, like calcium and magnesium, are left behind when water evaporates. These leave unsightly white or chalky marks.
- Mineral Buildup (Limescale): This is particularly problematic for the aerator, the small screen at the tip of the faucet. Limescale can clog the holes, reducing water flow and causing a weaker spray.
- Grime and Germs: Food particles, soap residue, and bacteria can accumulate on the faucet’s surface and around the handle. This is a hygiene concern.
- Reduced Water Pressure: A clogged aerator is the most common culprit for a weak stream.
Regular cleaning kitchen tap ensures that your faucet is not only visually appealing but also hygienic and efficient.
Simple Steps for Everyday Kitchen Faucet Cleaning
You don’t need fancy cleaners for daily upkeep. A few simple tools and solutions can keep your faucet looking great. This is the foundation of good sink faucet head maintenance.
What You’ll Need:
- Soft cloth or microfiber towel
- Mild dish soap
- Warm water
The Easy Process:
- Wipe Down: After each use, or at least once a day, take your soft cloth and wipe down the entire faucet. This removes fresh water spots and soap residue before they dry and harden.
- Mild Soap Solution: For a bit more cleaning power, mix a small amount of mild dish soap with warm water. Dip your cloth into this solution, wring it out so it’s damp, not dripping, and wipe down the faucet.
- Rinse and Dry: Use a clean damp cloth to rinse off any soap residue. Then, use a dry microfiber cloth to buff the faucet dry. This prevents new water spots from forming and leaves a nice shine.
This daily routine is crucial for preventing the buildup that leads to more intensive cleaning later. It’s a quick way to maintain your kitchen sink fixture upkeep.
Tackling Tougher Grime: Deep Cleaning Your Kitchen Faucet
When daily wiping isn’t enough, it’s time for a more thorough approach. This section will guide you through kitchen faucet cleaning for those more stubborn issues.
Dealing with Water Spots and Mild Buildup
For water spots that have started to set in or a general grimy feel, you can step up your cleaning game with common household items.
Method 1: Vinegar Power
Vinegar is an excellent natural cleaner for breaking down mineral deposits.
What You’ll Need:
- White vinegar
- Plastic bag (large enough to fit over the faucet head)
- Rubber band or twist tie
- Soft cloth
- Old toothbrush (optional)
The Process:
- Prepare the Vinegar Soak: Pour enough white vinegar into the plastic bag to submerge the faucet head and aerator.
- Attach the Bag: Carefully place the bag over the faucet head, ensuring the entire aerator is immersed in the vinegar. Secure the bag tightly around the faucet neck with a rubber band or twist tie.
- Let It Soak: Leave the bag in place for at least 30 minutes to an hour. For very stubborn buildup, you can leave it longer, even overnight. This is a key step in removing limescale from faucet.
- Remove and Scrub: After soaking, carefully remove the bag. You might see loosened mineral deposits in the vinegar. Use your soft cloth to wipe away any remaining residue. If there’s still buildup around the aerator holes, use an old toothbrush to gently scrub them.
- Rinse and Buff: Turn on the faucet to rinse away any vinegar. Dry the faucet thoroughly with a clean, soft cloth to reveal its sparkle.
Method 2: Baking Soda Paste
Baking soda is a mild abrasive that can help scrub away grime without scratching surfaces.
What You’ll Need:
- Baking soda
- Water
- Small bowl
- Soft cloth or sponge
- Old toothbrush (optional)
The Process:
- Make the Paste: In the small bowl, mix baking soda with just enough water to create a thick paste.
- Apply the Paste: Apply the paste to the faucet head, focusing on areas with water spots or grime.
- Let It Sit: Allow the paste to sit for about 10-15 minutes.
- Scrub Gently: Use your soft cloth or sponge to gently scrub the faucet. For tight spots or around the aerator, use an old toothbrush.
- Rinse and Dry: Rinse the faucet thoroughly with water and then buff it dry with a soft cloth.
These methods are part of effective DIY faucet cleaning.
Advanced Cleaning: Unclogging Your Kitchen Faucet Aerator
The aerator is often the silent villain behind a weak water stream. It’s the part that mixes air with water to create a smooth flow, but it’s also a prime spot for mineral deposits and debris to get stuck. Unclogging kitchen faucet aerators is a crucial part of sink faucet head maintenance.
How to Clean and Unclog the Aerator
This is arguably the most important part of kitchen faucet cleaning for restoring water pressure.
What You’ll Need:
- Adjustable wrench or pliers (with a cloth to protect the finish)
- Small bowl
- White vinegar
- Old toothbrush
- Toothpick or needle
The Process:
- Identify the Aerator: The aerator is the small, screw-on cap at the very tip of your faucet spout.
- Protect the Finish: Before attempting to unscrew it, wrap the aerator with a cloth or use tape on your wrench/pliers. This prevents scratching the faucet’s finish.
- Unscrew the Aerator: Gently turn the aerator counter-clockwise with your wrench or pliers. If it’s stuck, try applying a bit of penetrating oil (like WD-40, though be sure to rinse thoroughly afterward) and let it sit for a few minutes.
- Disassemble the Aerator: Once removed, carefully take apart the aerator. It usually consists of a screen, a washer, and a housing. Lay out the parts in order so you can reassemble them correctly.
- Soak the Parts: Place all the aerator parts in a small bowl filled with white vinegar. Let them soak for at least 30 minutes to an hour to dissolve mineral deposits. This is the best way to clean faucet aerator.
- Scrub and Clear: After soaking, use an old toothbrush to scrub away any remaining debris. For clogged holes, use a toothpick or a needle to carefully poke out the blockage.
- Rinse Thoroughly: Rinse all the aerator parts under running water.
- Reassemble: Put the aerator back together in the correct order.
- Reattach: Screw the reassembled aerator back onto the faucet spout, tightening it gently with your fingers or the wrench.
- Test the Flow: Turn on the water. You should notice a stronger, more even spray.
If your faucet has a pull-out or pull-down sprayer, the process for cleaning the sprayer head might be slightly different. Often, the sprayer head itself unscrews, and you can follow similar soaking and cleaning steps for that component.
Restoring Shine: Polishing Your Kitchen Faucet
Once you’ve cleaned away the grime and mineral buildup, you’ll want to restore that beautiful shine. Polishing kitchen faucet surfaces brings out their best appearance.
Polishing Different Faucet Finishes
The best polishing method depends on the material of your faucet.
For Chrome and Stainless Steel Faucets:
- Method 1: Microfiber Cloth Buffing: After cleaning and drying thoroughly, simply buff the faucet with a clean, dry microfiber cloth. This is often enough to bring back the shine.
- Method 2: Olive Oil or Mineral Oil: For an extra gleam, put a few drops of olive oil or mineral oil on a clean cloth. Rub it onto the faucet surface, then buff with another clean cloth. This not only shines but can also help repel water spots temporarily.
- Method 3: Commercial Polishes: There are specific stainless steel or chrome polishes available. Follow the product instructions carefully.
For Brushed Nickel Faucets:
Brushed nickel has a matte finish and requires a gentler approach.
- Method 1: Soft Cloth and Water: Usually, a good wipe-down with a damp microfiber cloth and then a dry buff is sufficient.
- Method 2: Mild Soap and Water: If there’s light grime, use a very mild dish soap solution and buff dry. Avoid abrasive cleaners or polishes, as they can damage the brushed finish.
For Brass or Gold-Plated Faucets:
These finishes can be more delicate.
- Method 1: Gentle Wipe: Use a soft, damp cloth and then dry thoroughly.
- Method 2: Brass Polish (Use Sparingly): If the brass has tarnished, you can use a dedicated brass polish. Apply it sparingly with a soft cloth, rub gently, and then remove all residue with a clean cloth. Test in an inconspicuous area first. Avoid harsh chemicals.
Important Note: Always check your faucet manufacturer’s recommendations for cleaning and polishing. Harsh chemicals or abrasive materials can permanently damage the finish.
Disinfecting Your Kitchen Faucet
Beyond appearance and function, hygiene is paramount. Disinfecting kitchen faucet ensures it’s free from harmful bacteria.
Safe Disinfection Methods
- Vinegar: As mentioned, vinegar has mild disinfecting properties. After cleaning, a final wipe with diluted vinegar (1:1 with water) and then rinsing and drying can help.
- Hydrogen Peroxide: A 3% hydrogen peroxide solution can be sprayed onto the faucet, allowed to sit for a few minutes, and then wiped clean and dried.
- Mild Bleach Solution (Use with Extreme Caution): For stubborn germ concerns, a very diluted bleach solution (1 tablespoon of bleach per gallon of water) can be used. However, never mix bleach with vinegar or other cleaners, as this can create toxic fumes. Always rinse thoroughly after using bleach and ensure good ventilation. This is generally not recommended for regular use due to potential damage to some finishes.
Always test any cleaning or disinfecting solution on an inconspicuous area of your faucet first.
Choosing the Right Tools and Supplies
Having the right supplies makes kitchen faucet cleaning much easier and more effective.
Essential Cleaning Kit:
| Item | Purpose | Notes |
|---|---|---|
| Microfiber Cloths | Wiping, polishing, drying | Soft, absorbent, won’t scratch surfaces. |
| Soft Sponges | Gentle scrubbing | Avoid abrasive scrubbers. |
| Old Toothbrush | Scrubbing tight spots and aerator holes | Ideal for detailed cleaning. |
| White Vinegar | Removing mineral deposits, mild disinfectant | Natural, effective, and readily available. |
| Baking Soda | Mild abrasive for paste cleaning | Gentle scrubbing power. |
| Small Bowl | Soaking aerator parts, mixing cleaning solutions | |
| Plastic Bags | Soaking faucet head with vinegar | Sealable bags work best. |
| Rubber Bands/Twist Ties | Securing bags for soaking | |
| Adjustable Wrench | Unscrewing aerator | Protect finish with a cloth. |
| Toothpicks/Needles | Clearing aerator holes | Be gentle. |
| Mild Dish Soap | General cleaning | Avoid harsh detergents. |
| Protective Gloves | Protecting hands from cleaning solutions | Especially when using vinegar or other solutions. |
| Optional: Mineral Oil | For extra shine on chrome/stainless steel | Use sparingly. |
| Optional: Commercial Polish | For specific finishes like brass or stainless steel | Read instructions carefully. |
Common Faucet Problems and Solutions
Let’s quickly recap some common issues you might face during kitchen sink fixture upkeep.
Problem: Weak Water Flow
- Likely Cause: Clogged aerator.
- Solution: Follow the unclogging kitchen faucet aerator steps outlined above.
Problem: Stains and Spots
- Likely Cause: Hard water mineral deposits.
- Solution: Vinegar soak, baking soda paste, or commercial limescale removers (use as directed). This is key for removing limescale from faucet.
Problem: Leaking Faucet
- Likely Cause: Worn-out washers, O-rings, or faulty cartridge.
- Solution: This typically requires more advanced faucet repair than simple cleaning. You might need to replace parts. Consult your faucet’s manual or a plumber.
Problem: Grimy Handles and Spout
- Likely Cause: Daily grime, soap residue, bacteria.
- Solution: Regular wiping with a damp cloth, mild soap solution, or disinfecting sprays.
Maintaining Your Faucet for Long-Term Sparkle
Consistent kitchen faucet cleaning is the secret to a long-lasting, sparkling faucet.
Preventative Measures:
- Wipe After Use: This is the golden rule for preventing water spots.
- Address Hard Water: If you have very hard water, consider a water softener for your home.
- Check for Leaks: Small drips can exacerbate mineral buildup. Fix leaks promptly.
- Avoid Harsh Cleaners: Never use abrasive pads, steel wool, or harsh chemical cleaners like bleach (unless specifically recommended and diluted), ammonia, or oven cleaner on your faucet, as they can damage the finish.
Frequently Asked Questions (FAQ)
Q1: How often should I clean my kitchen faucet?
A1: For everyday wiping, do it daily. For a more thorough clean to remove mineral buildup, aim for once a month or as needed when you notice spots or reduced flow.
Q2: Can I use CLR or Lime-A-Way on my faucet?
A2: While these products are effective for removing limescale from faucet, they can be quite harsh. Always check the product label and your faucet manufacturer’s recommendations. Test on an inconspicuous spot first, and rinse extremely well afterward. Vinegar is often a safer, gentler alternative for most situations.
Q3: My faucet has a special finish, like oil-rubbed bronze. How do I clean it?
A3: For special finishes, always use the gentlest method possible. Typically, this means wiping with a damp cloth and drying immediately. Avoid any abrasive cleaners or polishes unless specifically made for that finish. When in doubt, consult the manufacturer’s care guide.
Q4: Why is my faucet spray so weak even after cleaning?
A4: If cleaning the aerator didn’t help, the issue might be deeper within the faucet or even your home’s water supply. It could be a problem with the cartridge, supply lines, or low water pressure from your municipality.
Q5: Is it safe to clean the faucet with lemon?
A5: Yes, lemon juice is acidic and can help cut through grease and light mineral deposits, similar to vinegar. You can rub half a lemon on the faucet or use lemon juice mixed with water. Be sure to rinse and dry afterward. It’s a good option for a fresh scent and gentle cleaning.
By following these guidelines, you can easily keep your kitchen faucet head sparkling and functioning perfectly, adding both beauty and efficiency to your kitchen. Remember, consistent kitchen sink fixture upkeep makes deep cleaning less of a chore.