
Image Source: images.finehomebuilding.com
How To Vent A Kitchen Sink In An Island Properly: Step-by-Step Guide
Can a kitchen island sink be vented? Yes, a kitchen sink in an island absolutely needs proper venting to function correctly. Without adequate island sink plumbing, you’ll encounter issues like slow draining, gurgling sounds, and even sewer gases entering your home. This guide will walk you through how to vent kitchen island sink installations for optimal performance.
The Importance of Venting Your Island Sink
Venting might seem like a small detail, but it’s crucial for a well-functioning plumbing system. A vent pipe acts like a straw for your drain. When water flows down the drain, it creates suction. Without a vent, this suction can pull water out of the P-trap, the U-shaped pipe under your sink that holds water to block sewer gases. This allows unpleasant odors and harmful gases to enter your kitchen.
For an island sink drain vent, the challenge is often routing the vent pipe from the middle of your home, where the island is typically located, to the exterior. This can be more complex than venting a sink against an exterior wall.
Why Your Island Sink Needs a Vent
- Prevents Siphonage: As mentioned, vents prevent the air pressure in the drainpipe from dropping too low when water flows, which could suck the water out of the P-trap.
- Allows Smooth Drainage: Proper venting allows air to enter the drainpipe as water exits, preventing vacuum lock and ensuring a steady flow.
- Eliminates Gurgling Noises: Air being forced back up through the water in the trap causes gurgling. A vent allows this air to escape naturally.
- Keeps Sewer Gases Out: The water in the P-trap is your first line of defense against sewer gases. A properly vented trap always has water in it.
Common Problems with Unvented or Improperly Vented Island Sinks
Ignoring the need for a proper island sink vent can lead to a host of problems:
- Slow Draining: Water struggles to exit the pipes when air can’t easily enter to replace it.
- Gurgling Sounds: Air is trapped and forced back up through the water in the P-trap.
- Foul Odors: The P-trap can become siphoned dry, allowing sewer gases to escape into the kitchen.
- Water Backups: In severe cases, a lack of venting can cause slow backups and even minor overflows.
- Toilet Flushing Issues: In some integrated plumbing systems, an improperly vented sink can affect the performance of nearby fixtures, like toilets.
Methods for Venting a Kitchen Island Sink
There are several ways to achieve a proper kitchen sink drain venting for an island. The best method depends on your home’s existing plumbing, layout, and local building codes.
1. Traditional Venting (Connecting to Existing Stack)
This is the most common and often preferred method. It involves running a vent pipe from the island sink to your home’s main drain-waste-vent (DWV) stack.
Steps Involved:
- Locate the Nearest DWV Stack: Identify the main vertical pipe that carries waste and vents air from your plumbing system to the outside. This is usually found in a bathroom, laundry room, or near the main sewer line.
- Run the Vent Pipe:
- Drill holes through joists or studs to create a path for the vent pipe. Use appropriate tools like a long auger bit.
- Ensure the pipe maintains a continuous upward slope (typically ¼ inch per foot) to prevent condensation buildup.
- The vent pipe should tie into the existing DWV stack at a point above the flood level of the highest fixture connected to that stack. This prevents waste from backing up into the vent.
- Connect to the Sink Drain:
- Beneath the island sink, install a P-trap.
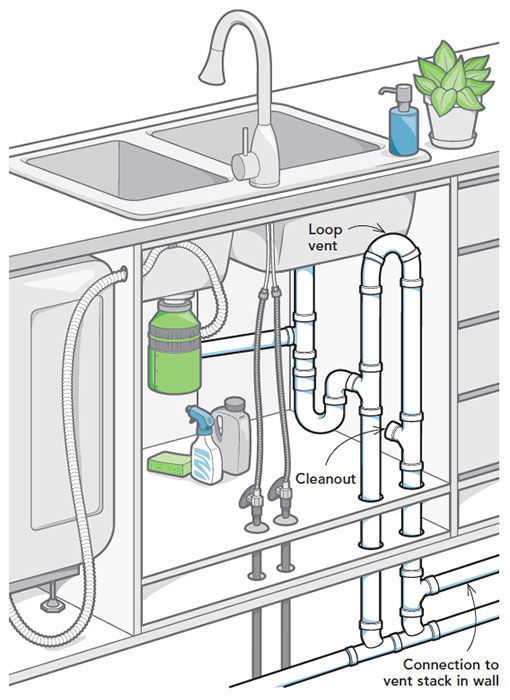
- Connect the vent pipe to the drain arm of the P-trap using a sanitary tee or a similar fitting designed for venting. This is often referred to as island sink trap venting.
- The island sink venting pipe needs to rise at least 6 inches above the trap weir (the highest point of the P-trap) before it begins its upward run to connect to the main stack.
- Penetrate the Roof: The vent pipe must eventually terminate through the roof, allowing air to escape to the atmosphere. Ensure this penetration is properly sealed to prevent leaks.
Considerations for Traditional Venting:
- Distance: Running a vent pipe from an island to a main stack can involve long runs, which might require larger diameter pipes to maintain airflow.
- Structural Obstacles: Navigating joists, beams, and other structural elements can be challenging.
- Building Codes: Always check local plumbing codes for specific requirements regarding vent pipe sizing, material, and termination.
2. Wet Venting
A wet vent island sink scenario occurs when a drainpipe also serves as a vent for a fixture located below it. In the context of an island sink, this usually means the drainpipe from the island sink is used to vent other fixtures in the vicinity, or the island sink itself is vented through a drainpipe that also serves another fixture.
How it Works:
- A wet vent typically involves a drainpipe that receives waste from one or more fixtures and then rises to connect to a vent system.
- For an island sink, the drainpipe from the sink might be routed to a point where it can connect to a larger drainpipe that is already vented. This larger drainpipe then provides the necessary air.
- The connection point needs to be carefully chosen to ensure proper airflow and prevent waste from entering the vent portion of the pipe.
Example of Wet Venting:
Imagine your island sink drain connects to a branch drainpipe. If that branch drainpipe also serves a sink or shower located downstream (further along the drain path) and that branch pipe is properly vented, the island sink can effectively “borrow” that vent.
Key Principles for Wet Venting:
- Fixture Unit Load: The drainpipe acting as the wet vent must be sized to handle the combined fixture unit load of all fixtures it serves.
- Venting Location: The vent connection to the wet vent pipe must be made above the trap weir of the fixture it’s serving.
- Code Compliance: Wet venting is permitted by many plumbing codes but has strict rules about how it can be implemented. It’s crucial to consult your local codes.
Advantages:
- Can reduce the number of vent pipes needed.
- May be simpler in certain layouts.
Disadvantages:
- Requires careful design to avoid issues.
- Can be more complex to troubleshoot if problems arise.
- Not suitable for all situations or plumbing layouts.
3. Air Admittance Valve (AAV)
An Air Admittance Valve (AAV), often called a Studor Vent or cheater vent, is a mechanical device that allows air to enter the plumbing system when needed but seals shut to prevent sewer gases from escaping. This can be an excellent solution for kitchen island without vent piping running all the way to the roof.
How it Works:
- The AAV is installed on the vent side of the P-trap, usually under the sink.
- When water drains, creating negative pressure, the AAV opens inward, allowing air to enter the drainpipe.
- Once the pressure equalizes, the valve closes, sealing the system.
Steps for Installing an AAV:
- Install the P-trap: Assemble the P-trap and connect it to the sink tailpiece.
- Install the Vent Connection: Connect a short piece of vent pipe (typically 1½-inch diameter) to the drain arm of the P-trap using a sanitary tee or a specialized AAV fitting.
- Install the AAV: Screw the AAV onto the vent pipe stub. Ensure it’s installed in an upright position as per the manufacturer’s instructions.
- Ensure Proper Clearance: The AAV needs to be installed in a location where it can receive fresh air and is not enclosed within a sealed cabinet. It must also be installed at a height that prevents it from being submerged in wastewater. The general rule is to install it at least 6 inches above the trap weir.
Advantages of AAVs:
- Simplicity: Easier to install than running a traditional vent pipe.
- Flexibility: Ideal for situations where traditional venting is difficult or impossible, such as in islands located far from the main vent stack.
- Cost-Effective: Can be cheaper than running extensive vent piping.
Disadvantages of AAVs:
- Mechanical Device: Can fail over time or become clogged.
- Building Codes: While widely accepted, some jurisdictions may have restrictions on their use or require specific types. Always check local codes.
- Airflow Capacity: The airflow capacity of an AAV is limited, and it might not be suitable for large fixture loads or multiple fixtures venting into the same system.
4. Individual Venting (Less Common for Islands)
In some rare cases, a kitchen island sink might be vented individually by running its own dedicated vent pipe directly to the outside. This is less common for islands due to the difficulty of routing such a pipe without it being unsightly or impractical.
How it Works:
- A separate vent pipe is run from the island sink’s P-trap directly through an exterior wall or up through the roof, independent of the main DWV stack.
Considerations:
- Aesthetics: Running an independent vent pipe can be visually disruptive.
- Complexity: Often more complex than connecting to an existing stack.
- Building Codes: May have specific requirements for individual vent terminations.
Designing Your Island Sink Venting System
When planning how to vent a sink, especially in an island, consider these design principles:
H4 Sizing Your Vent Pipe
Proper sizing is critical. Undersized vents won’t allow enough air in, leading to drainage issues. Oversized vents can cause trap seal dilution.
- Fixture Units: Plumbing codes use “fixture units” to measure the potential wastewater flow from different fixtures. A kitchen sink typically has a higher fixture unit rating than a bathroom sink.
- Vent Pipe Diameter: The required diameter of the vent pipe depends on the fixture units it serves and the length of the vent run. Refer to your local plumbing code tables for guidance. For a typical kitchen island sink, a 1½-inch or 2-inch vent pipe is often required.
H4 Vent Termination
The vent pipe must terminate to the atmosphere outside the building.
- Roof Termination: The most common method is to run the vent pipe through the roof. It must extend a specific height above the roof surface (usually 6 inches to 1 foot) and be a certain distance away from any windows, doors, or air intakes to prevent sewer gas from entering the building.
- Wall Termination (Less Common): In some cases, a vent might terminate through an exterior wall, but this is less common for island sinks and often subject to stricter code requirements regarding height and proximity to openings.
H4 Sloping the Vent Pipe
Vent pipes must slope continuously upwards towards the termination point.
- Slope: A minimum slope of ¼ inch per foot is generally recommended. This allows any condensate that forms within the vent pipe to drain back down into the drainage system, preventing blockages.
- Avoid Traps: Never create downward slopes or dips in a vent pipe, as these can collect water and become blocked.
Step-by-Step Guide to Venting a Kitchen Island Sink (Traditional Method)
This guide assumes you are using the traditional method of connecting to an existing DWV stack. Always adapt to your specific situation and consult local codes.
H5 Planning and Preparation
-
Gather Tools and Materials:
- PVC or ABS pipes and fittings (as required by your local code)
- Pipe primer and cement (for PVC) or solvent cement (for ABS)
- Pipe cutter or hacksaw
- Drill with appropriate size bits for joists/studs
- Measuring tape
- Level
- Pipe hangers or straps
- Roof flashing kit (if running through the roof)
- Gloves and safety glasses
- AAV (if you decide to use one as an alternative)
-
Confirm Location of DWV Stack: Precisely identify the main vent stack you’ll be connecting to.
-
Map the Vent Path: Plan the route for your vent pipe from the island sink to the DWV stack, noting any obstacles.
-
Check Local Codes: Review your local plumbing codes for specific requirements on pipe size, material, slope, and termination height.
H5 Running the Vent Pipe
- Marking the Path: Use chalk lines or a pencil to mark the intended path of the vent pipe through joists and studs.
- Drilling Holes: Carefully drill holes through joists and studs. Ensure the holes are large enough to accommodate the pipe without it being too tight.
- Securing the Pipe: Run the vent pipe, ensuring a continuous upward slope of at least ¼ inch per foot. Use pipe hangers or straps to secure the pipe firmly to the framing members at appropriate intervals.
- Navigating Obstacles: If you encounter beams or other difficult structural elements, you may need to use offsets (series of angled fittings) to go around them, maintaining the upward slope.
H5 Connecting the Vent to the Drain
- Install P-trap: Place the P-trap under the island sink, connecting the sink tailpiece to the trap inlet and the trap outlet to the trap arm.
- Install Sanitary Tee:
- On the trap arm of the P-trap, install a sanitary tee fitting. The run of the tee will be in the direction of the drain flow.
- The branch of the sanitary tee will be where the vent pipe connects.
- Connect Vent Pipe to Tee:
- Run your vent pipe to the sanitary tee.
- Ensure the vent pipe is rising from the trap arm. The top of the trap arm should be the lowest point of the vent connection to the trap assembly.
- Use primer and cement to securely glue the vent pipe into the branch of the sanitary tee.
- Continue Vent Pipe Upward: Continue running the vent pipe upwards, connecting to the main DWV stack at the approved height. This connection typically uses a wye fitting or a combination wye and ½ bend, depending on the orientation.
H5 Terminating the Vent
- Through the Roof:
- Drill a hole through the roof where the vent pipe terminates.
- Install a roof flashing kit specifically designed for plumbing vents. This will seal around the pipe and prevent water from entering your attic or home.
- Ensure the vent pipe extends the required height above the roof according to local codes.
- Final Check: Make sure the vent pipe is securely supported and has a continuous upward slope.
H5 Testing the System
- Water Test: After the cement has cured, run water through the island sink. Listen for gurgling noises and observe the drainage rate. The water should drain smoothly and quickly, without any unusual sounds or backups.
- Smoke Test (Optional): A professional plumber might perform a smoke test to check for leaks in the vent system.
Alternatives and Considerations
H5 Using an Air Admittance Valve (AAV)
If running a traditional vent is too difficult, an AAV is a viable alternative.
- Installation: Install the AAV on a short vent pipe stub coming off the trap arm of the P-trap.
- Location: Ensure the AAV is installed in a location that meets manufacturer and code requirements for access to fresh air and is not submerged.
- Code Check: Always verify if AAVs are permitted in your area and if specific models are approved.
H5 Wet Venting Considerations
- Fixture Load: Carefully calculate fixture units to ensure the wet vent can handle the load.
- Pipe Sizing: Use appropriate pipe sizes for wet venting scenarios, as per code.
- Connection Points: Correctly identify where to connect the island sink to the existing drain system for effective wet venting.
Frequently Asked Questions (FAQ)
Q: Can I connect my island sink vent to the vent stack of a toilet?
A: Generally, yes, but only if the connection point is made above the flood-level rim of the toilet. Toilet drain lines carry a significant amount of waste, and incorrect connections can cause issues. Always consult your local plumbing codes, as they often have specific rules about connecting vents from different types of fixtures.
Q: What happens if my island sink is not vented?
A: If your island sink is not properly vented, you’ll likely experience slow draining, gurgling noises from the pipes, and the possibility of foul sewer odors entering your kitchen because the P-trap can be siphoned dry.
Q: How high does an island sink vent pipe need to be?
A: The vent pipe must extend at least 6 inches above the flood-level rim of the fixture it serves. If it’s terminating through the roof, it must also meet specific heights above the roof surface as dictated by local building codes to prevent contamination.
Q: Can I vent my island sink into the same pipe as my dishwasher?
A: Yes, this is often possible if your dishwasher drain line is already part of a vented system. You would connect the island sink’s vent to the dishwasher’s drain line or vent pipe at an appropriate point above the trap weir.
Q: Do I need a plumber to vent my island sink?
A: While some DIYers with plumbing experience might tackle this, it’s highly recommended to hire a licensed plumber. Plumbing, especially venting, must comply with strict building codes to ensure safety and proper function. Incorrectly installed vents can lead to serious health and structural issues.
Q: My island sink is draining slowly, but there are no gurgling noises. Does it still need a vent?
A: Slow drainage can be a symptom of venting issues, even without gurgling. A partial blockage or improper airflow can cause slow drainage. It’s always best to ensure your island sink plumbing has a proper vent system in place.
Q: What is the best method to vent an island sink?
A: The “best” method depends on your home’s layout and local codes. Traditional venting to the main stack is often preferred for its reliability. However, an Air Admittance Valve (AAV) is a very practical and code-compliant solution for many island sink installations where traditional venting is challenging.
By following these guidelines and consulting with local building codes, you can ensure your kitchen island sink is properly vented for a safe, efficient, and odor-free plumbing system.