
The best way to clean painted kitchen cabinets is with gentle cleaners and a soft touch. You can use mild dish soap and water, or special cleaners made for painted surfaces. Always avoid harsh chemicals, abrasive scrubbers, or too much water. These things can damage the paint finish. Regular cleaning helps keep your cabinets looking fresh and new for a long time.
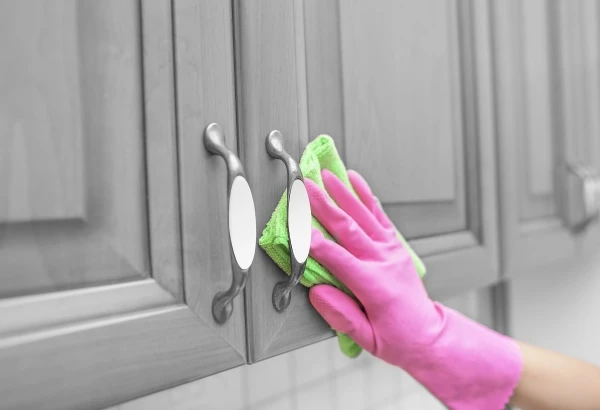
Image Source: www.fivestarpainting.com
Why Proper Cabinet Care Matters
Your kitchen cabinets work hard. They see a lot of use every day. Food spills, greasy hands, and dust can build up. If you do not clean them well, dirt can stick to the paint. This can make the paint look dull or even wear away over time. Taking good care of your cabinets means they will look good for many years. It also saves you money because you will not need to repaint or replace them often. Good care makes your kitchen a nicer place to be.
Daily vs Deep Cleaning Painted Cabinets
Knowing when and how to clean is key. Your cabinets need two kinds of cleaning. One is quick and often. The other is more thorough and less often.
Quick Daily Tidying
This type of cleaning is for small messes. It is about keeping things neat. You should do it every day or every few days. This stops dirt from building up.
- Wipe spills right away: If food or liquid spills, clean it quickly. Use a soft, damp cloth.
- Wipe down high-use areas: Clean around handles and knobs. These spots get touched a lot. Grease and fingerprints often build up here.
- Light dusting: Use a dry, soft cloth to dust the cabinet fronts. This helps keep dust from mixing with grease. This quick cleaning helps with your daily vs deep cleaning painted cabinets routine. It makes deep cleaning easier later.
Thorough Deep Cleaning
Deep cleaning goes beyond the surface. It gets rid of tough dirt and grease. You should do this every few months. How often depends on how much you cook.
- Choose a day: Pick a time when you can spend a few hours.
- Clear the area: Take items off your countertops.
- Work in sections: Clean one section of cabinets at a time. This helps you not get overwhelmed.
- Prepare your cleaners: Mix your solutions before you start.
- Rinse well: Make sure to rinse off all cleaner residue.
- Dry completely: Always dry cabinets after cleaning. This is very important.
Tools and Supplies You Will Need
Having the right tools makes cleaning easier and safer. Here is a list of what you will need.
| Item | Purpose | Why It’s Important |
|---|---|---|
| Soft Microfiber Cloths | Wiping, cleaning, buffing | Gentle on paint, absorbs well, leaves no lint |
| Warm Water | Mixing solutions, rinsing | Helps dissolve dirt, safe for paint |
| Mild Dish Soap (e.g., Dawn) | Gentle degreaser, general cleaning | Breaks down grease without harming paint |
| Spray Bottle | Applying cleaning solutions evenly | Prevents oversaturation, good for DIY mixes |
| Small Soft Brush or Toothbrush | Getting into tight corners, details | Reaches small spots without scratching |
| Drying Cloths (clean, dry) | Drying surfaces completely | Prevents water marks, protects paint from moisture |
| Old Towels or Drop Cloths | Protecting counters and floors | Catches drips, prevents spills on sensitive areas |
| Gloves (optional) | Protecting hands | Good for those with sensitive skin |
| White Vinegar (optional) | Mild acid for tough spots (diluted) | Natural cleaner, use with caution on paint |
| Baking Soda (optional) | Gentle abrasive paste for tough spots | Good for stubborn grime, use as a paste |
Preparing for a Safe Clean
Before you start cleaning, take a few steps to protect your kitchen. This helps keep your cabinets and other surfaces safe.
Protecting Painted Cabinets During Cleaning
You must protect the cabinets themselves. This means not using too much water. It also means not letting water sit on the surface.
- Protect nearby surfaces: Lay old towels or a drop cloth on your counters and floor. This catches any drips.
- Protect hinges and hardware: Try not to get water or cleaner on metal parts. They can rust. If they do get wet, dry them right away.
- Do not soak: Never spray water directly onto the cabinets. Spray your cloth first, then wipe. This is key for protecting painted cabinets during cleaning.
- Work in small sections: Do not try to clean all cabinets at once. Clean one door or one drawer front at a time. This lets you dry quickly.
- Test in a hidden spot: Before using any new cleaner, test it. Choose a small, out-of-sight area. This could be inside a cabinet door. Wait a few minutes. Check for any bad reactions. Make sure the paint does not change color or get damaged. This small test can save you big trouble.
Step-by-Step Guide to Cleaning Painted Cabinets
Now it is time to clean! Follow these steps for the best results.
First Pass: Dusting and Light Wipe-Down
Start by removing loose dirt. This makes the deeper cleaning easier.
- Dust thoroughly: Use a dry microfiber cloth. Wipe down all cabinet surfaces. Get rid of crumbs, dust, and spider webs.
- Open doors and drawers: Dust inside the edges, too.
- Use a vacuum (optional): For deep crevices, a brush attachment on your vacuum works well.
Tackling Everyday Grime and Fingerprints
This step is for common dirt. This is the stuff that builds up from daily use. This method helps with removing grime from painted wood cabinets.
- Mix your cleaner: In a spray bottle, mix a few drops of mild dish soap (like Dawn) with warm water. About one teaspoon of soap per two cups of water is good.
- Dampen your cloth: Spray the mixture onto a clean microfiber cloth. Do not spray directly onto the cabinets.
- Wipe the surfaces: Gently wipe down cabinet doors, drawer fronts, and frames. Focus on areas with fingerprints or light dirt.
- Work top to bottom: Start at the top of the cabinets. Work your way down. This way, dirt falls onto areas you have not cleaned yet.
- Rinse with a clean, damp cloth: Dip a new microfiber cloth in plain water. Wring it out very well. Wipe the cabinets again to remove soap residue.
- Dry completely: Use a separate, dry microfiber cloth. Wipe all surfaces until they are fully dry. Do not let any water sit on the paint.
The Grease Battle: How to Degrease Painted Cabinet Doors
Grease is the toughest enemy in a kitchen. It can make cabinets feel sticky. It also catches more dust. Here is how to handle it. This is for cleaning grease off painted cabinets and specifically how to degrease painted cabinet doors.
- For light grease: The mild dish soap and water mix often works. Follow the steps above. You might need to wipe a few times.
- For tougher grease:
- Increase soap concentration: Add a bit more dish soap to your water mix. Make it a bit stronger.
- Gentle scrub: Dip a soft sponge (not abrasive) or a microfiber cloth into the stronger solution. Gently rub the greasy spots. Do not scrub hard. Let the soap do the work.
- Baking soda paste (for very stubborn grease): Mix a small amount of baking soda with water. Make a thick paste. Put a tiny bit of this paste on a soft cloth. Gently rub the greasy spot. Baking soda is a very mild abrasive. Use it with extreme care. Rinse and dry right away. Test this method first in a hidden spot!
- Vinegar solution (use with caution): Mix equal parts white vinegar and water. This can cut grease. But vinegar is an acid. It can dull some paint finishes over time. Use it only on very tough spots. Test it first. Spray on your cloth, not the cabinet. Wipe quickly. Rinse immediately with plain water. Then dry completely.
- Commercial degreaser (specific for painted surfaces): Some products are made for this. Make sure they say “safe for painted surfaces.” Always follow the product’s directions. More on these later.
- Rinse and dry promptly: After treating grease, rinse the area with a clean, damp cloth. Then dry it completely with a dry cloth. This stops water marks and protects the paint.
Special Considerations for Painted MDF Cabinets
MDF stands for Medium-Density Fiberboard. It is a common material for cabinets. Painted MDF cabinets look great. But they need special care. MDF can swell easily if it gets too wet. This is why cleaning painted MDF cabinets needs extra thought.
- Use less water: This is the most important rule for MDF. Always spray your cloth, not the cabinet. Wring out your cloth very well. It should be just damp, not wet.
- Wipe quickly: Clean a small area. Then dry it right away. Do not let water sit on the surface, especially near edges or seams. Water can soak into the MDF here.
- Avoid abrasive cleaners: No rough scrubbers. No harsh chemicals. These can break down the paint. Once the paint is gone, the MDF is exposed and can soak up water.
- Gentle solutions are best: Stick to mild dish soap and water. If you need a stronger cleaner for grease, use it very sparingly. Wipe it off quickly.
- Check for damage: Look for any chips or cracks in the paint. If you find any, be very careful around them. Water can get in through these spots.
Best Cleaning Products for Painted Kitchen Cabinets
Choosing the right product is very important. The wrong product can ruin your paint.
Safe Cleaners for Painted Kitchen Cupboards
Many commercial products are safe. Look for labels that say “gentle” or “safe for painted surfaces.” Here are some good choices. These are the best cleaning products for painted kitchen cabinets that are also safe cleaners for painted kitchen cupboards.
- Mild Dish Soap (e.g., Dawn, Palmolive): This is often the best choice. It is cheap, effective, and safe. Mix a small amount with warm water.
- All-Purpose Cleaners (pH-neutral): Some all-purpose cleaners are fine. Check the label. Make sure it says it is pH-neutral. This means it is not too acidic or too basic. Look for “safe for finished wood” or “safe for painted surfaces.” Brands like Method or Mrs. Meyer’s often have safe options.
- Specialty Cabinet Cleaners: Some brands make cleaners just for cabinets. These are usually safe. But read reviews and product info carefully. Some may contain waxes. This can build up over time.
- Rubbing Alcohol (for tough stains, very diluted): For very stubborn marks like permanent marker, a tiny bit of rubbing alcohol on a cotton swab can work. Dilute it with water first (50/50). Use it only on the stain. Rinse right away. Test first!
DIY Kitchen Cabinet Cleaning Solutions
You can make your own cleaning solutions. These are often cheaper and use natural products. These are great DIY kitchen cabinet cleaning solutions.
-
Dish Soap and Water Solution:
- Mix 1-2 teaspoons of mild dish soap into 2 cups of warm water.
- Put it in a spray bottle.
- This is great for everyday grime and light grease.
-
White Vinegar and Water Solution (use with caution):
- Mix equal parts white vinegar and water.
- This can cut through grease.
- Caution: Vinegar is acidic. It can dull some paint finishes over time. Use it only for tough grease. Always test it first in a hidden spot. Rinse very quickly and thoroughly after use. Do not use this method often.
-
Baking Soda Paste:
- Mix baking soda with just enough water to form a thick paste.
- This paste is a very mild abrasive.
- Use it for stubborn scuff marks or sticky residue.
- Apply with a soft cloth. Rub gently. Rinse immediately and fully.
- Again, test first. Use very little pressure.
What to Avoid (and Why)
Some cleaners and tools can damage your cabinets. Do not use these!
- Abrasive Scrubbers: Steel wool, scouring pads, rough sponges. These will scratch and remove paint.
- Harsh Chemicals: Ammonia-based cleaners, bleach, oven cleaners, heavy-duty degreasers. These can strip paint, change color, or leave streaks.
- Silicone-based products: These can build up and make the surface sticky. They can also attract more dirt.
- Wax-based polishes: Unless your cabinets are meant for waxing, these can leave a sticky film. It builds up and looks bad over time.
- Oil-based soaps or polishes: These can leave an oily residue. This attracts dust and can be hard to remove.
- Too much water: This is the biggest danger, especially for MDF. It can cause swelling, peeling, and damage.
Bringing Back the Brilliance: Restoring Shine
After cleaning, your cabinets might look good. But you can make them look even better. This section is about restoring shine to painted cabinets.
Painted cabinets do not usually need a lot of extra shine products. Often, a good, thorough cleaning is enough. The shine is the clean surface itself.
- Proper Drying is Key: The best way to make them shine is to dry them very well. Use a clean, dry microfiber cloth. Buff gently as you dry. This removes any water spots and leaves a smooth, clean surface.
- Gentle Polish (Optional and Rare): For some very dull finishes, you can use a very light, non-abrasive furniture polish. Make sure it is safe for painted surfaces. Look for a polish that does not contain silicone or wax. Apply a tiny amount to a clean cloth. Buff lightly. Do this very rarely, maybe once a year. Always test it first!
- Avoid Over-Polishing: Too much polish can build up. It can make cabinets sticky and attract dust. Less is more here.
The best shine comes from a truly clean surface. If your cabinets are dull, it might mean there is a film of dirt or residue. A good deep clean will often fix this.
Maintaining Your Cabinets for Lasting Beauty
Cleaning is important. But keeping them clean is even better. This is about preventing future problems.
- Wipe spills right away: This is the golden rule. Acids from food (like lemon juice or tomato sauce) can stain or etch paint.
- Use an exhaust fan: Turn on your range hood when cooking. This pulls out steam, grease, and smoke. It stops them from settling on your cabinets.
- Clean sticky messes quickly: If something sticky like syrup or honey gets on the cabinets, clean it right away. Sticky messes attract more dirt.
- Keep hands clean: Try to encourage family members to wash hands before opening cabinet doors. Or, teach them to use a towel to open them.
- Use shelf liners: For inside cabinets, liners protect from spills.
- Regular light cleaning: Do not wait until your cabinets are very dirty. A quick wipe-down every week or two makes deep cleaning easier.
- Address problems early: If you see a small chip in the paint, touch it up. This stops water from getting under the paint.
Common Issues and Troubleshooting
Sometimes, you might run into problems even with good care.
- Stubborn Stains:
- Food stains (coffee, wine): Try a baking soda paste. Or a very diluted hydrogen peroxide solution (test first!). Apply to a cloth, wipe, rinse quickly.
- Ink/Marker: A tiny bit of rubbing alcohol (diluted 50/50 with water) on a cotton swab. Dab, don’t rub. Rinse immediately. Test first!
- Scuff Marks: Try a soft art eraser or the baking soda paste. Very gentle rubbing.
- Dullness After Cleaning:
- You might have soap residue left. Rinse again thoroughly with a plain, damp cloth. Then dry completely.
- The paint might be older and worn. In this case, a new coat of paint might be needed.
- Water Marks/Streaks:
- This happens from not drying completely. Go over the area again with a clean, dry microfiber cloth. Buff gently.
- If dried on, try a very mild vinegar solution (diluted), wipe quickly, and dry.
- Peeling Paint:
- This usually means there was too much moisture or improper prep before painting. You will need to scrape the peeling paint, sand, prime, and repaint the area. This is a bigger repair.
- Grease that won’t budge:
- Try a slightly stronger dish soap solution. Let it sit for a minute or two (do not let it dry!). Then wipe and rinse.
- Consider a commercial degreaser made for painted surfaces, following directions strictly.
Frequently Asked Questions (FAQ)
Here are answers to common questions about cleaning painted cabinets.
Q: Can I use Pine-Sol or similar strong cleaners on painted cabinets?
A: No. Avoid strong cleaners like Pine-Sol, Mr. Clean, or Fantastic. They often contain harsh chemicals. These can strip the paint, dull the finish, or leave a sticky residue. Stick to mild dish soap or cleaners made for painted surfaces.
Q: How often should I deep clean my painted kitchen cabinets?
A: Most homes need a deep clean every 3 to 6 months. If you cook a lot of greasy foods, you might need to do it more often. If you cook less, you can do it less often.
Q: Is it safe to use a Magic Eraser on painted cabinets?
A: No, it is generally not safe. Magic Erasers are abrasive. They are made of melamine foam. They act like very fine sandpaper. Using one on painted cabinets can remove the paint or dull the finish. Always use soft microfiber cloths.
Q: My cabinets look dull after cleaning. What did I do wrong?
A: Most likely, you left some soap residue or did not dry them completely. Go back and wipe them down again with a clean cloth dampened with plain water. Then dry them very well with a separate, clean, dry microfiber cloth. Buff gently as you dry. This should bring back the natural shine of the clean paint.
Q: Can I use furniture polish on my painted kitchen cabinets?
A: Generally, it is not recommended for kitchen cabinets. Many furniture polishes contain waxes or silicones. These can build up over time, creating a sticky film that attracts dust. This film is also hard to remove. For painted cabinets, a thorough cleaning and proper drying are usually enough to make them shine. If you insist on a polish, choose one that clearly states it is safe for painted surfaces and is wax-free.
Q: What if I have scratches or chips in my painted cabinets?
A: Small scratches can sometimes be minimized with a matching touch-up paint pen. You can often get these from the cabinet maker or paint store. For chips, you might need to clean the area, sand lightly, apply wood filler if needed, and then touch up with paint. For bigger damage, consider hiring a professional.
Cleaning painted kitchen cabinets is not hard. It just needs the right approach. With gentle products and careful steps, your cabinets can stay beautiful for many years. Regular care saves you work in the long run. Enjoy your clean and bright kitchen!