
Grouting a kitchen backsplash yourself can save you money and give you a great sense of accomplishment. Yes, you can absolutely grout your own kitchen tile backsplash with the right tools and a bit of patience! This guide will walk you through the entire process, from preparing your tiles to sealing the finished job.
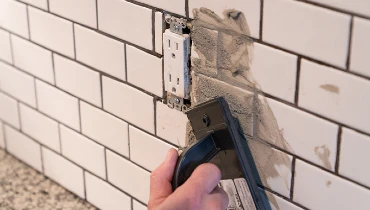
Image Source: www.mrhandyman.com
Grouting Your Kitchen Backsplash: A DIY Masterclass
So, you’ve tackled the exciting part of backsplash installation and your gorgeous kitchen tile is up and looking fantastic. But wait, there are still gaps between those tiles, and that’s where grout comes in. Grouting is a crucial step that not only fills these spaces but also adds strength, protects your walls from moisture, and can even enhance the overall aesthetic of your kitchen. Don’t let the word “grout” intimidate you; with this step-by-step guide, you’ll be a pro in no time.
Preparing Your Workspace
Before you even think about mixing grout, a little preparation goes a long way. A clean and organized workspace will make the entire process smoother and less stressful.
Protecting Surfaces
- Cover Everything: Grout is messy. Use painter’s tape to protect your countertops, cabinets, and walls adjacent to the backsplash. Lay down drop cloths or old sheets to catch any stray grout or water.
- Cleanliness is Key: Ensure your tiles are clean and free of any debris or dust. Any stray particles can get mixed into the grout, affecting its color and finish. You might need to carefully scrape off any excess tile adhesive that has squeezed through the grout lines with a putty knife.
Choosing the Right Grout and Tools
The type of grout you choose and the tools you have at hand are critical for a successful outcome.
Grout Types Explained
There are several types of grout, each with its own properties and best uses. For most kitchen backsplashes, you’ll likely be choosing between sanded and unsanded grout.
- Sanded Grout: Contains sand particles. It’s stronger and more durable, making it ideal for wider grout lines (typically 1/8 inch or wider). The sand helps prevent shrinkage and cracking.
- Unsanded Grout: Does not contain sand. It’s smoother and more flexible, best suited for narrow grout lines (less than 1/8 inch), especially with delicate tiles like glass or natural stone. The lack of sand prevents scratching these surfaces.
Grout Color plays a significant role in the final look. Consider the color of your tiles and the overall kitchen aesthetic. Lighter grout can make tiles pop, while darker grout can create a more subtle, blended look. Always check grout color charts and perhaps test a small amount in an inconspicuous area.
Essential Grouting Tools
Having the right tools makes the job much easier and the results better.
- Grout Float: This is your primary tool for spreading grout. It has a durable rubber base and a handle.
- Grout Sponge: A dense, high-quality grout sponge is essential for cleaning excess grout and smoothing the surface.
- Mixing Bucket: You’ll need at least two buckets – one for mixing grout and one for rinse water.
- Measuring Cup and Scale: For precise grout mixing (follow manufacturer instructions).
- Stir Stick or Mixing Paddle: For thoroughly mixing the grout to the correct consistency.
- Rubber Gloves: Grout can dry out your skin.
- Safety Glasses: Protect your eyes from dust and debris.
- Putty Knife or Grout Removal Tool: For cleaning up any errant adhesive before grouting or for grout removal if you make a mistake.
- Clean Rags or Microfiber Cloths: For final buffing.
Mixing the Grout
This is where precision matters. Too much water can weaken the grout, while too little can make it difficult to work with.
Step-by-Step Grout Mixing
- Read the Instructions: Every grout product will have specific mixing instructions. Read them carefully!
- Measure Accurately: Use your measuring cup and scale to measure the correct ratio of grout powder to water.
- Add Water Gradually: Pour the measured water into your mixing bucket. Then, gradually add the grout powder to the water, stirring continuously.
- Achieve the Right Consistency: The goal is a consistency similar to peanut butter or thick toothpaste. It should be smooth and spreadable, not too runny or too stiff.
- Mix Thoroughly: Mix until there are no dry clumps. Avoid overmixing, as this can introduce too much air.
- Let it Slake (Rest): Most grouts require a short resting period, often called “slaking.” This allows the chemicals to react. Follow the package directions for the exact time, usually 5-10 minutes. After resting, give it a final quick stir.
Applying the Grout
This is the core of the process. Work in small sections to ensure the grout doesn’t dry out before you can clean it.
The Grouting Technique
- Loading the Grout Float: Scoop a generous amount of mixed grout onto your grout float.
- Spreading the Grout: Hold the float at a 45-degree angle to the tile surface. Spread the grout across the tiles, pressing it firmly into the grout lines. Work diagonally across the tiles to ensure the lines are filled completely.
- Removing Excess Grout: Once a section of tiles is covered, hold the float at a steeper angle (almost 90 degrees) and scrape off the excess grout from the tile surfaces. Again, work diagonally to avoid pulling grout out of the lines.
- Work in Sections: Don’t try to grout the entire backsplash at once. Work in manageable sections, perhaps 2-3 square feet at a time.
Cleaning Up Excess Grout
This is a critical step that requires careful timing and technique to avoid a patchy or hazy finish.
The Initial Clean
- Wait for the Grout to Set Slightly: After applying grout to a section, let it set for about 10-20 minutes. It should be firm enough not to pull out easily when wiped. You can test this by gently touching a grout line with your finger; it shouldn’t be sticky.
- Damp Sponge Technique: Dampen your grout sponge in your rinse bucket. Wring it out thoroughly – the sponge should be just damp, not wet.
- Gentle Wiping: Gently wipe diagonally across the tiles. The goal is to remove the bulk of the excess grout from the tile faces without digging into the freshly applied grout lines.
- Rinse the Sponge Frequently: Rinse your sponge in the second bucket of clean water very frequently. This is crucial to avoid spreading grout residue back onto the tiles. Change the rinse water often.
- Shape the Grout Lines: Use the rounded edge of the sponge to gently shape and smooth the grout lines for a uniform appearance.
The Second Pass
After completing the initial clean on a section, you might notice some lingering grout residue. A second, lighter pass with a well-wrung-out sponge can help.
The Final Touches and Curing
Once the grout has set and you’ve cleaned off the excess, there are still a few important steps to ensure a beautiful and durable finish.
Buffing Away Grout Haze
As the grout dries, a faint film, known as grout haze, can appear on the tile surface.
- Timing is Crucial: This haze typically appears a few hours after grouting.
- Use a Clean, Dry Cloth: Once the grout is dry to the touch (usually after 2-3 hours, but check product instructions), buff the tiles with a clean, dry microfiber cloth. Work in a circular motion.
- Stubborn Haze: If the haze is persistent, you can use a slightly damp cloth, but be careful not to wet the grout lines themselves.
Curing Time
Grout needs time to cure and reach its full strength.
- Keep it Dry: Avoid getting the backsplash wet for at least 24-72 hours after grouting, depending on the grout type and humidity.
- Avoid Heavy Use: It’s best to avoid heavy cleaning or placing heavy items against the backsplash for at least a week.
Sealing the Grout
Grout is porous, meaning it can absorb stains and moisture. Sealing is a vital step to protect your hard work.
Why and When to Seal
- Protection: A grout sealant creates a barrier against spills, grease, and stains, which are common in kitchens.
- When to Apply: Most grout needs to cure for at least 72 hours, and often up to two weeks, before sealing. Always check the grout manufacturer’s recommendations.
Applying Grout Sealant
- Clean the Grout: Ensure the grout lines are completely dry and free of any residue.
- Apply Sealant: You can apply grout sealant using a small brush, a roller, or a brush applicator.
- Work in Sections: Apply a thin, even coat directly to the grout lines. Avoid getting too much sealant on the tile surface, especially with porous tiles.
- Wipe Off Excess: Wipe away any excess sealant from the tile surface immediately with a clean, dry cloth.
- Multiple Coats: Some sealants recommend a second coat after the first has dried, but follow the product instructions.
- Drying Time: Allow the sealant to dry completely according to the manufacturer’s instructions before exposing the backsplash to moisture or heavy use.
Troubleshooting Common Grouting Issues
Even with careful work, you might encounter a few hiccups. Here’s how to address them.
What if I made a mistake?
- Too Much Grout on Tiles: If you catch it early, before it sets, use your grout float to scrape off the excess diagonally. If it’s starting to set, a damp sponge is your best friend.
- Uneven Grout Lines: If the grout lines are uneven after cleaning, you can sometimes carefully shave off high spots with a putty knife or razor blade once the grout is partially set but before it’s fully cured. For major issues, grout removal might be necessary, followed by re-grouting.
- Holes or Cracks in Grout: If you notice holes or cracks after the grout has dried, you can often do a small touch-up with a bit more grout mixture.
What if my grout is too wet or too dry?
- Too Wet: If your grout mixture is too wet, try adding a tiny bit more grout powder and mixing it in, or let it sit for a few extra minutes to thicken naturally.
- Too Dry: If it’s too dry and crumbly, add a tiny bit more water, but be very cautious – a teaspoon at a time – and mix thoroughly.
Maintaining Your Grout
Proper maintenance will keep your grout looking great for years to come.
- Regular Cleaning: Clean your backsplash regularly with a pH-neutral cleaner. Avoid harsh or acidic cleaners, as they can damage the grout and sealant.
- Address Spills Quickly: Wipe up spills, especially oily ones, as soon as possible to prevent staining.
- Re-sealing: Depending on traffic and cleaning habits, you may need to reapply grout sealant every 1-2 years.
Frequently Asked Questions (FAQ)
Q1: How long does it take to grout a kitchen backsplash?
A1: For a standard backsplash, the grouting process itself (applying and initial cleaning) might take anywhere from 4 to 8 hours, depending on the size and complexity. The entire process, including drying and sealing, can take several days.
Q2: Can I grout over old grout?
A2: It’s generally not recommended to grout over old grout. For the best results and a durable finish, old grout should be removed using a grout removal tool or an oscillating multi-tool with a grout blade.
Q3: How thick should the grout lines be?
A3: The thickness of your grout lines will depend on the tile size and your preference. For most kitchen tile backsplashes, lines between 1/8 inch and 1/4 inch are common. Always check the tile manufacturer’s recommendations.
Q4: How do I clean grout haze if it hardens?
A4: If grout haze has dried hard, you may need a commercial grout haze remover. Follow the product instructions carefully and test in an inconspicuous area first. A slightly damp cloth or fine steel wool (use with extreme caution and only on appropriate tile types) can also sometimes work.
Q5: What’s the difference between grout and caulk for backsplashes?
A5: Grout fills the spaces between tiles. Caulk is a flexible sealant used at joints where two different surfaces meet, such as where the backsplash meets the countertop or cabinets. Caulk is flexible and waterproof, while grout is more rigid.
By following these detailed steps, you can confidently tackle the grouting of your kitchen backsplash. It’s a rewarding project that adds the finishing touch to your beautiful kitchen tile work and protects your investment for years to come. Enjoy your newly grouted masterpiece!