
What is the best way to measure a kitchen for cabinets? The best way to measure a kitchen for cabinets involves meticulous attention to detail, accurate tools, and a systematic approach to ensure every dimension is recorded precisely. This cabinet measurement guide will walk you through the entire process, from the initial steps to final checks, so you can confidently plan your kitchen renovation or new cabinet installation. Getting kitchen cabinet dimensions just right is crucial for both aesthetics and functionality.
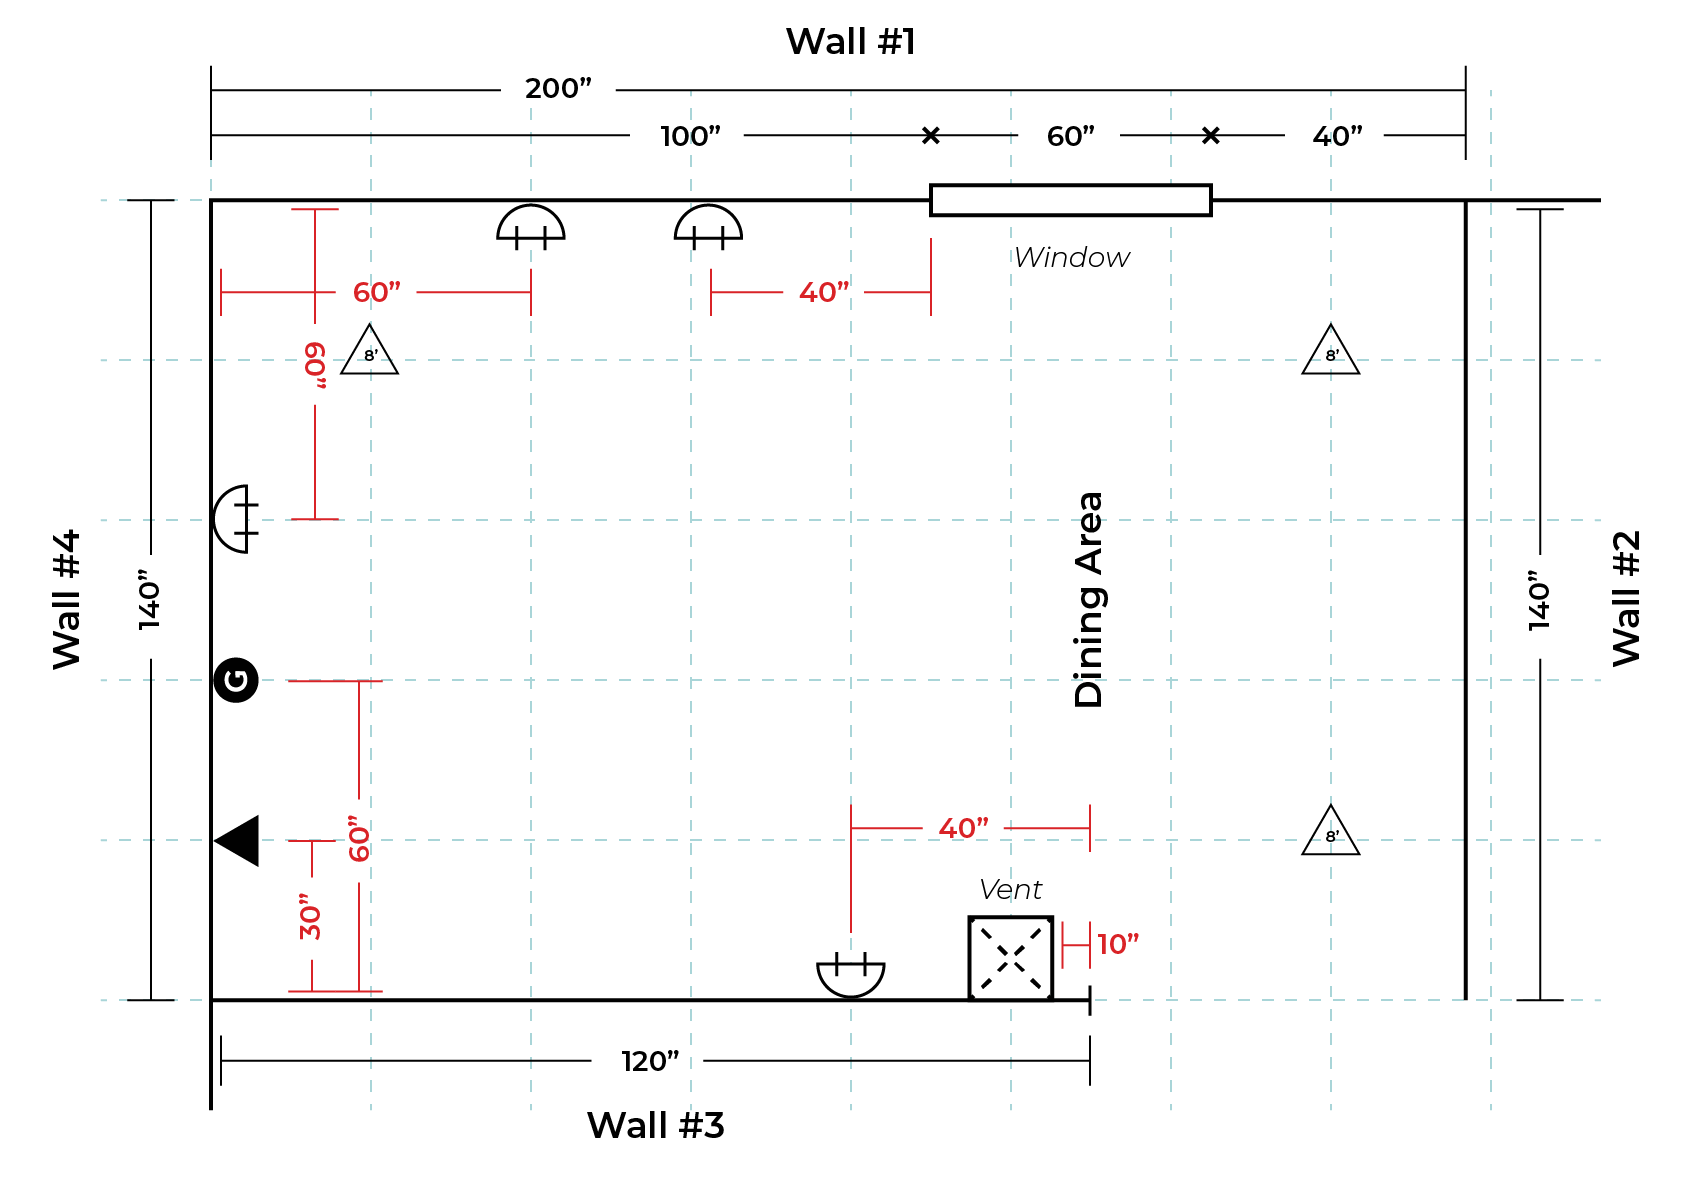
Image Source: cdn.kitchencabinetkings.com
The Importance of Precise Measurements
Why is measuring your kitchen so important before buying cabinets? Accurate measurements are the bedrock of a successful kitchen cabinet project. Even a slight error can lead to cabinets that don’t fit, require costly adjustments, or disrupt the overall flow and design of your kitchen. This guide will help you master how to measure kitchen space effectively.
Avoiding Common Measurement Mistakes
Many DIYers and even some professionals stumble when measuring. The most frequent errors include:
- Not accounting for obstructions: Windows, doors, pipes, radiators, electrical outlets, and switches can all impact cabinet placement and size.
- Inaccurate wall measurements: Assuming walls are perfectly straight or corners are exactly 90 degrees can lead to problems.
- Forgetting ceiling height variations: Ceilings aren’t always flat.
- Ignoring appliance clearances: Each appliance has specific ventilation and access requirements.
- Not measuring for the countertop overhang: This detail affects the final cabinet depth.
Gathering Your Tools
Before you start, ensure you have the right tools for the job. This will make the process smoother and more accurate.
Essential Measuring Tools
- Measuring Tape: A sturdy, retractable metal tape measure is essential. Longer tapes (25 feet or more) are ideal for larger kitchens.
- Pencil and Paper (or Digital Tool): For recording all your measurements. Graph paper can be helpful for sketching.
- Level: To ensure you’re measuring true horizontal and vertical lines.
- Ladder or Step Stool: For reaching high areas safely.
- Helper (Optional but Recommended): An extra pair of hands can make measuring walls and holding the tape measure much easier.
Optional but Helpful Tools
- Laser Measure: For quicker and sometimes more precise long-distance measurements, though still requires careful calibration.
- Stud Finder: To locate wall studs for cabinet mounting.
- Camera: To take photos of your kitchen space, which can be helpful for visualization and documentation.
Step-by-Step: How to Measure Kitchen Space
This section details the systematic approach to measuring your kitchen, covering all essential elements for cabinet installation measurements.
Step 1: Prepare Your Kitchen Space
Clear as much as possible from the walls where cabinets will go. Remove appliances if they are in the way and you need to measure behind them (ensure you are comfortable and safe doing so, or have a helper).
Step 2: Measure Wall Lengths
This is the most fundamental part of diy kitchen cabinet measurements.
- Start at one corner. Hold the end of your tape measure firmly against the wall.
- Extend the tape measure to the next corner or obstacle.
- Record the measurement. It’s best to measure from the finished wall surface to the finished wall surface.
- Measure each wall segment. Break down long walls into smaller, manageable sections if necessary, especially if there are windows, doors, or openings.
- Account for corners. Measure the length of each wall segment leading into a corner.
Pro Tip: Walls are rarely perfectly straight. Measure at the top, middle, and bottom of the wall, and use the smallest measurement. Also, check if corners are perfectly square (90 degrees) using a large carpenter’s square or by measuring diagonally across the corner (the diagonal measurements should be equal if the corner is square).
Step 3: Measure for Windows and Doors
Accurate measurements around openings are critical.
- Window Measurements:
- Width: Measure from the wall edge to the wall edge where the window frame sits.
- Height: Measure from the sill (or floor if it’s a floor-to-ceiling window) to the top of the frame.
- Distance from Floor: Measure the height from the finished floor to the bottom of the window sill.
- Distance from Ceiling: Measure the height from the top of the window frame to the ceiling.
- Door Measurements:
- Width: Measure from the wall edge to the wall edge of the doorway.
- Height: Measure from the finished floor to the top of the door frame.
- Door Swing: Note which way the door opens and if it will interfere with cabinet placement. Measure the arc of the door swing.
Step 4: Note Obstructions and Features
Every kitchen has unique elements that need to be documented.
- Electrical Outlets and Switches: Mark their exact location on your diagram. Measure their distance from the floor and from the nearest corner or wall.
- Plumbing and Vents: Locate any exposed pipes, sink drains, or vent pipes. Measure their position relative to walls and floor.
- Radiators and Vents: Measure their dimensions and their distance from the walls and floor. Consider if cabinet bases will need to be modified or if heat can damage cabinets.
- Appliance Placement: Mark the intended location of your refrigerator, dishwasher, stove, oven, microwave, etc. Measure the space required for each appliance, including ventilation and access. This is a key part of appliance placement and cabinets.
Step 5: Measure Ceiling Height
This is vital for upper cabinet selection.
- Measure ceiling height in several locations, especially in corners and the middle of walls.
- Note any variations. Uneven ceilings are common. Use the lowest measurement to ensure upper cabinets will fit throughout the kitchen.
Step 6: Measure for Countertops
While not directly measuring for cabinets, countertop measurement for cabinets is intertwined. The depth of your base cabinets, plus the countertop overhang, determines the total depth.
- Base Cabinet Depth: Standard base cabinets are typically 24 inches deep (excluding the countertop).
- Countertop Overhang: Standard countertop overhangs are typically 1.5 inches on the front and sides. Measure existing countertops if you are replacing them, or decide on your desired overhang for new ones. This will influence the overall reach of your cabinets.
Step 7: Create a Detailed Kitchen Diagram
A visual representation is crucial.
- Sketch your kitchen floor plan. Draw the shape of your kitchen to scale.
- Add walls, doors, and windows. Mark their exact locations and dimensions.
- Include all obstructions (outlets, pipes, radiators, etc.).
- Mark appliance locations.
- Label all measurements clearly. Use consistent units (e.g., inches).
Example Diagram Elements:
| Feature | Dimension 1 (e.g., Length) | Dimension 2 (e.g., Height) | Location Notes |
|---|---|---|---|
| Wall A (North) | 120 inches | 96 inches | From NW corner to NE |
| Window 1 | 36 inches (width) | 48 inches (height) | 36″ from floor, centered on Wall A |
| Doorway (East) | 32 inches (width) | 80 inches (height) | 10″ from NE corner |
| Sink Plumbing | N/A | N/A | Under Wall B, 36″ from NW corner |
Measuring for Specific Cabinet Types
Different cabinet types require slightly different measurement considerations.
Base Cabinets
These sit on the floor and support countertops.
- Wall Length: Measure the length of each wall where base cabinets will be installed.
- Depth: Standard base cabinet depth is 24 inches, but measure your existing space if you have specific constraints.
- Height: Standard base cabinet height is 34.5 inches, designed to reach a 36-inch countertop height with a standard countertop thickness.
Wall/Upper Cabinets
These hang on the wall above countertops.
- Wall Length: Measure the wall length for placement.
- Depth: Standard wall cabinet depth is usually 12 inches.
- Height: Common wall cabinet heights are 30, 36, or 42 inches. This is where ceiling height is critical. Ensure there’s enough clearance between the countertop and the bottom of the wall cabinet. A standard space is 18 inches.
- Distance from Ceiling: Measure the distance from the top of your planned wall cabinets to the ceiling. This helps determine if taller cabinets are feasible or if a filler panel is needed.
Tall Cabinets (Pantry, Oven Cabinets)
These are floor-to-ceiling or near floor-to-ceiling.
- Height: Measure the full height from the floor to the ceiling in the exact location the tall cabinet will stand.
- Depth: Standard depths are similar to base cabinets (24 inches), but can vary.
- Width: Measure the available width for the cabinet.
Special Considerations for Cabinet Layout Planning
Beyond basic measurements, think about how your cabinets will function together. This is key to cabinet layout planning.
Appliance Placement and Cabinets
- Refrigerator: Requires a dedicated space, often with extra clearance on the sides and top for ventilation. Consider door swing.
- Dishwasher: Needs plumbing and electrical access and a specific width (typically 24 inches).
- Oven/Range: The range requires ventilation and a specific width. Wall ovens need cabinet space with proper depth and height.
- Microwave: Can be built-in, over-the-range, or counter-top. Each has different space requirements.
Sink and Faucet Considerations
- Sink Base Cabinet: This cabinet must be wider than the sink itself to accommodate the sink’s mounting and plumbing. Check the manufacturer’s recommendations for the sink you choose.
- Faucet Clearance: Ensure there’s enough space behind the sink for the faucet handles and for easy access for maintenance.
Corner Cabinets
These can be tricky.
- Blind Corner Cabinets: Require you to measure the wall length leading into the corner. The cabinet itself will have a “face” that extends out, and the rest of its depth is hidden behind the adjacent cabinet.
- Lazy Susans or Pull-Outs: If you plan for these, you need to measure the internal corner dimensions or the cabinet opening width that allows them to function.
Measuring for Custom Cabinets
When measuring for custom cabinets, you have more flexibility but also a greater need for precision.
- Irregular Spaces: Custom cabinets are ideal for oddly shaped kitchens, nooks, or areas with unusual angles.
- Precise Detail: Measure every inch and nook. If a wall isn’t straight, note the deviation.
- Customization: You can specify exact depths and heights to maximize your space.
Double-Checking Your Measurements
Never skip this step. A second check can catch errors before they become costly problems.
Tips for a Thorough Review
- Recalculate: Go back through your measurements. Do the individual wall segments add up correctly?
- Measure Diagonally: As mentioned, measure diagonally across corners and even entire walls to ensure squareness.
- Visualize: Imagine placing the cabinets. Does the layout make sense? Will doors and drawers open freely?
- Consult a Professional: If you’re unsure, consider having a cabinet designer or installer review your measurements.
Understanding Kitchen Cabinet Dimensions
Knowing standard kitchen cabinet dimensions is helpful, but your unique measurements take precedence.
Standard Cabinet Sizes (in inches)
| Cabinet Type | Standard Widths | Standard Depths | Standard Heights |
|---|---|---|---|
| Base Cabinets | 9, 12, 15, 18, 21, 24, 27, 30, 33, 36, 42, 48 | 24 (box), 25.5 (with standard countertop) | 34.5 (box), 36 (with standard countertop) |
| Wall Cabinets | 12, 15, 18, 21, 24, 27, 30, 33, 36, 42, 48 | 12, 15, 18, 24 | 30, 36, 42 |
| Tall Cabinets | 18, 24, 30, 36 | 24 (box) | 84, 90, 96, 102, 108 |
Note: These are typical. Cabinet manufacturers offer a wide range of sizes, including custom options.
Factors Influencing Cabinet Size Choices
- Kitchen Size and Layout: Small kitchens may need shallower or narrower cabinets.
- Appliance Size: You need to accommodate specific appliance dimensions.
- Storage Needs: Do you need deeper drawers for pots and pans? Taller upper cabinets for extra storage?
- Aesthetics: The visual balance of cabinet sizes is important.
Frequently Asked Questions (FAQ)
Q1: Do I need to measure my walls for squareness?
Yes, measuring the diagonals of your walls, especially corners, is crucial. If the diagonal measurements are not equal, your walls are not square, and this will need to be accounted for in cabinet installation.
Q2: What if my kitchen walls are not straight?
If your walls are not straight, measure the length at the top, middle, and bottom. Record all measurements and note the deviation. Cabinet installers can often scribe cabinets to fit uneven walls, but they need to know the exact dimensions.
Q3: How much space should I leave between countertops and wall cabinets?
The standard clearance between the countertop and the bottom of wall cabinets is 18 inches. However, this can be adjusted based on your needs, such as accommodating larger appliances or adding a backsplash.
Q4: What if I’m installing a backsplash? How does that affect measurements?
The backsplash adds to the overall depth of the countertop assembly. If you have an existing backsplash, measure to the front edge of it. If you are adding a new one, account for its thickness when determining the final countertop depth and cabinet clearance.
Q5: Can I measure my kitchen myself or should I hire someone?
You can measure your kitchen yourself with careful attention to detail and the right tools. However, if you’re not confident or if your kitchen has many complexities, hiring a professional for measurements can prevent costly mistakes.
Q6: What is the difference between cabinet box dimensions and installed dimensions?
Cabinet box dimensions are the actual measurements of the cabinet unit itself. Installed dimensions include any added elements like toe kicks, decorative panels, or countertop overhangs, which contribute to the overall footprint in your kitchen.
By following this comprehensive guide, you’ll be well-equipped to measure your kitchen for cabinets accurately. This meticulous approach is your best defense against errors and the key to a beautifully functional new kitchen.