
Yes, you can absolutely spray paint kitchen cabinets for a smooth, professional finish that’s difficult to achieve with brushes or rollers. This guide will walk you through everything you need to know about using a cabinet painting sprayer to transform your kitchen.
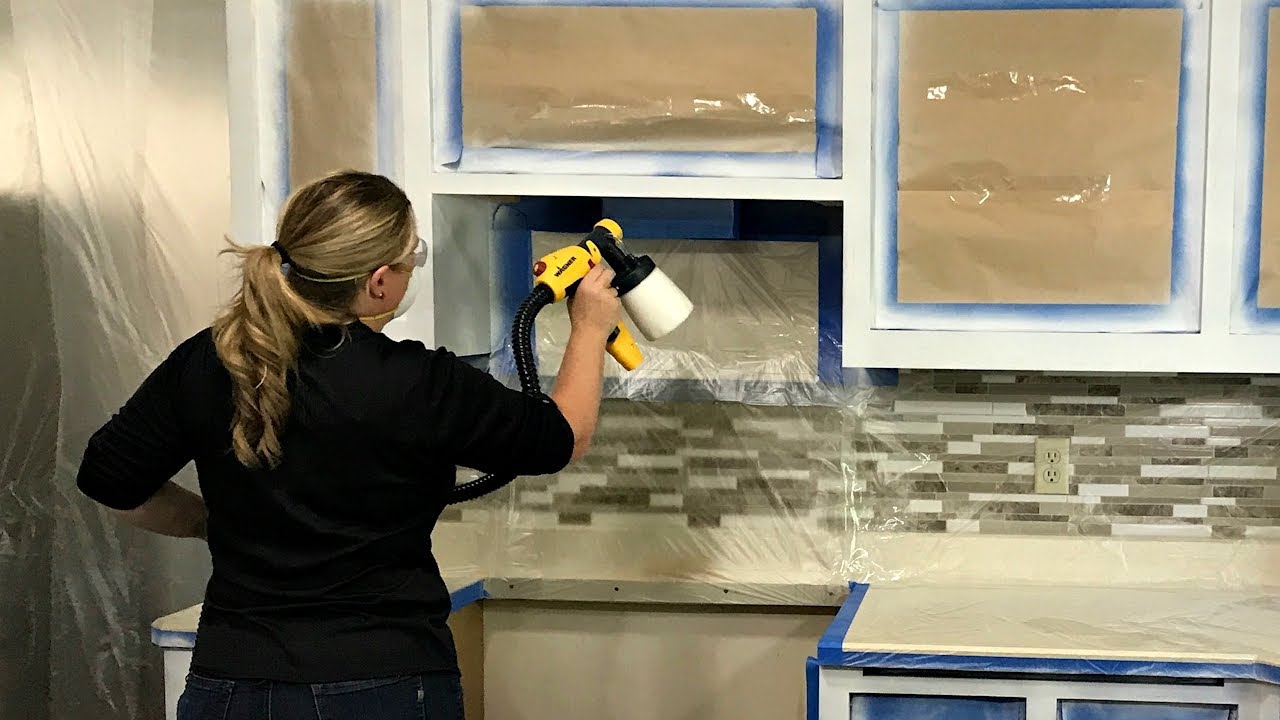
Image Source: i.ytimg.com
Why Spray Paint Your Kitchen Cabinets?
When considering a kitchen cabinet makeover, painting is a popular and cost-effective option. While brushing and rolling are viable methods, using a paint sprayer offers several distinct advantages, especially if you’re aiming for a showroom-quality finish. This method allows for an even, consistent coat of paint that eliminates brush strokes and roller marks, giving your cabinets a sleek, factory-like appearance. The speed at which you can cover large surfaces is also a significant benefit, making the overall project completion time much shorter. Furthermore, paint sprayers can reach into nooks and crannies that are difficult to access with other tools, ensuring every part of your cabinets is coated thoroughly.
Choosing the Best Sprayer for Kitchen Cabinets
Selecting the right equipment is crucial for a successful spray painting project. The best sprayer for kitchen cabinets will depend on your budget, the size of your project, and the type of paint you plan to use.
HVLP Sprayers: The Top Choice
For kitchen cabinets, HVLP sprayer kitchen cabinets are generally considered the gold standard. HVLP stands for High Volume, Low Pressure. These sprayers atomize paint at lower pressures, meaning they use more air to push the paint out. This results in:
- Less Overspray: This is a huge advantage when working in a home environment, as it minimizes the amount of paint that drifts onto surrounding surfaces.
- Better Control: The lower pressure provides a more controlled spray pattern, allowing for greater precision.
- Smoother Finish: HVLP sprayers are excellent at atomizing paint finely, leading to a much smoother, more professional-looking finish.
Popular HVLP Sprayer Options:
- Wagner Flexio Series: These are excellent entry-level to mid-range options that are very popular for DIY projects. They offer good control and a decent finish for the price.
- Graco Magnum Series: Graco offers a range of sprayers, and many of their models are well-suited for cabinet painting, often with more power and finer atomization than entry-level units.
- DeVilbiss FinishPro HVLP: For a more professional-grade finish and higher durability, DeVilbiss is a top-tier brand, though they come with a higher price tag.
Airless Sprayers: Pros and Cons
Airless sprayers are faster and can handle thicker paints. However, they produce more overspray and can be more difficult to control for intricate work like cabinets. If you choose an airless sprayer, you’ll need to:
- Use a Fine Finish Tip: This is essential for achieving a smoother finish on cabinets.
- Mask extensively: Be prepared for significant overspray protection.
- Practice: Get a feel for the spray pattern before tackling your cabinets.
When considering an airless sprayer for cabinets, prioritize models designed for fine finishing.
Other Sprayer Types to Consider:
- Electric Paint Sprayers (Non-HVLP): These can be a budget-friendly option, but often produce more overspray and a less refined finish compared to HVLP systems.
- Cans of Spray Paint: While convenient for small projects, using cans for an entire kitchen’s worth of cabinets is expensive, time-consuming, and rarely yields a professional, durable finish. It’s generally not recommended for a significant cabinet painting project.
Getting Started: Essential Supplies for Spraying
Before you even think about picking up a sprayer, gather all your necessary supplies. This preparation phase is critical to a successful outcome.
Table 1: Essential Supplies for Spray Painting Kitchen Cabinets
| Item | Description | Why It’s Important |
|---|---|---|
| Paint Sprayer | HVLP sprayer (recommended) or a fine-finish airless sprayer. | The primary tool for applying paint evenly and smoothly. |
| Primer | High-quality bonding primer specifically designed for cabinetry. | Ensures paint adheres well, blocks stains, and creates a uniform base for your topcoat. |
| Cabinet Paint | High-quality acrylic enamel or lacquer formulated for cabinets. | Provides durability, a smooth finish, and resistance to chipping and wear in a high-traffic area like the kitchen. |
| Paint Strainers | Fine-mesh strainers to filter paint and primer. | Prevents clogs in the sprayer by removing any dried paint flakes or debris. |
| Masking Paper | Wide rolls of paper to cover large surfaces. | Protects walls, countertops, floors, and appliances from overspray. |
| Painter’s Tape | High-quality painter’s tape in various widths. | Creates crisp, clean lines along edges and helps secure masking paper. Use tape designed for a clean release. |
| Plastic Sheeting | Heavy-duty plastic to cover larger areas or create a spray booth. | Offers an extra layer of protection against fine mist overspray. |
| Screwdriver/Drill | To remove cabinet doors, hinges, and hardware. | Allows for complete disassembly, enabling you to paint doors and boxes separately for a professional finish. |
| Sanding Sponges/Blocks | Fine-grit (150-220) for general scuff sanding, and potentially a bit coarser if there are imperfections. | Prepares surfaces for better adhesion and smooths out any rough spots. |
| Degreaser/Cleaner | TSP substitute or a good quality degreaser. | Essential for removing grease, grime, and any residues from cabinets, ensuring proper adhesion. |
| Rags/Microfiber Cloths | For cleaning and wiping surfaces. | To apply cleaners, wipe away dust, and generally maintain a clean working environment. |
| Drop Cloths | Canvas or plastic drop cloths for floors. | Protects your flooring from paint drips and overspray, especially in the spray area. |
| Safety Glasses | To protect your eyes from paint and dust. | Crucial safety gear. Paint can get into your eyes. |
| Respirator Mask | A good quality respirator with organic vapor cartridges. | Essential for respiratory protection when spraying paint, as fine paint particles can be inhaled. |
| Gloves | Nitrile or latex gloves. | Protects your hands from paint and cleaning chemicals. |
| Paint Thinner/Reducer | As recommended by your paint manufacturer for thinning. | May be needed to achieve the correct viscosity for spraying, especially with certain paints. Always use what the paint manufacturer specifies. |
| Spray Tent (Optional) | A dedicated area or tent set up for spraying. | Helps contain overspray and create a cleaner environment for spraying. |
| Paint Tray/Bucket | For pouring paint into the sprayer’s cup or reservoir. | Makes it easy to load the sprayer and filter the paint. |
| Extension Cord | If your sprayer isn’t battery-powered. | For powering your sprayer. Ensure it’s the correct gauge for your tool. |
Prepping Cabinets for Spraying: The Foundation of a Great Finish
This is arguably the most critical step in the entire cabinet painting refinishing sprayer process. Proper preparation ensures your paint adheres well, lasts longer, and looks its best. Rushing this stage will lead to a poor final result.
1. Remove Cabinet Doors, Drawers, and Hardware
- Take Photos: Before you start, take pictures of each cabinet with its corresponding door. This will help you reassemble them correctly later.
- Label Everything: Label each door and drawer with a small piece of painter’s tape so you know where it belongs. Label the corresponding cabinet box as well.
- Remove Hinges and Knobs: Use a screwdriver to detach doors and drawers. Store hinges and hardware in labeled bags or containers.
2. Clean Thoroughly
Grease and grime are the enemies of good paint adhesion.
- Degrease: Use a TSP substitute or a strong degreaser and a clean rag to wipe down every surface of the cabinet boxes and doors. Pay special attention to areas around the stovetop and sink.
- Rinse: Wipe down all surfaces with a damp cloth to remove any cleaning residue.
- Dry: Allow all surfaces to dry completely.
3. Sanding for Adhesion
Sanding creates a slightly rough surface that the primer and paint can grip onto.
- Scuff Sand: Use 150-220 grit sandpaper or a sanding sponge to lightly scuff all surfaces that will be painted. You don’t need to remove the old finish, just dull it down.
- Focus on Smoothness: Gently sand any drips or imperfections from the existing finish.
- Clean Dust: After sanding, wipe down all surfaces with a tack cloth or a microfiber cloth dampened with mineral spirits (if using oil-based paint) or water (if using water-based paint). This removes all sanding dust.
4. Repair Imperfections
- Fill Holes: Use wood filler to fill any dings, dents, or holes.
- Sand Smooth: Once the filler is dry, sand it smooth with fine-grit sandpaper.
- Clean Dust Again: Wipe away any dust created by sanding.
5. Masking: Protecting What You Don’t Want to Paint
This is where you create your “spray booth” within your kitchen. Good masking prevents hours of cleanup later.
- Cover Everything: Use masking paper and painter’s tape to cover countertops, backsplashes, appliances, floors, and any other surfaces you don’t want to paint.
- Seal Edges: Press the painter’s tape down firmly along all edges to prevent paint from seeping underneath.
- Consider a Spray Booth: For best results and minimal overspray in your living space, consider setting up a temporary spray booth in a garage or an unused room using plastic sheeting. Hang plastic from the ceiling and walls to create a contained environment.
How to Use a Paint Sprayer on Cabinets: Step-by-Step
Now that your cabinets are prepped and protected, it’s time to master the cabinet spray paint technique.
1. Prepare Your Sprayer
- Read the Manual: Always start by reading your sprayer’s instruction manual. Each model has specific setup and cleaning procedures.
- Assemble: Attach the correct spray tip and nozzle for your paint type and desired finish. For cabinets, a fine-finish tip is usually best.
- Strain Paint: Pour your primer or paint through a paint strainer into a clean bucket or the sprayer’s reservoir. This is a non-negotiable step.
2. Thin the Paint (If Necessary)
- Check Manufacturer’s Recommendation: Some paints require thinning to achieve the correct viscosity for spraying. Check the paint can or ask the paint store.
- Use the Right Reducer: Always use the thinner or reducer recommended by the paint manufacturer.
- Test Viscosity: Many HVLP sprayers have a viscosity cup. The paint should flow out of the cup within a specified time (usually around 10-15 seconds). If it’s too thick, add a small amount of reducer and test again.
3. Practice Your Spraying Technique
- Use Scrap Material: Before spraying your cabinets, practice on a piece of cardboard or scrap wood. This helps you get a feel for the sprayer’s output and how to create an even coat.
- Spray Strokes:
- Trigger Control: Get your trigger control and movement synchronized. Start spraying just before the edge of your surface and release the trigger just after you pass the other edge. This prevents paint buildup at the start and end of your passes.
- Consistent Distance: Hold the sprayer a consistent distance from the surface, typically 8-12 inches, depending on the sprayer and paint.
- Overlapping Passes: Overlap each spray pass by about 50% to ensure complete coverage and avoid lines.
- Keep the Sprayer Moving: Never stop spraying while the trigger is pulled.
- Parallel Strokes: Keep your strokes parallel and at a consistent speed.
4. Spraying Cabinet Doors
- Lay Doors Flat: Lay cabinet doors on a flat surface (e.g., sawhorses with painter’s pyramids or blocks to keep them elevated) in a well-ventilated area.
- Apply Primer: Apply one or two thin coats of primer, following your practiced technique. Allow adequate drying time between coats as recommended by the primer manufacturer.
- Light Sanding (Optional): After the primer is dry, you can lightly sand with 220-grit sandpaper for an extra smooth finish, then wipe with a tack cloth.
- Apply Topcoat: Apply your chosen cabinet paint in thin, even coats. It’s better to apply multiple thin coats than one thick coat.
- Drying Time: Allow sufficient drying time between coats according to the paint manufacturer’s instructions. This is crucial for durability.
5. Painting Cabinet Boxes with Sprayer
- Work Section by Section: Tackle one cabinet box at a time.
- Spray Interior First (Optional): Some people prefer to spray the interiors of cabinets first. If you do this, ensure you mask off the exterior very carefully.
- Spray Exterior: Use your practiced technique to spray the exterior of the cabinet boxes. Pay attention to corners and edges.
- Follow Drying Times: Allow proper drying time between coats for the cabinet boxes as well.
Applying Primer and Paint
Primer Coats
- Purpose: Primer creates a uniform surface, enhances paint adhesion, and blocks stains that might bleed through your topcoat.
- Application: Apply thin, even coats. Most cabinet projects benefit from at least one good coat of primer. For very dark cabinets or if you’re painting with a light color, two coats of primer might be necessary.
- Drying: Always adhere to the manufacturer’s recommended drying times.
Topcoat Application
- Multiple Thin Coats: This is the key to a smooth, professional finish when you spray paint kitchen cabinets. Aim for 2-3 thin coats of your topcoat.
- Flash Off Time: Allow paint to “flash off” (partially dry) between coats. This typically means waiting 10-30 minutes, but always check your paint can.
- Inspect: Between coats, lightly inspect for any drips or uneven coverage. You can often fix minor issues with a small brush or by lightly sanding and re-spraying that specific spot.
Reassembly and Finishing Touches
Once all your cabinet doors and boxes have been painted and have dried for the recommended time (often 24-48 hours before handling, but longer for full cure), it’s time to reassemble.
- Attach Hardware: Reattach hinges to the doors and then hang the doors back on the cabinet boxes.
- Install Knobs/Pulls: Screw in your new or existing hardware.
- Remove Masking: Carefully remove all painter’s tape and masking paper. If any paint bled under the tape, you can gently score the edge with a craft knife before peeling.
- Clean Up: Clean your sprayer immediately according to the manufacturer’s instructions.
Troubleshooting Common Spray Painting Issues
Even with careful preparation, you might encounter some snags. Here’s how to address them:
What is “Orange Peel”?
Orange peel is a common issue where the paint finish has a texture similar to the skin of an orange. It happens when the paint dries too quickly or is not atomized finely enough.
- Solutions:
- Reduce paint viscosity by adding more reducer.
- Increase the spray gun’s air pressure (if using HVLP).
- Hold the sprayer closer to the surface.
- Use a finer spray tip.
- Ensure consistent, even strokes.
- Try a different paint if the current one is problematic for spraying.
What are “Runs” or “Drips”?
Runs and drips occur when too much paint is applied to one area, and gravity pulls it down before it can dry.
- Solutions:
- Apply thinner coats.
- Keep the sprayer moving consistently.
- Hold the sprayer at the correct distance (not too close).
- Overlap passes correctly (not too much overlap).
- If a run occurs, don’t try to fix it while wet. Let it dry, then gently sand it smooth and re-spray the area.
What is “Splatters”?
Splatters are uneven blobs of paint. This usually indicates a clogged spray tip, insufficient paint flow, or a damaged spray tip.
- Solutions:
- Ensure paint and any strainers are clean.
- Check for clogs in the spray gun and tip.
- Clean the spray gun thoroughly.
- If the tip is damaged, replace it.
What is “Poor Adhesion” or “Peeling”?
This is usually a result of poor preparation.
- Solutions:
- Ensure surfaces were thoroughly cleaned and degreased.
- Sand surfaces adequately to create a profile for adhesion.
- Use a high-quality primer.
- Allow sufficient drying time between coats.
Maintaining Your Sprayer
Regular maintenance is key to keeping your cabinet painting sprayer in good working order for this and future projects.
- Immediate Cleaning: Clean your sprayer thoroughly immediately after each use. Dried paint is much harder to remove.
- Flush with Water/Solvent: Follow the manufacturer’s instructions for flushing. For water-based paints, use water. For oil-based paints, use the appropriate solvent (mineral spirits, lacquer thinner).
- Disassemble and Clean: Disassemble the fluid needle, nozzle, and air cap and clean them individually.
- Lubricate: Lightly lubricate moving parts as recommended by the manufacturer.
- Store Properly: Store your sprayer in a clean, dry place.
Frequently Asked Questions (FAQ)
Can I spray paint kitchen cabinets with a handheld sprayer?
Yes, many handheld electric sprayers, like the Wagner Flexio series, are designed for DIY projects and can achieve good results on kitchen cabinets, especially with proper prep and technique. They offer a good balance of affordability and performance.
What type of paint is best for spraying kitchen cabinets?
High-quality acrylic enamel or water-based lacquers are generally recommended for kitchen cabinets. These paints offer good durability, a smooth finish, and are easier to clean up than oil-based paints. Always ensure the paint is suitable for spraying and follow the manufacturer’s thinning recommendations.
Do I need to use a primer?
Yes, using a high-quality bonding primer is highly recommended. It helps the paint adhere better, blocks stains from the old finish, and provides a uniform base color, ensuring your topcoat looks its best.
How many coats of paint do I need?
For a durable and smooth finish, you’ll typically need 2-3 thin coats of your topcoat, applied over 1-2 coats of primer. It’s always better to apply multiple thin coats rather than one thick coat to avoid drips and runs.
How long does it take to spray paint kitchen cabinets?
The actual spraying time might be only a few hours, but the entire process, including preparation, drying between coats, and reassembly, can take several days. Proper drying time is crucial for a lasting finish.
Is it better to spray paint doors separately or on the cabinets?
It is significantly better to spray cabinet doors separately. Laying them flat on sawhorses or painter’s pyramids allows for even application of paint on both sides and edges without drips, and ensures you can achieve a much smoother finish than trying to spray them while attached.
By following these detailed steps and tips, you’ll be well-equipped to use a paint sprayer and achieve a beautiful, professional-looking finish on your kitchen cabinets. Happy painting!