
Can you replace a kitchen sink strainer yourself? Absolutely! Replacing a kitchen sink strainer is a manageable DIY project that most homeowners can tackle with basic tools and a little patience. If your current strainer is cracked, leaking, or clogged beyond repair, a fresh one will restore your sink’s functionality and prevent potential water damage.
A malfunctioning kitchen sink strainer can be more than just an annoyance; it can lead to slow drains, unpleasant odors, and even costly water damage if leaks go unnoticed. Thankfully, kitchen sink strainer replacement is a task that many can accomplish with the right guidance. This guide will walk you through the entire process, from identifying the need for replacement to how to install new sink strainer components. We’ll cover everything you need to know about your sink drain assembly and how to give it a new lease on life.
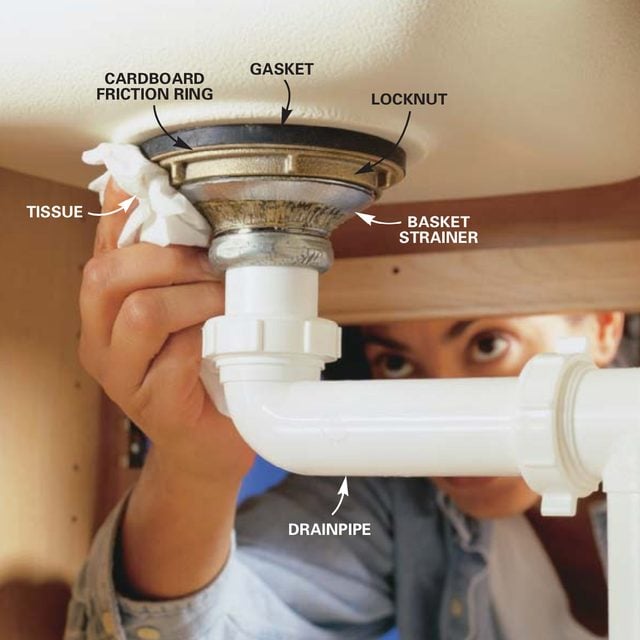
Image Source: www.familyhandyman.com
Why Replace Your Kitchen Sink Strainer?
Several signs point to a failing sink strainer. Ignoring these can lead to bigger problems down the line.
Common Indicators of a Problematic Strainer:
- Slow Drains: If water backs up in your sink and drains slowly, even after drain cleaning kitchen sink efforts, the strainer might be the culprit. Debris can accumulate and restrict water flow.
- Persistent Odors: A dirty or damaged strainer can trap food particles and moisture, leading to unpleasant smells that can permeate your kitchen. Sometimes, a thorough cleaning isn’t enough for a kitchen sink strainer repair.
- Leaks: You might notice water pooling around the base of the strainer or dripping underneath the sink. This is a clear sign that the seals are compromised and fixing leaky sink strainer issues require a replacement.
- Physical Damage: Cracks or rust on the strainer basket or the flange can compromise its integrity and lead to leaks or improper drainage. This makes replacing sink strainer basket essential.
- Difficulty with the Stopper: If your kitchen sink stopper replacement is also a concern, a worn-out strainer assembly might be contributing to the issue, preventing a proper seal.
Gathering Your Tools and Materials
Before you start, ensure you have all the necessary items. This will make the kitchen sink strainer replacement process smoother and more efficient.
Essential Tools:
- Bucket or Bowl: To catch any residual water from the drain pipe.
- Adjustable Wrench or Basin Wrench: A basin wrench is particularly useful for reaching nuts in tight spaces under the sink.
- Screwdriver (Phillips or Flathead): Depending on the type of screws used in your drain assembly.
- Pliers: Useful for gripping and turning stubborn parts.
- Putty Knife or Scraper: To remove old plumber’s putty.
- Rags or Towels: For wiping up spills and cleaning.
- Plumber’s Putty or Silicone Sealant: For creating a watertight seal.
- New Sink Strainer Assembly: Ensure it’s compatible with your sink’s material and size. This includes the strainer basket and sometimes the entire sink drain assembly.
Choosing the Right New Strainer
When selecting a new strainer, consider these factors:
- Material: Stainless steel is durable and resistant to rust. Brass is also a good option. Plastic strainers are less common for the main assembly but are often used for strainers themselves.
- Finish: Match it to your faucet and other kitchen hardware (chrome, brushed nickel, oil-rubbed bronze, etc.).
- Type: Most kitchen sinks use a standard screw-in or push-and-twist type strainer. Check your existing one to know what to buy.
- Basket Strainer vs. Simple Strainer: Most kitchen sink strainers come with a removable basket to catch food debris. Ensure your new one includes this feature.
Step-by-Step Guide: How To Replace Strainer In Kitchen Sink
Follow these detailed steps for a successful kitchen sink strainer replacement.
Step 1: Prepare the Area
- Clear out the cabinet space under your sink. This gives you ample room to work.
- Place a bucket or bowl directly underneath the existing drain assembly to catch any water.
- Lay down some old towels or rags to absorb any spills.
Step 2: Remove the Old Strainer
This is often the most challenging part, especially if the old putty has hardened or corrosion has set in.
- Locate the Locknut: Underneath the sink, find the large nut that secures the strainer body to the sink basin.
- Loosen the Locknut: Use your adjustable wrench or basin wrench to turn the locknut counter-clockwise. If it’s very tight, you might need to apply some penetrating oil and let it sit for a few minutes.
- Remove the Strainer Body: Once the locknut is loose enough, the entire strainer assembly should detach from the sink. You might need to gently twist or pull from above.
- Clean Away Old Putty: From the top of the sink, push out the old strainer basket. Use your putty knife or scraper to remove any remaining plumber’s putty or sealant from the sink drain opening. This is crucial for a good seal with the new strainer.
Step 3: Clean the Sink Opening
- Wipe down the area around the drain opening thoroughly with a damp cloth. Ensure it’s free of debris, food particles, and old sealant. A clean surface is essential for a proper seal. You might need to do some light drain cleaning kitchen sink here as well.
Step 4: Install the New Strainer Assembly
This is where you’ll be how to install new sink strainer.
- Apply Plumber’s Putty: Take a generous amount of plumber’s putty and roll it into a rope, about ½ inch thick.
- Wrap the Flange: Carefully wrap this rope of putty around the underside of the new strainer’s flange (the part that sits against the sink from the top). Ensure it’s continuous and forms a good seal.
- Insert the New Strainer: From the top of the sink, push the new strainer assembly (flange first) down into the drain opening. Press firmly to squeeze out some of the putty.
- Add Rubber Gasket and Washer: From underneath the sink, slide the rubber gasket, followed by the fiber or plastic washer, onto the threaded tailpiece of the strainer.
- Thread on the Locknut: Screw the locknut onto the tailpiece. Hand-tighten it first.
- Position and Tighten: From the top, ensure the strainer is straight and centered in the sink. Use your basin wrench to hold the strainer steady while you tighten the locknut from underneath with your adjustable wrench. Tighten it firmly but avoid overtightening, which could crack the sink. The excess plumber’s putty should squeeze out around the flange.
Step 5: Connect the Drain Pipe and Test
- Reassemble the Drain: Reconnect any drain pipes that you may have disconnected. Ensure all connections are secure.
- Water Test: Once everything is reassembled, plug the sink drain and fill the sink with a few inches of water. Let it sit for a few minutes.
- Check for Leaks: Carefully inspect the area around the strainer flange (top and bottom) and all drain pipe connections for any signs of leakage.
- Drain and Re-check: Pull the stopper and let the water drain. Check again for leaks as the water flows out. If you see any drips, you may need to tighten the locknut slightly or check the putty seal.
Troubleshooting Common Issues
Even with careful work, you might encounter minor problems.
Fixing Leaky Sink Strainer Issues:
- Leaking at the Flange: This usually means the plumber’s putty seal wasn’t adequate. You may need to remove the assembly, clean off the old putty, reapply fresh putty, and reinstall.
- Leaking at the Locknut: Ensure the locknut is sufficiently tightened. Check that the rubber gasket and washer are properly seated.
- Leaking at Drain Pipe Connections: Tighten the slip nuts on the drain pipes. If the problem persists, the washers inside might be worn or missing.
When to Consider Replacing Other Sink Drain Parts:
Sometimes, a faulty strainer is a symptom of a larger issue with your kitchen sink drain parts. If you’re replacing sink strainer basket and notice other parts, like the tailpiece, P-trap, or the pipe connecting to the wall, are heavily corroded or damaged, it might be wise to replace those as well to prevent future problems.
Advanced Tips and Considerations
For those looking for a more permanent or specialized solution, consider these points.
Using Silicone Sealant:
While plumber’s putty is traditional, some prefer using silicone sealant for how to install new sink strainer. Silicone can offer a more durable and flexible seal, especially for certain sink materials like granite composite or stainless steel where putty might not adhere as well over time. Ensure you use a sealant specifically designed for plumbing applications.
Replacing the Entire Sink Drain Assembly:
In some cases, the entire sink drain assembly might be outdated or corroded. This typically includes the strainer, tailpiece, and P-trap. If you’re doing a major overhaul or have significant wear and tear, replacing the whole unit might be more efficient than just kitchen sink strainer replacement. This ensures all components are working harmoniously.
Dealing with Stubborn Strainers:
If a strainer is seized due to corrosion or old putty, a penetrating oil can help loosen the locknut. In extreme cases, you might need to use a hacksaw to cut through the locknut and carefully remove the old assembly. Be cautious not to damage the sink basin itself.
Maintaining Your New Strainer:
To prolong the life of your new strainer and avoid future kitchen sink strainer repair needs:
- Regularly remove the strainer basket and clean out food debris.
- Avoid pouring grease or coffee grounds down the drain, as these can contribute to clogs and strain the strainer.
- Periodically flush the drain with hot water or a mixture of baking soda and vinegar to help keep it clear and odor-free. This can help with unclog kitchen sink strainer issues before they become severe.
Kitchen Sink Strainer Components Explained
Let’s break down the parts of a typical sink drain assembly. Knowing these terms helps when buying replacements or diagnosing problems.
| Component | Description | Function |
|---|---|---|
| Strainer Flange | The visible metal ring that sits at the top of the drain opening in the sink. | Creates a watertight seal with the sink basin, preventing water from leaking around the opening. |
| Strainer Basket | The removable cup with holes that fits inside the strainer. | Catches food scraps and debris, preventing them from entering the drain pipes. Often paired with a stopper. |
| Strainer Body | The main part of the strainer that sits below the sink basin. | Connects the flange to the tailpiece and supports the basket. |
| Rubber Gasket | A rubber ring that fits onto the tailpiece under the sink basin. | Provides a watertight seal between the strainer body and the underside of the sink. |
| Fiber Washer | A washer, often made of fiber or plastic, that fits above the rubber gasket. | Helps create a compressed, watertight seal against the sink basin when the locknut is tightened. |
| Locknut | A large nut that screws onto the tailpiece to secure the entire assembly. | Tightens the strainer assembly against the sink, compressing the gaskets and creating a seal. |
| Tailpiece | The short pipe extending downwards from the strainer body. | Connects the strainer to the rest of the drain piping (P-trap, etc.). |
Frequently Asked Questions (FAQ)
How often should I replace my kitchen sink strainer?
There’s no set schedule for replacing a kitchen sink strainer. They are generally quite durable. You should replace it if you notice any of the issues mentioned earlier, such as leaks, persistent odors, slow draining that can’t be fixed by drain cleaning kitchen sink, or physical damage.
What’s the difference between plumber’s putty and silicone sealant for sink strainers?
Plumber’s putty is a traditional, oil-based sealant that remains pliable. It’s excellent for creating a watertight seal between metal and non-porous surfaces like porcelain or stainless steel. Silicone sealant is a synthetic polymer that cures to form a flexible, waterproof barrier. It can be a good alternative, especially for materials like granite or if you anticipate more movement. Always ensure the product is rated for plumbing use.
Can I just replace the strainer basket, or do I need to replace the whole assembly?
If the strainer basket is damaged or the stopper mechanism is faulty, and the rest of the assembly (flange, body, tailpiece) is in good condition and not leaking, you might be able to replace just the basket. However, if you’re experiencing leaks around the flange or locknut, or if the metal is corroded, it’s best to replace the entire kitchen sink strainer assembly. This ensures all kitchen sink drain parts are working together effectively and addresses potential fixing leaky sink strainer issues at their source.
I can’t get the old strainer off. What should I do?
If the locknut is corroded or fused, try applying a penetrating oil (like WD-40) and letting it sit for 15-30 minutes. You may need to use a basin wrench for leverage. If it still won’t budge, you might have to carefully cut the old strainer assembly off with a hacksaw. Be extremely careful not to damage your sink.
My new strainer is still leaking. What went wrong?
The most common causes of leaks with a new installation are an insufficient or improperly applied plumber’s putty seal, or a loosely tightened locknut. Double-check that you used enough putty, that it formed a continuous rope, and that the locknut is snug. Also, ensure the rubber gasket and fiber washer are correctly positioned. If the leak persists, you may need to disassemble and reapply the sealants.
By following these comprehensive steps and tips, you’ll be well-equipped to handle your kitchen sink strainer replacement with confidence. A properly functioning strainer not only keeps your sink looking good but also protects your plumbing and your kitchen from potential water damage.