
Can you replace the wood under your kitchen sink yourself? Yes, you absolutely can! This guide will walk you through the process of replacing rotten wood under your kitchen sink, a common issue stemming from leaks. We’ll cover identifying the damage, gathering supplies, and safely executing the repairs. This is a manageable DIY under sink repair project for most homeowners, and it’s crucial for preventing further structural damage and mold growth.
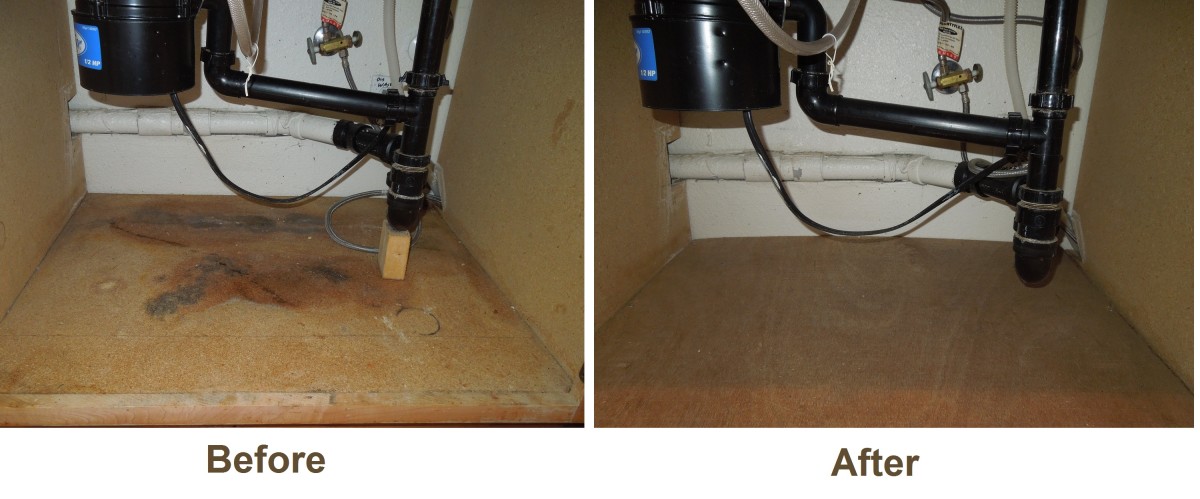
Image Source: images.saymedia-content.com
Why Wood Under Your Sink Degrades
The wood under your kitchen sink is susceptible to moisture. Leaks from the sink, pipes, faucet, or even condensation can saturate the particleboard or plywood that often forms the cabinet base. Over time, this constant dampness leads to rotten wood repair kitchen sink needs.
Common Causes of Wood Damage
- Leaky Pipes: Small drips from supply lines or drain pipes can go unnoticed for a long time, slowly soaking the wood.
- Faulty Faucet Seals: Worn-out seals or gaskets around the faucet can allow water to seep down the back of the sink and onto the cabinet floor.
- Drain Pipe Connections: Improperly sealed drain pipes are a major culprit for water damage under sinks.
- Garbage Disposal Leaks: The seals and housing of a garbage disposal can fail, leading to leaks.
- Dishwasher Hoses: The water supply or drain hoses for a dishwasher, if located nearby, can also cause leaks.
- Condensation: Cold water running through pipes can cause condensation, especially in humid environments, which can drip onto the wood.
Spotting the Signs of Trouble
Early detection is key to minimizing damage. Regularly inspecting the area under your sink can save you a lot of work and expense.
What to Look For
- Discoloration: The wood may turn dark brown or black in areas where it’s been wet.
- Soft or Spongy Texture: When you press on the wood, it might feel soft, spongy, or crumbly. This is a clear indicator of rot.
- Musty Odor: A persistent musty or moldy smell coming from under the sink is a strong sign of moisture and potential mold growth.
- Sagging or Warping: The cabinet floor might start to sag or warp as the wood loses its structural integrity.
- Visible Mold: Green, black, or white fuzzy patches on the wood are obvious signs of mold.
- Water Stains: Look for water rings or damp spots on the cabinet floor and walls.
When to Call a Professional
While this is a DIY-friendly task, consider calling a plumber or a general contractor if:
- You suspect a major pipe leak that you cannot identify or fix.
- The damage is extensive and affects the surrounding cabinet structure.
- You are uncomfortable working with plumbing or basic carpentry.
- You see significant mold growth, which may require professional mold remediation.
Preparing for the Repair: Gathering Your Tools and Materials
Before you start, ensure you have everything you need. This will make the DIY under sink repair go smoothly and efficiently.
Essential Tools
- Safety Gear:
- Safety glasses or goggles
- Work gloves
- Dust mask or respirator (especially if dealing with mold)
- Measuring and Marking:
- Tape measure
- Pencil
- Cutting and Shaping:
- Utility knife or heavy-duty scissors (for removing caulk and sealant)
- Jigsaw or reciprocating saw (with a wood blade) for cutting out damaged wood. A handsaw can work for smaller areas, but it’s more labor-intensive.
- Sander or sandpaper (medium and fine grit) for smoothing edges.
- Demolition and Removal:
- Pry bar or putty knife for gently separating components.
- Bucket and rags for cleaning up water.
- Installation:
- Screwdriver or drill with appropriate bits
- Clamps (if needed to hold pieces in place)
- Cleaning:
- Scrub brush
- Mild detergent or cleaner
- Bleach or mold killer (if mold is present)
- Microfiber cloths or sponges
Necessary Materials
- Replacement Wood:
- A piece of moisture-resistant plywood or a specialized cabinet repair panel. Typically, 1/2-inch or 3/4-inch thickness is used, depending on the original material. For replacing sink cabinet base sections, choose exterior-grade plywood or treated lumber if moisture is a persistent concern.
- Adhesives and Sealants:
- Wood glue (waterproof or exterior grade)
- Construction adhesive (optional, for extra strength)
- Caulk (kitchen and bath, mildew-resistant)
- Fasteners:
- Wood screws (stainless steel or coated to resist rust)
- Finishing (Optional):
- Primer and paint (waterproof)
Step-by-Step Guide to Replacing Rotten Wood
This section details how to tackle the rotten wood repair kitchen sink area and complete a cabinet floor replacement.
Step 1: Empty and Inspect the Cabinet
Start by removing everything from under the sink. This includes cleaning supplies, pipes, and any other items. Once the cabinet is clear, get down on your hands and knees and thoroughly inspect the wood for damage. Identify the full extent of the rot and any water-damaged areas. This is crucial for water damage remediation sink issues.
Step 2: Turn Off Water and Disconnect Plumbing
Safety First! You must turn off the water supply to the sink.
1. Locate the shut-off valves for the hot and cold water lines, usually found under the sink.
2. Turn the valves clockwise until they are snug.
3. Open the faucet to release any remaining water pressure and to confirm the water is off.
4. Place a bucket or towels under the pipes to catch residual water.
5. Carefully disconnect the water supply lines from the faucet. You might need a wrench.
6. Disconnect the P-trap (the U-shaped pipe under the drain) to remove the sink’s drainage system. Have your bucket ready for any trapped water.
Step 3: Remove the Sink (Optional but Recommended)
For better access and a cleaner repair, it’s often best to remove the sink itself.
1. Check how the sink is secured. It might be held in place by clips underneath or by plumber’s putty/caulk around the rim.
2. If caulked, use a utility knife to carefully cut through the sealant around the sink’s edge.
3. Remove any clips holding the sink in place.
4. Gently push the sink up from below or lift it out from the top. You might need a helper.
5. Place the sink aside in a safe place.
Step 4: Remove the Damaged Wood
This is where you’ll address the moldy wood removal sink and any damp plywood fix needs by cutting out the affected parts.
1. Use your tape measure and pencil to mark the boundaries of the rotten or damaged wood. Ensure your marks extend slightly beyond the visibly damaged area to get to solid wood.
2. Put on your safety glasses, gloves, and dust mask.
3. Using a jigsaw or reciprocating saw, carefully cut along your marked lines to remove the damaged section. If the damage is minor and contained to a small area, a utility knife might suffice for softer wood, but a saw is generally more effective for true rotten wood repair kitchen sink situations.
4. Be cautious not to cut too deep and damage any pipes or the sink cabinet’s structure.
5. Dispose of the removed wood properly. If it’s significantly moldy, consider double-bagging it for waterlogged wood disposal.
Step 5: Prepare the Area for the New Wood
Once the rotten wood is out, you need to prepare the space for the new material.
1. Clean the edges of the opening. Use a utility knife or sandpaper to remove any loose splinters or debris.
2. If you encountered mold, thoroughly clean the surrounding areas with a bleach solution (1 part bleach to 10 parts water) or a specialized mold cleaner. Allow the area to dry completely. Ensure good ventilation during this process.
3. Inspect the surrounding cabinet structure for any other signs of damage or rot. Address any minor issues before proceeding. This is part of effective water damage remediation sink protocols.
Step 6: Measure and Cut the Replacement Wood
Now it’s time to create your replacement piece. This is for your cabinet floor replacement.
1. Measure the opening you created very carefully. Measure both length and width in a few places to account for any slight inaccuracies.
2. Transfer these measurements to your new piece of plywood or cabinet panel.
3. Use your pencil to draw the cutting lines.
4. Carefully cut the new piece to fit the opening. Test the fit. You might need to make minor adjustments with sandpaper or a file if it’s too tight.
Step 7: Install the New Wood
Secure your new piece of wood.
1. Apply a generous amount of waterproof wood glue or construction adhesive to the edges of the opening where the new wood will sit.
2. Carefully place the new wood piece into the opening. Ensure it sits flush and is level.
3. If necessary, use clamps to hold the piece in place while the adhesive dries.
4. Once the new piece is seated, pre-drill pilot holes through the new wood and into the existing cabinet structure. This prevents the wood from splitting.
5. Drive wood screws through the pilot holes to securely fasten the new piece. Use stainless steel or coated screws to prevent rust. Space screws every 6-8 inches for a secure fit. This forms the new subfloor repair kitchen cabinet base.
Step 8: Reinstall the Sink and Plumbing
Reassemble everything you disconnected.
1. If you removed the sink, carefully place it back into its opening. Apply a bead of silicone caulk around the rim of the sink before setting it down if it was originally sealed that way.
2. Re-secure any sink clips.
3. Reconnect the P-trap and any other drain pipes. Ensure all connections are tight and sealed properly.
4. Reconnect the water supply lines to the faucet. Tighten them with a wrench, but don’t overtighten.
5. Turn the water supply valves back on slowly.
6. Check all connections for leaks. Turn on the faucet and let the water run for a few minutes, checking again for drips under the sink. Run both hot and cold water. Test the dishwasher if it was disconnected.
Step 9: Seal and Finish
The final touches make a difference.
1. Apply a bead of mildew-resistant kitchen and bath caulk around the edges where the sink meets the countertop, and around any pipe penetrations through the cabinet. This helps prevent future water ingress.
2. If the new wood is visible and you want a finished look, you can prime and paint it with a waterproof paint.
Dealing with More Extensive Damage
Sometimes, the damaged particleboard replacement is more significant, or the rot has spread to other parts of the cabinet. This might involve replacing sink cabinet base sections or even dealing with damage to the floor beneath the cabinet.
When the Damage is Widespread
If the rot extends beyond the cabinet floor and affects the cabinet walls or base, the repair becomes more complex.
- Cabinet Walls: If the side panels or back panel are rotten, you may need to cut out and replace these sections as well. This might involve carefully disassembling parts of the cabinet.
- Cabinet Base/Toe Kick: Damage to the base or the toe kick (the recessed area at the bottom of the cabinet) will require similar cutting and patching techniques using new wood.
- Subfloor: In severe cases, water may have leaked through the cabinet floor and onto the subfloor beneath. If the subfloor is damaged, it will need to be repaired or replaced. This is a more advanced repair that might involve lifting the cabinet or working from below if there’s access to a crawl space or basement. This would be a subfloor repair kitchen cabinet project.
Considerations for Plywood vs. Particleboard
Many kitchen cabinets, especially older ones or builder-grade models, use particleboard for the cabinet floor. Particleboard is highly susceptible to water damage and will swell and disintegrate when wet, making damaged particleboard replacement a frequent necessity. Plywood, especially exterior-grade or marine-grade plywood, is much more resistant to moisture and a better choice for repairs or replacements.
Preventing Future Water Damage
The best approach to rotten wood repair kitchen sink issues is prevention.
Proactive Measures
- Regular Inspections: Make it a habit to check under your sink at least every few months. Look and feel for any signs of moisture or leaks.
- Address Small Leaks Immediately: Don’t ignore minor drips. A small leak can cause significant damage over time. Call a plumber if you can’t fix it yourself.
- Install a Sink Mat: A rubber or plastic mat under the sink can catch small spills or drips and prevent them from reaching the wood.
- Improve Ventilation: Ensure the area under your sink is not stagnant. If it’s a damp environment, consider a small dehumidifier or ensuring the cabinet door isn’t sealed too tightly.
- Check Caulk and Seals: Periodically inspect the caulk around the sink rim and any pipe penetrations. Re-caulk as needed.
- Water Leak Detectors: Consider placing battery-operated water leak detectors under the sink. They will sound an alarm if they detect moisture, alerting you to a problem quickly.
Frequently Asked Questions (FAQ)
Q1: How long does it take to replace the wood under the sink?
A: For a straightforward DIY under sink repair where you only need to replace a section of the cabinet floor, it typically takes 2-4 hours, depending on your skill level and how easily you can access the area. If you need to remove the sink or deal with more extensive damage, it could take longer.
Q2: What kind of wood should I use for the replacement?
A: Plywood is generally recommended over particleboard due to its superior resistance to moisture. Exterior-grade plywood (like CDX plywood) or marine-grade plywood are excellent choices. If you’re only replacing a small section, matching the thickness of the original material is important.
Q3: I see mold under my sink. What should I do?
A: If you find mold, it indicates a moisture problem that needs immediate attention. Wear protective gear (gloves, mask, goggles). Clean the affected area with a bleach solution (1 part bleach to 10 parts water) or a dedicated mold remover. Ensure the area is thoroughly dried and ventilated. If the mold is extensive or you have respiratory issues, consider professional mold remediation. This is a critical part of water damage remediation sink work.
Q4: Do I need to be a plumber to do this repair?
A: You don’t need to be a professional plumber, but you do need to be comfortable with basic plumbing tasks like turning off water, disconnecting and reconnecting pipes, and identifying potential leaks. If you’re unsure about any plumbing aspect, it’s best to consult a plumber.
Q5: My cabinet floor is completely rotten and falling apart. What are my options?
A: If the damaged particleboard replacement is extensive, you might need to replace a larger section or even the entire cabinet floor. This involves carefully measuring, cutting, and securing a new piece of wood. For very severe damage, you might consider replacing the entire sink cabinet.
Q6: What’s the best way to dispose of rotten wood?
A: Bag the removed wood, especially if it’s moldy, in heavy-duty plastic bags. Seal them tightly. Check your local waste disposal regulations for proper disposal of potentially moldy materials.
By following these steps, you can effectively tackle the rotten wood repair kitchen sink and ensure the longevity of your kitchen cabinets. Regular checks and prompt action are your best defenses against further water damage remediation sink issues.