
Are your kitchen lights old? Do they buzz, flicker, or give off dim, yellow light? Many homes have old fluorescent kitchen lights. They might be in a large box on the ceiling or behind a plastic cover. Can I update fluorescent kitchen lighting myself? Yes, you certainly can! Upgrading these lights is a great way to make your kitchen brighter, more energy-efficient, and look much better. You can do this with simple changes or by replacing the whole light fixture. This guide will show you easy ways to update your fluorescent kitchen lighting. It will help make your kitchen modern and bright.
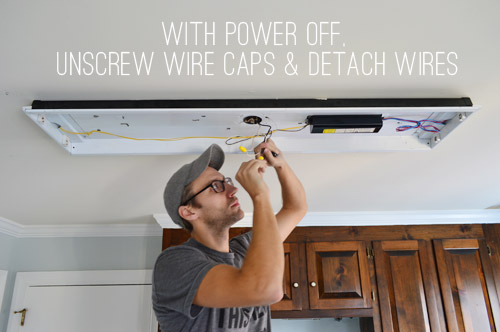
Image Source: images.younghouselove.com
Why Update Your Old Fluorescent Lights?
Old fluorescent lights come with many problems. They are often not very pleasing to look at. They can also be noisy and make your kitchen feel dark. Upgrading them brings many good changes.
Annoying Problems Solved
Old fluorescent lights are known for a few issues. These issues can make your kitchen less enjoyable.
Fluorescent Buzzing Flickering Fix
One common problem is the fluorescent buzzing flickering fix. These lights often hum loudly. They can also flicker when you turn them on. Sometimes they flicker even when they are on. This noise and flickering can be very annoying. It can make it hard to focus or relax in your kitchen. This is a clear sign it’s time for an upgrade. New lighting does not have these issues.
Poor Light Quality
Fluorescent lights often give off a dull, yellowish, or even greenish light. This kind of light can make food look less appetizing. It can also make colors in your kitchen seem off. Plus, they may not be bright enough for tasks like cooking or chopping food. Good light is key for a busy kitchen.
High Energy Use
Older fluorescent systems use a lot of electricity. They are not very good at turning power into light. This means your energy bills can be higher than they need to be. New lights use less power.
Dated Look
Fluorescent box lights often look old. They can make your kitchen feel stuck in the past. If you want a modern kitchen, these lights often stand out in a bad way. A lighting upgrade can change the whole feel of your kitchen.
Benefits of New Kitchen Lighting
Choosing to update your kitchen lights brings many good things. It’s more than just fixing a problem. It improves your home.
Energy Efficient Kitchen Lighting
One of the biggest pluses is saving energy. Energy efficient kitchen lighting uses much less power. This means lower electricity bills every month. LED lights are very efficient. They turn most of their power into light, not heat. This is good for your wallet and the planet.
Brighter, Better Light
New lights give off a much better kind of light. It can be bright and clear. This makes cooking easier and safer. You can see colors truly. Your kitchen will feel more inviting. Good light changes how a room feels.
Modern Kitchen Lighting Ideas
Updating your lights lets you bring in modern kitchen lighting ideas. You can pick new styles. These can match your kitchen’s look. Modern lights can be sleek, simple, or even smart. They can make your kitchen look fresh and new. This is a big step in modernizing your home.
Long Lifespan
LED lights last a very long time. Many can last for 20 years or more. This means you won’t need to change bulbs often. It saves you time and hassle. It is a long-term fix for your kitchen lighting needs.
Options for Updating Fluorescent Lights
There are a few main ways to update your kitchen lights. Each way has its own steps and benefits. You can choose what works best for you.
Option 1: Using LED Retrofit Kits
This is often the easiest way to update existing fluorescent fixtures. LED retrofit kits let you use your old light fixture housing. You just change out the insides. This saves time and work.
What Are LED Retrofit Kits?
An LED retrofit kit changes your old fluorescent fixture to use LED lights. It often includes new LED tubes or a new LED panel. These kits are made to fit right into your old light fixture. They are a popular choice for quick updates.
Types of LED Retrofit Tubes
There are two main types of LED tubes for retrofits:
- “Plug-and-Play” (Type A): These work with your existing ballast. You just swap the old fluorescent tube for the new LED tube. No wiring changes are needed. This is the simplest option. But, if your ballast fails, the LED tube stops working too.
- “Ballast Bypass” (Type B): These ballast bypass LED tubes connect directly to your home’s power. You must remove the old fluorescent ballast. This makes the system more energy-efficient. It also means you never need to worry about a ballast failing. This option usually gives the most savings over time. It is a very common and good choice.
- “Hybrid” (Type C): These can work with or without a ballast. They offer flexibility. You can use them “plug-and-play” first. Then, you can remove the ballast later if it fails or you want more efficiency.
Safety First: Important Warning
Before you start any work, always, always, turn off the power to the light fixture at your circuit breaker. Use a non-contact voltage tester to make sure the power is off. Safety is the most important thing.
Steps for Installing Ballast Bypass LED Tubes
This method gets rid of the old ballast. It is a great way to improve efficiency and avoid future problems.
Tools You Will Need:
* Screwdriver (flathead and Phillips)
* Wire strippers
* Pliers
* Non-contact voltage tester
* New ballast bypass LED tubes
* Wire nuts
* Ladder (if needed)
Step-by-Step Guide:
- Turn off Power: Go to your home’s main electrical panel. Find the breaker that controls your kitchen lights. Flip it to the “OFF” position. Tag it so no one turns it back on.
- Confirm Power is Off: Use your non-contact voltage tester. Touch it to the wires inside the light fixture. If it beeps or lights up, the power is still on. Stop and recheck the breaker.
- Remove Cover and Old Tubes: Take off the light fixture’s plastic cover or diffuser. Carefully remove the old fluorescent tubes. Twist them gently and pull them out.
- Access the Ballast: You will need to get to the ballast. This is a metal box inside the fixture. It has many wires going to it. You might need to remove a metal plate to see it.
- Perform Fluorescent Ballast Removal: The ballast has wires connecting it to the power source and to the lamp holders (tombstones).
- Cut Wires: Use wire cutters to cut the wires going to and from the ballast. Leave enough wire length to strip and connect new wires. You’ll usually see black (hot) and white (neutral) wires coming into the ballast. You’ll also see other colored wires (red, blue, yellow) going from the ballast to the lamp holders.
- Remove Ballast: Unscrew or unbolt the ballast from the fixture. Take it out. Throw it away properly, as some contain harmful chemicals. Check local rules for disposal.
- Rewire the Lamp Holders: This is the key step. You need to connect the lamp holders directly to the power source.
- Single-Ended Power: If your new LED tubes are “single-ended,” power only one end of the lamp holder. Connect the black (hot) wire to one side of the lamp holder at one end of the fixture. Connect the white (neutral) wire to the other side of the same lamp holder. You will not use the lamp holders at the other end of the fixture for power. Check your LED tube instructions for which pins need power.
- Double-Ended Power: If your new LED tubes are “double-ended,” power both ends of the lamp holders. Connect the black (hot) wire to one side of the lamp holder at one end of the fixture. Connect the white (neutral) wire to one side of the lamp holder at the other end of the fixture.
- Use Wire Nuts: Use wire nuts to make sure all connections are tight and safe.
- Install New LED Tubes: Insert the new ballast bypass LED tubes into the lamp holders. Make sure they click into place.
- Replace Cover: Put the plastic cover or diffuser back on the fixture.
- Restore Power: Go back to your circuit breaker and turn the power back “ON.”
- Test Lights: Check to see if your new LED lights are working. Enjoy your bright, modern kitchen!
Table: Ballast Bypass Pros and Cons
| Feature | Pros | Cons |
|---|---|---|
| Efficiency | Very high energy savings | Requires more wiring work |
| Lifespan | LED tube lasts longer (no ballast to fail) | Not “plug and play” |
| Cost | Higher upfront, lower long-term | Some older fixtures may be hard to rewire |
| Light Quality | Excellent, instant on, no flicker |
Option 2: Full Kitchen Light Fixture Replacement
Sometimes, you might want to replace the whole light fixture. This is a good choice if your old fixture is damaged or if you want a totally new look. This is a more involved step, but it gives you full control over the style.
When to Replace the Whole Fixture?
You should consider a kitchen light fixture replacement if:
* Your existing fixture is old, rusty, or damaged.
* You want a completely new style or design.
* You are doing a full kitchen remodel.
* The wiring inside the old fixture is in bad shape.
Modern Kitchen Lighting Ideas for Replacement
There are many modern kitchen lighting ideas for new fixtures.
- Flush Mount Lights: These sit flat against the ceiling. They are good for low ceilings.
- Semi-Flush Mount Lights: These hang a little bit from the ceiling. They offer more style than flush mounts.
- Pendant Lights: These hang down from the ceiling. They are great for islands or peninsulas.
- Track Lighting: A track with multiple lights that can be aimed. Good for flexible lighting.
- Recessed LED Kitchen Lights: These lights are hidden inside the ceiling. They give a very clean, modern look. They can also provide strong general lighting.
Safety First: Important Warning
Always, always, turn off the power to the light fixture at your circuit breaker. Use a non-contact voltage tester to make sure the power is off before touching any wires.
Steps for Replacing a Kitchen Ceiling Light Upgrade
This involves taking down the old light and putting up a brand new one.
Tools You Will Need:
* Screwdriver (flathead and Phillips)
* Wire strippers
* Pliers
* Non-contact voltage tester
* New light fixture
* Wire nuts
* Ladder (if needed)
Step-by-Step Guide:
- Turn off Power: Go to your home’s main electrical panel. Find the breaker that controls your kitchen lights. Flip it to the “OFF” position.
- Confirm Power is Off: Use your non-contact voltage tester to double-check that no power is coming to the light fixture wires.
- Remove Old Fixture:
- Take off any decorative covers or diffusers.
- Locate the screws or nuts that hold the fixture to the ceiling box. Unscrew them.
- Carefully lower the fixture. You will see wires connected with wire nuts.
- Disconnect Wires: Untwist the wire nuts. Separate the wires. There will usually be black (hot), white (neutral), and a bare or green (ground) wire. Keep them separate.
- Completely remove the old fixture.
- Install New Mounting Bracket: Most new fixtures come with a mounting bracket. Screw this bracket to the electrical box in the ceiling. Make sure it is secure.
- Connect New Fixture Wires:
- Match the wires:
- Connect the black wire from the ceiling to the black wire of the new fixture.
- Connect the white wire from the ceiling to the white wire of the new fixture.
- Connect the bare copper or green ground wire from the ceiling to the ground wire (usually green or bare copper) of the new fixture.
- Use wire nuts to make all connections tight. Wrap electrical tape around the wire nuts for extra safety.
- Match the wires:
- Mount the New Fixture: Carefully push the connected wires back into the electrical box. Lift the new fixture and attach it to the mounting bracket. Screw it in securely.
- Install Bulbs and Cover: Screw in the new LED bulbs (if the fixture doesn’t have integrated LEDs). Put on any decorative covers or diffusers.
- Restore Power: Go back to the circuit breaker and turn the power back “ON.”
- Test Lights: Enjoy your brand new, modern kitchen light!
This kitchen ceiling light upgrade can totally change the look and feel of your kitchen.
Option 3: Adding New Lighting Layers
Sometimes, updating the main ceiling light is not enough. Adding other types of lights can make your kitchen even better. This creates layers of light. These layers improve how your kitchen looks and works.
Under Cabinet LED Lighting
One of the most popular additions is under cabinet LED lighting. These lights are put under your upper cabinets. They shine down on your countertops.
Benefits of Under Cabinet Lighting:
* Task Lighting: Great for food prep, reading recipes, or other countertop work.
* Accent Lighting: Creates a warm glow and highlights your backsplash.
* Ambiance: Makes the kitchen feel cozy and inviting.
* Energy Efficient: LEDs use very little power.
Types of Under Cabinet Lighting:
* LED Strips/Tapes: Flexible, thin strips that stick on. They give a smooth, even light.
* LED Puck Lights: Small, round lights that give bright spots of light.
* LED Bar Lights: Rigid light bars that give strong, even light.
Installation Tips:
* Power Source: Some plug into an outlet. Others are hardwired (connected directly to your home’s electrical system). Hardwired options look cleaner.
* Placement: Mount them towards the front edge of the cabinet. This helps avoid shadows on your counter.
* Wiring: Hide wires by running them along the back of the cabinet or through small holes.
Recessed LED Kitchen Lights
Another great option for layering light is recessed LED kitchen lights. These lights sit inside the ceiling. They are hidden and give a very clean, modern look. They are perfect for general lighting or for highlighting certain areas.
Benefits of Recessed Lights:
* Sleek Look: They do not hang down, making the ceiling look clean and uncluttered.
* Even Light: Many recessed lights can spread light evenly across the room.
* Adjustable: Some types have adjustable heads. You can point the light where you need it.
* Task and General Lighting: Can be used for both.
Placement Tips:
* General Lighting: Place them in a grid pattern across the ceiling. Plan them to avoid dark spots.
* Task Lighting: Place them directly over key work areas like islands, sinks, or main countertops.
* Spacing: A common rule is to space them about 3-4 feet apart. But this depends on ceiling height and light beam spread.
Installation Steps (for new installation, not replacing a fixture):
* Plan: Mark where each light will go on your ceiling.
* Cut Holes: Use a hole saw attached to a drill to cut circular holes.
* Wiring: Run electrical wires from your power source to each light. Use appropriate wiring methods (e.g., Romex cable).
* Connect Lights: Connect the wires from the ceiling to the wires on the recessed light housing. Use wire nuts.
* Insert Fixture: Push the recessed light into the hole. Spring clips usually hold it in place.
* Trim: Attach the decorative trim ring.
Adding these layers, especially under cabinet LED lighting and recessed LED kitchen lights, can transform your kitchen. They provide excellent task lighting and enhance the overall feel of the space.
Deciphering Light Color and Brightness
When picking new LED lights, two terms are very important: Color Temperature (CCT) and Lumens. Knowing these helps you choose the right light for your kitchen.
Grasping Color Temperature (CCT)
Color Temperature (CCT) tells you how warm or cool the light looks. It is measured in Kelvins (K).
- Warm Light (2700K-3000K): This light is soft and yellowish, like old incandescent bulbs. It creates a cozy, inviting feel. Good for dining areas or creating a relaxed mood.
- Cool White Light (3500K-4000K): This light is brighter and whiter. It is good for task lighting. It feels more modern and clean. This range is often best for kitchens where you do a lot of cooking.
- Daylight (5000K-6500K): This light is very white or has a blue tint. It mimics natural daylight. It is great for seeing fine details. Some people find it too harsh for a kitchen, but others like its clear light.
For kitchens, 3500K to 4000K is often a good choice. It offers good clarity for tasks without being too harsh.
Interpreting Lumens (Brightness)
Lumens measure how bright a light is. The more lumens, the brighter the light. Do not confuse lumens with watts. Watts tell you how much power a bulb uses. Lumens tell you how much light it gives off.
For a kitchen, you usually want plenty of light.
* General Lighting: Aim for about 50-75 lumens per square foot.
* Task Areas (like over a counter): You might want 75-100 lumens per square foot for these spots.
It is better to have more lumens and be able to dim the lights. This gives you control over the brightness.
Safety Measures and Best Practices
Working with electricity can be dangerous. Always follow these rules.
- Turn Off Power: This is the most important rule. Always turn off the circuit breaker before starting any work. Double-check with a voltage tester.
- Use Right Tools: Use tools made for electrical work. Make sure they are in good shape.
- Insulate Wires: Always use wire nuts to cover exposed wires. Wrap them with electrical tape for extra security.
- Follow Instructions: Read the instructions that come with your new lights or kits.
- Get Help: If you are unsure about any step, especially with wiring, hire a qualified electrician. It is safer to pay a professional than risk injury or fire.
- Dispose Properly: Old fluorescent tubes contain a small amount of mercury. Do not throw them in the regular trash. Take them to a special recycling center. Your local waste management or hardware store can tell you where. This is part of responsible fluorescent ballast removal and disposal.
Tools and Materials for Your Lighting Project
Having the right tools makes the job easier and safer.
- Screwdriver Set: Flathead and Phillips head.
- Wire Strippers: For removing insulation from wires.
- Wire Cutters: For cutting wires.
- Pliers: For gripping and twisting wires.
- Non-Contact Voltage Tester: Essential for safety. It tells you if wires are live.
- Ladder: For reaching ceiling fixtures safely.
- Safety Glasses: To protect your eyes.
- Work Gloves: To protect your hands.
- Wire Nuts: For connecting wires.
- Electrical Tape: For extra insulation on wire connections.
- New LED Retrofit Kit or New Light Fixture: Your chosen upgrade.
- New LED Bulbs (if not integrated in fixture): Pick the right CCT and lumens.
Wrapping Up Your Kitchen Lighting Project
Updating your fluorescent kitchen lighting is a smart move. It gets rid of the buzz and flicker. It saves energy. It makes your kitchen look modern and inviting. Whether you choose LED retrofit kits or a full kitchen light fixture replacement, you will love the change. Adding under cabinet LED lighting or recessed LED kitchen lights can complete the look. With careful planning and safety, you can easily transform your kitchen into a bright, modern, and energy-efficient space. Enjoy your new, beautifully lit kitchen!
Frequently Asked Questions (FAQ)
Q1: What is a ballast in a fluorescent light?
A ballast is like a power regulator for fluorescent lights. It controls the electric current going to the bulb. It helps the bulb start and stay lit. Old ballasts can buzz or flicker.
Q2: Can I put LED bulbs directly into my old fluorescent fixture?
It depends on the LED bulb. Some LED tubes are “plug-and-play” (Type A). These work with your old ballast. Others are “ballast bypass” (Type B). These need you to remove the ballast. Always check the bulb’s instructions.
Q3: How do I know if my LED tube is single-ended or double-ended power?
Your LED tube’s packaging or instructions will tell you. Single-ended tubes only get power from one end. Double-ended tubes get power from both ends. This affects how you wire them after fluorescent ballast removal.
Q4: Is it safe to remove the ballast myself?
If you are comfortable with basic electrical work and always turn off the power, it can be safe. But if you are unsure, it is best to hire a licensed electrician. Safety comes first.
Q5: How much money can I save by switching to LED kitchen lighting?
You can save a lot! LED lights use up to 80% less energy than old fluorescent lights. Over time, these savings add up. They also last much longer, saving you money on replacement bulbs. This is a key benefit of energy efficient kitchen lighting.
Q6: What is the best light color (CCT) for a kitchen?
For kitchens, most people prefer a neutral white light, like 3500K to 4000K. This provides good visibility for tasks. It also makes food and colors look natural. Warmer lights (2700K-3000K) are cozy but might not be bright enough for tasks.
Q7: Can I dim my new LED kitchen lights?
Yes, but you need special dimmable LED bulbs or fixtures. You also need an LED-compatible dimmer switch. Check the product details to make sure they work together.
Q8: Do I need special tools for under cabinet LED lighting?
For most plug-in or battery-operated under cabinet LED lighting, you only need basic tools like a screwdriver. For hardwired systems, you might need wire strippers and the skills to connect wires to an electrical source.
Q9: How long does it take to update kitchen lighting?
For a simple LED retrofit kit (ballast bypass), it can take 30 minutes to 1 hour per fixture. A full kitchen light fixture replacement might take 1 to 2 hours per fixture. Adding new recessed LED kitchen lights or under cabinet lights can take longer, depending on how many you install and if new wiring is needed.