
Can I use my KitchenAid mixer for more than just baking? Yes, your KitchenAid mixer is incredibly versatile! With the right attachments, it can become a powerhouse for many kitchen tasks beyond whipping cream or kneading dough. This guide will help you master your mixer and discover the exciting world of its essential attachments. Think of your stand mixer as the hub of your culinary adventures.
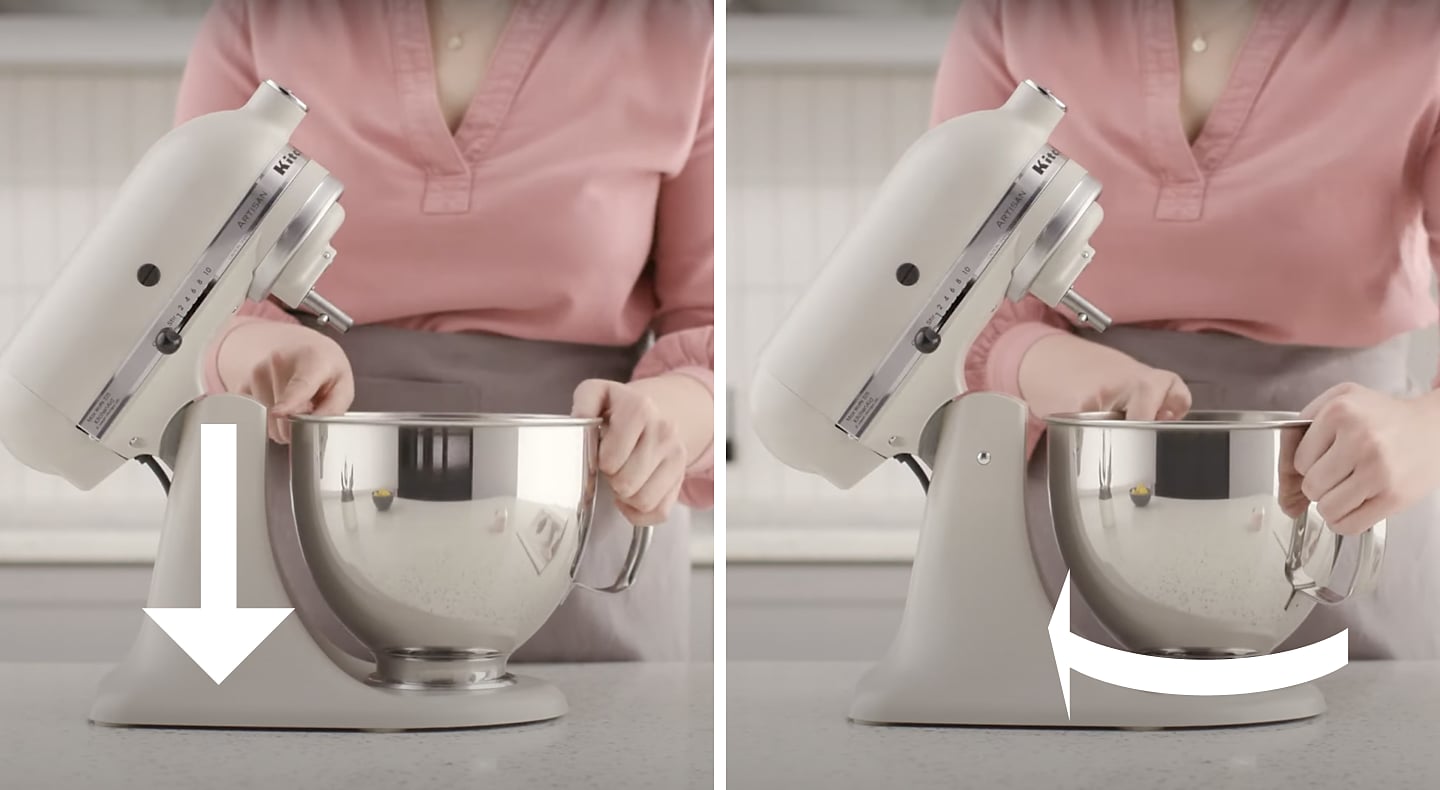
Image Source: www.kitchenaid.com
Getting Started with Your KitchenAid Stand Mixer
So, you’ve unboxed your shiny new KitchenAid mixer, or perhaps you’ve had yours for a while and want to unlock its full potential. This stand mixer guide is your starting point to becoming a KitchenAid pro.
The Anatomy of Your Mixer
Before you dive into recipes, let’s familiarize ourselves with the parts:
- The Bowl: This is where all the magic happens. KitchenAid mixers come with different bowl sizes, usually stainless steel.
- The Mixer Head: This tilts back to allow you to attach accessories.
- The Attachment Hub: Located at the front of the mixer head, this is where you connect most of your attachments.
- The Speed Control Lever: This allows you to adjust the mixing speed from slow to fast.
- The Beater/Whisk/Dough Hook: These are the primary mixing tools that attach to the beater shaft.
Basic Operation: Mixing Made Simple
Using your KitchenAid mixer for fundamental tasks is straightforward.
Attaching the Beater, Whisk, or Dough Hook
- Tilt the Mixer Head: Lift the mixer head up and back until it locks into place.
- Insert the Attachment: Align the flat side of the beater shaft (or the hook of the dough hook) with the beater shaft opening on the mixer.
- Push and Turn: Push the attachment up firmly and turn it slightly until it clicks into place.
- Lower the Mixer Head: Gently lower the mixer head back down until it locks.
Choosing the Right Attachment for the Job
- Flat Beater (or Paddle): This is your all-purpose tool. It’s perfect for cakes, cookies, brownies, mashed potatoes, and even shredded chicken. It scrapes the sides of the bowl efficiently.
- Wire Whisk (or Balloon Whisk): Use this for incorporating air. It’s ideal for whipping cream, beating egg whites for meringues, and making light batters like sponge cakes.
- Dough Hook: This is specifically designed for kneading yeast doughs, like bread, pizza dough, and cinnamon rolls. Its spiral shape mimics hand-kneading.
Setting the Speed
Your KitchenAid mixer typically has multiple speed settings.
- Speed 1 (Stir/Fold): Use for starting out, adding dry ingredients, or gently folding delicate mixtures.
- Speed 2 (Mix/Blend): Good for initial mixing of ingredients, like creaming butter and sugar.
- Speed 3 (Beat): Excellent for creaming, beating eggs, and mixing cookie dough.
- Speed 4 (Blend): Suitable for incorporating ingredients more thoroughly, like in cake batters.
- Speed 6 (Whip): Perfect for whipping cream or egg whites.
- Speed 10 (Whip): For fastest whipping and incorporating maximum air.
Table: Common Mixing Tasks and Recommended Speeds
| Task | Recommended Attachment | Recommended Speed |
|---|---|---|
| Creaming Butter & Sugar | Flat Beater | 2-4 |
| Mixing Cake Batter | Flat Beater | 4-6 |
| Kneading Bread Dough | Dough Hook | 2 |
| Whipping Cream | Wire Whisk | 6-10 |
| Beating Egg Whites | Wire Whisk | 8-10 |
| Mashing Potatoes | Flat Beater | 2-4 |
| Shredding Cooked Chicken | Flat Beater (on low speed) | 2 |
KitchenAid Cleaning Tips
Keeping your KitchenAid mixer clean ensures its longevity and hygienic operation.
- Unplug First: Always unplug the mixer before cleaning.
- Bowl and Attachments: Most stainless steel bowls and the flat beater, wire whisk, and dough hook are dishwasher safe. However, handwashing is often recommended to preserve their finish. If handwashing, use warm, soapy water and a soft cloth or sponge. Dry them thoroughly.
- Wipe Down the Mixer Body: Use a damp cloth to wipe the exterior of the mixer. For stubborn spots, you can use a mild, non-abrasive cleaner. Avoid immersing the mixer in water.
- Clean the Attachment Hub: Ensure the area around the attachment hub is clean and dry.
- Never use abrasive cleaners or steel wool on any part of your mixer.
Expanding Your Culinary Horizons: Essential KitchenAid Attachments
The real magic of a KitchenAid stand mixer lies in its attachment system. The attachment hub opens up a universe of possibilities, transforming your mixer into a versatile kitchen assistant. Let’s explore some of the most popular and useful KitchenAid mixer attachments.
1. The KitchenAid Food Processor Attachment
This attachment is a game-changer for prepping ingredients. It essentially turns your stand mixer into a high-powered food processor.
- What it does: Chops, slices, shreds, dices, and even purees ingredients.
- Key Features: Comes with various blades and discs for different tasks.
- Shredding/Slicing Discs: Perfect for cheeses, vegetables for salads or coleslaw, and potatoes for gratins. They usually have different thickness settings.
- Dicing Kit: Creates uniform cubes of fruits and vegetables for salsa, salads, or garnishes.
- All-Purpose Blade: For chopping nuts, making breadcrumbs, pureeing soups, or making pesto.
- Best KitchenAid Uses:
- Quickly shredding cheese for pizza or tacos.
- Slicing vegetables for stir-fries or salads.
- Dicing onions, peppers, and tomatoes for salsa.
- Making smooth purees for soups and baby food.
- Chopping nuts for baking or toppings.
- Tips for Use: Ensure all parts are securely locked into place. Start with a lower speed and gradually increase as needed. Don’t overfill the bowl.
2. The KitchenAid Blender Attachment
For those who love smoothies, soups, and sauces, this attachment is a must-have. It connects to the attachment hub and uses the power of your stand mixer motor.
- What it does: Blends ingredients into smooth and creamy textures.
- Key Features: Includes a blade assembly and a pitcher. Some models come with different-sized pitchers or travel cups.
- Best KitchenAid Uses:
- Creating silky smooth fruit smoothies.
- Making creamy soups and purees.
- Whipping up sauces and dips.
- Crushing ice for cocktails or slushies.
- Tips for Use: Start with liquids at the bottom, followed by softer ingredients, and then harder ingredients like ice or frozen fruit. Begin on a lower speed and gradually increase. Don’t overfill the blender jar.
3. The Pasta Maker Attachments
If you love fresh pasta, these are your gateway to authentic Italian flavors. There are several types of pasta attachments:
- The Pasta Roller: This attachment flattens dough into sheets of varying thicknesses, perfect for lasagna, ravioli, or fettuccine.
- The Fettuccine Cutter: Attaches to the roller and cuts the pasta sheets into classic fettuccine noodles.
- The Spaghetti Cutter: Cuts pasta sheets into thinner spaghetti noodles.
- The Angel Hair Cutter: Creates even finer, delicate strands of pasta.
- Best KitchenAid Uses:
- Making homemade fettuccine, spaghetti, and angel hair pasta.
- Creating lasagna sheets.
- Preparing dough for ravioli and other filled pastas.
- Tips for Use: You’ll need to make a basic pasta dough first (often using the dough hook). Cut the dough into manageable pieces before feeding it through the roller. Lightly flour the dough sheets to prevent sticking. Work in batches.
4. The Spiralizer Attachment
For healthy eating and creative presentation, the spiralizer is fantastic.
- What it does: Turns fruits and vegetables into noodles, ribbons, or peels.
- Key Features: Comes with different blades for various cuts, like spiral, peel, and ribbon.
- Best KitchenAid Uses:
- Making “zoodles” (zucchini noodles) as a pasta alternative.
- Creating veggie noodles from carrots, sweet potatoes, or squash.
- Peeling apples for pies or garnishes.
- Making curly fries or ribbons for salads.
- Tips for Use: Choose firm, cylindrical fruits and vegetables for best results. Secure the attachment and the vegetable properly.
5. The Ice Cream Maker Attachment
Enjoy homemade ice cream, sorbet, or gelato with this fun attachment.
- What it does: Churns and freezes your ice cream base.
- Key Features: A frozen bowl that connects to the mixer.
- Best KitchenAid Uses:
- Making classic ice cream flavors.
- Creating refreshing sorbets.
- Whipping up delicious gelatos.
- Tips for Use: The frozen bowl needs to be frozen solid for at least 12-24 hours beforehand. Follow your recipe precisely for the best texture.
6. The Meat Grinder Attachment
For the home chef who loves to control their ingredients, this attachment is invaluable.
- What it does: Grinds fresh meat, poultry, and even hard vegetables.
- Key Features: Comes with different grinding plates for fine, medium, and coarse grinds, and various stuffing tubes for sausages.
- Best KitchenAid Uses:
- Grinding your own beef for burgers, meatballs, or meatloaf.
- Making homemade sausage.
- Grinding poultry for patties or stuffing.
- Grinding vegetables for relishes or pâtés.
- Tips for Use: Chill the grinder parts and the meat before grinding for the best results. Cut meat into small, uniform cubes.
7. The Sifter and Flour Duster Attachment
This attachment is a baker’s dream for achieving perfectly aerated baked goods.
- What it does: Sifts flour and other dry ingredients and dusts baking pans.
- Key Features: A sifting mechanism that ensures even distribution.
- Best KitchenAid Uses:
- Sifting flour, cocoa powder, and powdered sugar for lighter cakes and pastries.
- Ensuring lump-free dry ingredients.
- Dusting baking pans with flour or cocoa for easy release.
- Tips for Use: Add ingredients to the hopper and turn the mixer on a low speed. Ensure your pans are clean for dusting.
8. The Juicer and Strainer Attachment
Get fresh juice from your favorite fruits and vegetables.
- What it does: Juices soft fruits and vegetables and strains them.
- Key Features: Comes with different strainers for pulp control.
- Best KitchenAid Uses:
- Making fresh fruit juices.
- Juicing berries or soft fruits.
- Straining seeds from fruit purees.
- Tips for Use: Wash and prepare your produce. Use softer fruits for best results.
9. The Vegetable Strainer Attachment
This is great for making smooth sauces, purees, or even baby food.
- What it does: Strains cooked fruits and vegetables, separating seeds and skins.
- Key Features: Comes with different screens for varying degrees of smoothness.
- Best KitchenAid Uses:
- Making smooth tomato sauce or puree.
- Creating fruit sauces and jams without seeds.
- Making baby food.
- Tips for Use: Cook fruits or vegetables until soft before processing.
KitchenAid Recipe Ideas to Inspire You
With your KitchenAid mixer and its attachments, the recipe possibilities are endless! Here are some ideas to get you started.
Baking Delights with Your Stand Mixer
- Classic Chocolate Chip Cookies: Use the flat beater to cream butter and sugar, then add eggs and vanilla. Gradually add dry ingredients and then the chocolate chips.
- Artisan Bread: Let the KitchenAid dough hook do the heavy lifting for your homemade bread loaves.
- Meringues: Whip egg whites to stiff peaks with the wire whisk for light and airy meringues.
- Cakes and Cupcakes: From simple vanilla to rich chocolate, your mixer can handle all cake batters.
- Pies and Tarts: Use the flat beater for pie crusts and pastry dough.
Savory Creations with Attachments
- Homemade Pasta: Roll out fresh fettuccine or spaghetti for a delicious Italian dinner.
- Zucchini Noodles with Pesto: Use the spiralizer for a healthy pasta alternative.
- Freshly Ground Burger Patties: Grind your own beef with the meat grinder attachment for the best burgers.
- Homemade Sausage: Experiment with different spice blends when using the meat grinder and stuffing tubes.
- Fresh Salsa: Chop tomatoes, onions, and peppers quickly with the food processor attachment.
- Creamy Tomato Soup: Blend cooked tomatoes and vegetables into a velvety smooth soup using the blender attachment.
KitchenAid Troubleshooting: Common Issues and Solutions
Even the best kitchen tools can sometimes present challenges. Here’s how to handle common KitchenAid troubleshooting scenarios.
- Mixer Not Turning On:
- Check Power: Ensure the mixer is plugged into a working outlet.
- Head Locked: Make sure the mixer head is fully locked down. It won’t operate if it’s not properly secured.
- Overheating: If the mixer has been running for a very long time at a high speed, it might have an automatic shut-off to prevent overheating. Let it cool down for a while.
- Attachments Not Mixing Properly:
- Bowl Height Adjustment: Most KitchenAid mixers have a mechanism to adjust the bowl height. If the beater is too high, it won’t scrape the bottom effectively. If it’s too low, it might hit the bottom. Consult your manual for how to adjust this.
- Speed Setting: Ensure you are using the appropriate speed for the task.
- Incorrect Attachment: Double-check that you’re using the right attachment for your recipe.
- Motor Sounds Unusual:
- Overloading: If you’re trying to mix a very stiff dough on a high speed, you might be straining the motor. Reduce the speed or divide the dough into smaller batches.
- Internal Issue: If the unusual noise persists or seems mechanical, it might be time to contact KitchenAid support or a qualified repair technician.
- Attachment Hub Not Working:
- Loose Attachment: Ensure the attachment is securely locked into the hub.
- Hub Cover: Some models have a cover for the attachment hub. Make sure it’s removed.
- Internal Mechanism: If the hub is spinning but not engaging the attachment, there might be an internal issue.
Fathoming the Versatility: Beyond the Basics
Your KitchenAid mixer is more than just a baking tool; it’s a culinary command center. Embrace the array of stand mixer accessories and attachments to discover new ways to simplify and elevate your cooking and baking. From grinding your own spices to making fresh pasta from scratch, the possibilities are vast.
Frequently Asked Questions (FAQ)
Q: Can I use my KitchenAid mixer to mash potatoes?
A: Yes, the flat beater attachment is excellent for mashing potatoes. Start on a low to medium speed.
Q: Is the KitchenAid blender attachment as good as a standalone blender?
A: The KitchenAid blender attachment is very capable for most blending tasks like smoothies and soups. For very heavy-duty tasks or extremely fine purees, a high-end standalone blender might offer a slight advantage, but it’s a great option for convenience.
Q: How do I clean my KitchenAid mixer attachment hub?
A: Unplug the mixer. Use a damp cloth to wipe down the area. Ensure it’s dry before attaching anything. Avoid getting excess moisture into the hub mechanism.
Q: Can I buy generic KitchenAid attachments?
A: While some third-party attachments exist, it’s generally recommended to use genuine KitchenAid attachments to ensure proper fit, performance, and safety.
Q: What are the best KitchenAid uses for the dough hook?
A: The KitchenAid dough hook is perfect for kneading all types of yeast doughs, including bread, pizza dough, rolls, and even some pasta doughs.
Q: My KitchenAid mixer seems slow when kneading bread. What should I do?
A: Ensure you are using Speed 2. If the dough is very stiff or the batch is too large, the mixer might struggle. Try dividing the dough into smaller portions. Also, check the bowl height adjustment.
Q: Can I make ice cream without the ice cream maker attachment?
A: While you can make “no-churn” ice cream recipes without the attachment, the dedicated ice cream maker attachment is designed to churn the mixture as it freezes, creating the best creamy texture.
Q: Are all KitchenAid attachments compatible with all KitchenAid mixers?
A: Most attachments are designed for the standard attachment hub found on most KitchenAid tilt-head and bowl-lift stand mixers. However, it’s always best to check the compatibility guide for your specific mixer model and the attachment you are interested in.
By mastering your KitchenAid mixer and exploring its essential attachments, you’ll unlock a world of culinary creativity and efficiency. Happy mixing!