
Image Source: i.ytimg.com
How To Paint Kitchen Cabinets Without Sanding: Stunning Results
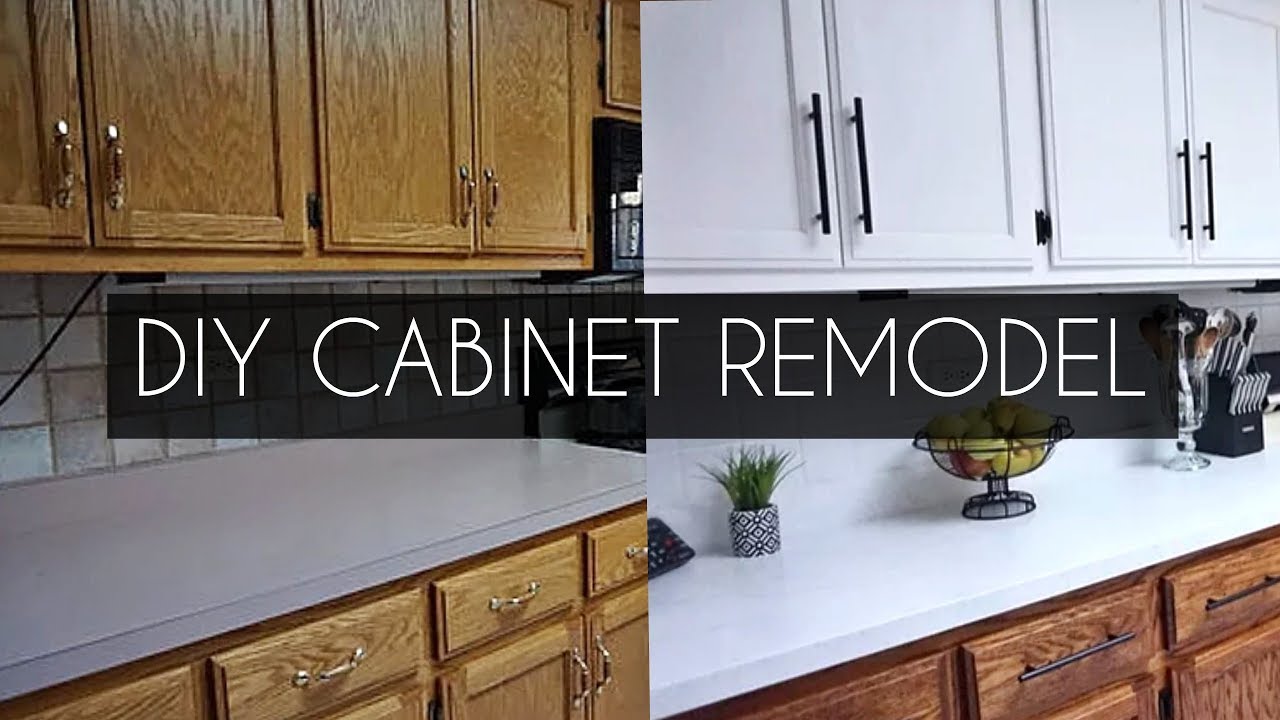
Can you paint kitchen cabinets without sanding? Yes, you absolutely can! With the right products and techniques, you can achieve beautiful, professional-looking results without the dusty, time-consuming process of sanding. This guide will walk you through the entire no sand cabinet painting process, transforming your kitchen into a fresh, updated space.
The Allure of No-Sand Cabinet Painting
Updating your kitchen cabinets can be a significant undertaking. Often, the thought of sanding cabinets conjures images of dust everywhere, hours of labor, and the potential for uneven finishes. However, the world of cabinet refinishing no prep has revolutionized this DIY project. Modern paints and primers are designed to adhere directly to existing finishes, saving you considerable time and effort. This makes DIY cabinet painting an accessible project for almost anyone looking for an easy cabinet makeover or simply new cabinet update ideas.
Why Choose No-Sand Cabinet Painting?
- Time Savings: Skipping the sanding step dramatically reduces the project timeline.
- Less Mess: No sanding means significantly less dust and debris to clean up.
- Accessibility: This method makes cabinet painting achievable for beginners.
- Cost-Effective: You save on sandpaper, dust masks, and the extra time invested.
- Durability: With the right products, the finish will be as durable as traditionally sanded cabinets.
Deciphering the Products: Choosing the Right Paint and Primer
The key to successful no sand cabinet painting lies in selecting the correct products. Not all paints are created equal, and a dedicated primer is essential for optimal adhesion and a long-lasting finish.
Essential Products:
- High-Adhesion Primer: This is the most crucial component for cabinet priming without sanding. Look for primers specifically designed for slick surfaces, cabinets, or furniture. These primers create a strong bond to glossy or difficult-to-adhere-to surfaces.
- Popular Choices:
- Shellac-based primers: Excellent adhesion, odor-blocking, and fast-drying.
- Water-based bonding primers: Often low VOC, easy cleanup, and good adhesion.
- Popular Choices:
- Cabinet Paint: Once primed, you’ll need a durable paint.
- Latex Paint Cabinets: High-quality acrylic latex paints are a popular choice for cabinets. They offer good durability, flexibility, and are easy to clean up. Look for finishes like satin or semi-gloss for cabinets, as they are more resistant to moisture and easier to wipe down.
- Chalk Paint Cabinets: Chalk paint is known for its matte finish and ease of use. It adheres well to many surfaces with minimal prep. However, chalk paint typically requires a topcoat (like polyurethane or wax) for durability, especially in a high-traffic area like the kitchen. This adds an extra step and can sometimes create a different aesthetic than traditional cabinet paint.
- Cabinet Enamels: These are specifically formulated for cabinets and furniture, offering superior hardness and durability. Many are water-based for easier cleanup but provide a tough, enamel-like finish.
Paint Finishes for Cabinets:
- Satin: Offers a subtle sheen, good durability, and is easy to clean. A great all-around choice.
- Semi-Gloss: Provides a higher sheen, excellent durability, and is very easy to wipe clean. Can highlight imperfections if the surface isn’t perfectly smooth, but often ideal for kitchens.
- Gloss: The highest sheen. Very durable and easy to clean, but will show every imperfection on the surface. Typically not recommended for DIY cabinet painting unless you are very meticulous.
The Step-by-Step Guide to No-Sand Cabinet Painting
This comprehensive guide breaks down the process, ensuring you achieve stunning results. Think of this as an easy cabinet makeover that yields professional-looking results.
Step 1: Preparation is Paramount (Even Without Sanding!)
While we’re skipping sanding, thorough cleaning and prep are non-negotiable for a lasting finish.
Gathering Your Supplies:
- High-adhesion primer
- Cabinet paint (latex, enamel, or chalk paint with topcoat)
- Painter’s tape
- Screwdriver (for removing hardware)
- Degreaser or TSP substitute (trisodium phosphate)
- Clean cloths or sponges
- Gloves
- Safety glasses
- Drop cloths or old sheets
- Paint rollers (foam or high-density nap)
- High-quality paint brushes (angled for trim and corners)
- Paint tray
- Optional: Paint sprayer (for a perfectly smooth finish, especially if using spray paint kitchen cabinets)
- Optional: Mineral spirits (for oil-based primers/paints or stubborn grease)
Cleaning Your Cabinets:
- Remove Doors and Hardware: Use a screwdriver to remove all cabinet doors, drawer fronts, and hardware. Label each piece with its corresponding location (e.g., “Upper Left Door,” “Drawer 3”) using masking tape and a marker. This will save you headaches during reassembly.
- Thorough Degreasing: Kitchen cabinets accumulate grease, grime, and food splatters. You need to remove all of this for the primer and paint to adhere properly.
- Mix your degreaser (TSP substitute is recommended as it’s safer than traditional TSP) with warm water according to the product instructions.
- Using a clean cloth or sponge, wipe down every surface of the cabinets, doors, and drawer fronts. Pay extra attention to areas around the stove and sink.
- Rinse the cabinets thoroughly with a clean cloth dampened with plain water.
- Allow the cabinets to dry completely. You can speed this up with a fan or hair dryer.
- Wipe Down with Rubbing Alcohol (Optional but Recommended): For an extra layer of assurance, wipe down all surfaces with isopropyl alcohol. This removes any residual cleaner or oils and helps the primer adhere even better.
Step 2: Priming for Success (The “No-Sand” Secret)
This is where the magic happens for no sand cabinet painting. A good primer acts as the bridge between your existing cabinet finish and your new paint.
Applying the Primer:
- Read Primer Instructions: Always follow the manufacturer’s specific instructions for your chosen primer.
- Stir Thoroughly: Ensure the primer is well-mixed before you begin.
- Application Methods:
- Brushing: Use an angled brush for edges, corners, and any detailed areas.
- Rolling: Use a high-density foam roller or a small nap roller for smooth surfaces. Avoid rollers that leave a lot of texture.
- Spraying (Optional): If you have a paint sprayer, this is an excellent option for a super smooth, professional finish. Ensure you have proper ventilation and a spray shelter for this method, especially if using spray paint kitchen cabinets.
- Apply Thin, Even Coats: It’s better to apply two thin coats of primer than one thick coat. This promotes better adhesion and a smoother finish.
- Coverage: Ensure you get complete coverage without drips or runs.
- Drying Time: Allow the primer to dry completely according to the manufacturer’s recommended drying time. This is crucial for proper adhesion. Rushing this step can compromise the entire project.
- Second Coat (If Needed): Some surfaces or darker original finishes might benefit from a second thin coat of primer for optimal coverage and adhesion.
Step 3: Painting Your Cabinets
Now for the fun part – applying the color!
Applying the Paint:
- Stir the Paint: Mix your chosen cabinet paint thoroughly.
- Application Methods:
- Brushing: Use your angled brush for edges and details. Keep a damp cloth handy to wipe away any drips immediately.
- Rolling: Use the same type of roller you used for the primer. Apply the paint in a “W” or “N” pattern to ensure even coverage, then lightly roll over it in one direction to smooth out the strokes.
- Spraying: If you are using spray paint kitchen cabinets, follow the manufacturer’s instructions for your specific sprayer and paint. This method often yields the smoothest, most factory-like finish.
- Thin, Even Coats: Just like with the primer, apply multiple thin coats of paint rather than one thick coat. This prevents drips and ensures a more durable finish.
- Drying Time Between Coats: Allow each coat of paint to dry completely according to the manufacturer’s instructions before applying the next. This can range from 2 to 4 hours for latex paints, but always check the can.
- Number of Coats: You’ll likely need 2-3 coats of paint to achieve full, opaque coverage.
- Light Sanding Between Coats (Optional but Recommended for a Smoother Finish): For an ultra-smooth finish, especially if you notice any minor imperfections or slight texture from the roller, you can very lightly scuff sand with a fine-grit sanding sponge (220-grit or higher) between paint coats. This is not the same as the aggressive sanding you’re avoiding; it’s a very light touch-up to knock down any tiny bumps. Wipe away all dust with a tack cloth or damp cloth before applying the next coat. This is a key furniture painting technique for achieving a professional look.
Step 4: Reassembly and Finishing Touches
Once the paint is fully cured, it’s time to put everything back together.
Reassembling Your Cabinets:
- Allow for Curing: While paint may feel dry to the touch within hours, it can take several days or even weeks for the paint to fully cure and harden. Avoid heavy use or cleaning during this curing period.
- Reattach Hardware: Screw the original hardware back onto the doors and drawers. If you’re upgrading your hardware, now is the time!
- Rehang Doors and Drawers: Carefully rehang the cabinet doors and reinsert the drawers, using your labels to ensure everything goes back in its correct place.
Alternative Cabinet Refinishing No Prep Options
While the primer and paint method is highly effective, here are a couple of other no sand cabinet painting approaches and considerations:
Using Specialized Cabinet Painting Kits
Several brands offer “all-in-one” cabinet painting kits that include a special primer and paint designed for direct application. These can be a convenient option, but always read reviews and ensure they are suitable for your cabinet material.
Considering Chalk Paint Cabinets
Chalk paint offers a distinct matte, velvety finish. It adheres exceptionally well to most surfaces with minimal prep, often just a good cleaning.
- Pros: Easy to apply, forgiving finish, unique aesthetic.
- Cons: Requires a durable topcoat (polyurethane or wax) for kitchen cabinets, which adds an extra step and can alter the intended matte finish slightly. The topcoat is crucial for protection against moisture and wear.
Exploring Latex Paint Cabinets (High-Quality Acrylic Latex)
As mentioned earlier, high-quality acrylic latex paints are a fantastic choice.
- Pros: Durable, easy to clean, wide range of colors and finishes, water-based cleanup.
- Cons: Requires a high-adhesion primer for a no-sand application.
Spray Paint Kitchen Cabinets
For the ultimate smooth, factory-like finish, consider using a paint sprayer.
- Pros: Creates a very smooth, even finish, can be faster for large projects.
- Cons: Requires practice to achieve an even coat, needs proper ventilation and masking, can be messier if not set up correctly. You still need to prep and prime.
Table: Comparing Paint Types for No-Sand Cabinet Painting
| Paint Type | Prep Needed (No-Sand Method) | Finish Options | Durability (with proper primer/topcoat) | Ease of Application | Notes |
|---|---|---|---|---|---|
| High-Adhesion Primer + Latex/Acrylic Enamel | Cleaning, degreasing, optional light scuffing (for smoothness) | Satin, Semi-Gloss, Eggshell | Excellent | Good | Most popular and versatile option. |
| Chalk Paint | Cleaning, degreasing | Matte | Good (with topcoat) | Very Easy | Requires a durable topcoat (polyurethane or wax) for kitchen use. |
| Cabinet Paint Kits | Cleaning, degreasing | Varies by kit (often Satin or Eggshell) | Varies by kit (generally good) | Easy | Convenient, check reviews for specific brands. |
| Spray Paint (Cabinet Grade) | Cleaning, degreasing, priming | Satin, Semi-Gloss, Gloss | Excellent | Advanced | Requires a sprayer; offers the smoothest finish. |
Important Cabinet Priming Considerations
- Surface Type: Most cabinets are laminate, wood, or MDF. Ensure your primer is suitable for the specific material. If you have a very slick laminate, a shellac-based primer is often best.
- Color Change: If you’re going from a dark cabinet color to a light one, you might need an extra coat of primer or a tinted primer to ensure full coverage and prevent the old color from showing through.
- Sheen: Glossy finishes are the most challenging for paint adhesion. This is where a high-quality bonding primer is absolutely essential.
Table: Troubleshooting Common Issues
| Issue | Cause | Solution |
|---|---|---|
| Paint peeling or chipping | Insufficient cleaning; primer not adhering; paint not fully cured | Re-clean thoroughly; use a high-adhesion primer; allow adequate drying/curing time. |
| Brush or roller marks | Wrong tools; paint applied too thickly; not enough coats | Use high-quality brushes/rollers; apply thin coats; lightly sand between coats for smoothness. |
| Drips or runs | Paint applied too thickly; excess paint on brush/roller | Apply thin coats; wipe excess paint from brush/roller before applying; catch drips immediately. |
| Uneven color coverage | Insufficient coats of paint; old color showing through | Apply additional thin coats of paint; consider a second coat of primer or a tinted primer. |
| Tackiness after drying | Paint not fully cured; high humidity during drying; wrong paint type | Allow more drying time; ensure proper ventilation; check paint specifications for curing conditions. |
| Glossy finish showing imperfections | Surface not perfectly smooth | While no sanding, a very light scuff with a fine-grit sanding sponge between coats can help smooth minor flaws. |
Frequently Asked Questions (FAQ)
-
Q1: Can I really paint my kitchen cabinets without any sanding at all?
A: Yes, by using a high-adhesion primer specifically designed for slick surfaces, you can bypass the traditional sanding step. Thorough cleaning is still essential. -
Q2: What is the best type of paint for kitchen cabinets?
A: High-quality acrylic latex enamel paints or specialized cabinet paints in a satin or semi-gloss finish are generally best for durability and ease of cleaning in a kitchen. -
Q3: How many coats of primer and paint will I need?
A: Typically, one to two thin coats of primer are sufficient, followed by two to three thin coats of paint. This can vary based on the paint color, the original cabinet color, and the application method. -
Q4: Is there a significant difference between using latex paint and chalk paint for cabinets?
A: Yes. Latex paint offers a durable, cleanable finish suitable for kitchens as is (with proper priming). Chalk paint provides a matte finish but requires a protective topcoat (like polyurethane or wax) to withstand kitchen wear and tear, adding an extra step. -
Q5: How long will it take for the paint to cure?
A: While paint may be dry to the touch within a few hours, it can take anywhere from 7 to 30 days for the paint to fully cure and harden. Avoid heavy use or cleaning during this period. -
Q6: Can I use a paint sprayer for this project?
A: Absolutely! Using a paint sprayer, especially for spray paint kitchen cabinets, can provide a very smooth, professional finish. Ensure you have adequate ventilation and practice proper spraying furniture painting techniques for even coverage. -
Q7: What’s the best way to clean kitchen cabinets before painting?
A: Thoroughly degrease them using a TSP substitute or a strong degreaser, rinse well, and allow them to dry completely. Wiping down with isopropyl alcohol afterwards is also highly recommended for optimal adhesion.
Conclusion
Painting your kitchen cabinets without sanding is a highly achievable and rewarding DIY project. By focusing on meticulous cleaning, selecting the right high-adhesion primer, and applying your paint in thin, even coats, you can transform your kitchen with stunning results. This easy cabinet makeover offers a cost-effective and less labor-intensive alternative to traditional methods, proving that beautiful cabinet update ideas are within everyone’s reach. Happy painting!