
Can you lay kitchen floor tiles yourself? Absolutely! With the right tools, materials, and a step-by-step approach, most homeowners can successfully tackle a DIY kitchen tile installation project. This guide will walk you through every stage, from preparing your space to the final touches, making tiling a kitchen floor an achievable and rewarding endeavor.
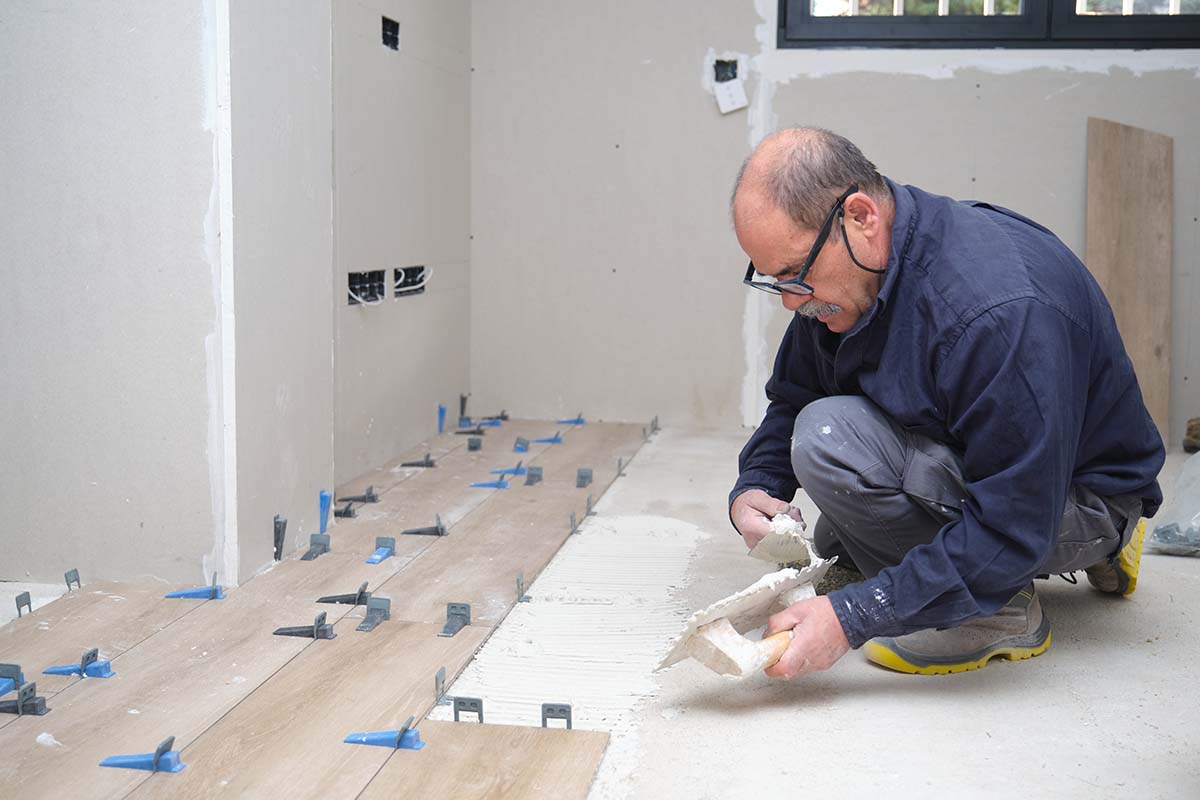
Image Source: acekitchen.co.uk
Preparing Your Kitchen Subfloor: The Foundation of Success
A solid, level subfloor is crucial for a long-lasting and beautiful tile installation. Skipping this step can lead to cracked tiles, uneven surfaces, and potential structural issues down the line. This phase of kitchen tile installation might not be the most glamorous, but it’s arguably the most important.
Assessing Your Current Subfloor
Before you begin, you need to know what you’re working with. Common subfloor materials in kitchens include plywood, concrete, and sometimes old vinyl or linoleum.
- Plywood: Check for any signs of rot, water damage, or delamination. Loose or damaged sections will need to be repaired or replaced. Ensure the plywood is at least 5/8 inch thick for proper rigidity. If you have thinner plywood, you may need to add a layer of cement board.
- Concrete: Concrete subfloors are generally very durable. Inspect for cracks or unevenness. Small cracks can be filled with a concrete repair compound. Large cracks or significant unevenness might require leveling compound.
- Existing Flooring: If you have old vinyl or linoleum, you’ll need to remove it completely. Do not tile over it, as this can create an unstable surface and adhesion problems.
Repairing and Strengthening the Subfloor
Once you’ve assessed your subfloor, it’s time for repairs.
-
For Plywood:
- Secure any loose boards with screws. Drive screws every 6 inches along the joists and every 8-10 inches in the field of the board.
- If the plywood feels soft or spongy, it may need to be replaced.
- Consider adding a layer of cement backer board (like HardieBacker or Durock) for added strength and moisture resistance, especially in high-moisture areas or over thinner plywood. Cut cement board with a utility knife and secure it with special screws designed for backer board.
-
For Concrete:
- Clean the concrete thoroughly, removing any old adhesive, paint, or debris. A shop vac is essential here.
- Fill any cracks or holes with a suitable concrete patch or epoxy filler.
- If the concrete is uneven, use a self-leveling compound. Follow the manufacturer’s instructions carefully, ensuring you mix it to the correct consistency and spread it evenly.
Preparing for Tile Adhesion
The subfloor needs to be clean, dry, and free from any contaminants that could prevent the best kitchen tile adhesive from bonding properly.
- Cleanliness is Key: Sweep and vacuum the subfloor thoroughly. You can also mop it with a mild cleaner and water, but ensure it dries completely before proceeding.
- Moisture Barrier: In areas prone to moisture (though less common in kitchens than bathrooms, it’s still good practice), a liquid or sheet membrane vapor barrier can be applied over the subfloor before tiling. This helps protect the subfloor from any moisture that might penetrate the grout or tile over time.
Selecting Your Kitchen Tiles: Style Meets Functionality
Choosing the right tiles is a significant part of your DIY kitchen flooring project. Consider durability, slip resistance, ease of cleaning, and, of course, aesthetics.
Popular Kitchen Tile Materials
- Ceramic Tile: A popular and versatile choice, ceramic tiles are affordable, come in a vast array of colors, patterns, and styles, and are relatively easy to cut and install. They are generally glazed, making them resistant to stains and water.
- Porcelain Tile: Denser and less porous than ceramic, porcelain tiles are exceptionally durable, water-resistant, and frost-proof (though the latter is less critical for indoor kitchens). They can mimic the look of natural stone, wood, and metal, offering a wide range of design possibilities.
- Natural Stone Tile (e.g., Granite, Marble, Slate): These offer a luxurious and unique look. However, they are typically more expensive, require sealing to prevent staining, and can be more challenging to cut and install.
- Vinyl Tile: While not a traditional ceramic or stone tile, modern vinyl tiles (Luxury Vinyl Tile or LVT) offer excellent durability, water resistance, and are very forgiving for DIYers. They often click together, reducing the need for extensive adhesive work.
Considering Tile Size and Shape
The size and shape of your tiles can impact the overall look and feel of your kitchen.
- Large Format Tiles: Can make a small kitchen feel larger by reducing the number of grout lines.
- Small Mosaics: Add intricate detail and can be used as accents or borders.
- Subway Tiles: A classic choice, often laid in a brick pattern, they offer a timeless appeal.
- Geometric Tiles: Can create a bold statement and add visual interest.
Understanding Tile Layout for Kitchens
Proper tile layout for kitchens is essential to minimize awkward cuts and ensure a balanced, professional look.
- Find the Center: Locate the center of the room or the most visually prominent area (like the center of the main walkway).
- Dry Lay a Section: Lay out a few rows of tiles in your chosen pattern, starting from the center, to see how the pattern flows and where cuts will fall.
- Aim for Full Tiles: Try to arrange the layout so that full tiles are visible in the most prominent areas, with cuts happening at the edges or under cabinets.
- Consider Grout Lines: Account for the width of your grout lines when planning your layout.
Gathering Your Kitchen Tile Tools and Materials
Having the right kitchen tile tools at your disposal will make the process smoother and the results more professional.
Essential Tools for Tiling
- Tape Measure: For accurate measurements.
- Pencil: For marking tiles and lines.
- Chalk Line or Laser Level: For establishing straight reference lines.
- Tile Saw (Wet Saw): Essential for making straight and angled cuts in ceramic and porcelain tiles. A wet saw uses water to cool the blade and reduce dust.
- Tile Nippers: For making small, curved cuts around obstacles.
- Notched Trowel: The size of the notches depends on the tile size; larger tiles require larger notches to spread enough adhesive.
- Tile Spacers: To ensure consistent grout lines.
- Grout Float: A rubber-faced tool used to spread grout into the tile joints.
- Grout Sponge: A dense sponge for cleaning excess grout.
- Buckets: For mixing adhesive and grout, and for water.
- Utility Knife: For scoring and cutting backer board or vinyl.
- Safety Glasses: Protect your eyes from flying debris.
- Gloves: Protect your hands from adhesive, grout, and sharp tile edges.
- Knee Pads: For comfort during long hours on the floor.
- Dust Mask: Especially important when cutting tiles.
Materials Needed
- Tiles: Order 10-15% extra to account for cuts, breakage, and future repairs.
- Adhesive (Thin-set Mortar): The best kitchen tile adhesive will depend on your tile type and subfloor. For most ceramic and porcelain tiles on a solid subfloor, a good quality thin-set mortar is recommended.
- Grout: Choose a grout suitable for kitchen floors. Consider sanded grout for wider joints (1/8 inch or more) and unsanded grout for narrower joints. Epoxy grout is highly durable and stain-resistant, but more difficult to work with.
- Grout Sealer (if applicable): For cementitious grouts.
- Thin-set Mortar Additive (optional): Some additives improve flexibility and water resistance.
- Backer Board and Screws (if needed): As discussed in the subfloor preparation section.
- Caulking: For sealing edges and expansion joints, especially around fixtures and wall bases.
The Tile Installation Process: Step-by-Step
Now that your subfloor is ready and you have all your tools and materials, it’s time to get tiling!
Laying Out Your Pattern and Reference Lines
- Dry Layout: Before mixing any adhesive, lay out your tiles in the area you plan to start. This helps visualize the final pattern and identify any potential issues.
- Establish a Starting Point: For a balanced layout, find the center of the room or the focal point and work outwards.
- Draw Reference Lines: Use a chalk line or laser level to draw two perpendicular lines that intersect at your starting point. These lines will guide your tile placement. Ensure these lines are perfectly square.
Mixing and Applying the Adhesive
- Mix the Thin-set Mortar: Follow the manufacturer’s instructions precisely. Add the powder to water, not vice versa. Mix to a smooth, peanut-butter-like consistency. Let it slake (rest) for the time recommended by the manufacturer, then remix briefly. Only mix what you can use within its working time (usually 20-30 minutes).
- Spread the Adhesive: Using the flat side of your notched trowel, spread a thin, even layer of adhesive onto the subfloor in a small section (about 2-3 square feet) along your reference line.
- Trowel the Notches: Then, hold the trowel at a 45-degree angle and comb the adhesive with the notched side to create uniform ridges. This ensures full coverage and proper adhesion.
Setting the Tiles
- Place the First Tile: Position the first tile firmly into the adhesive along your reference lines. Press it down with a slight twisting motion to ensure good contact.
- Continue Laying Tiles: Place subsequent tiles, using tile spacers between each one to maintain consistent grout lines. Work your way outwards from your starting point, following your chalk lines.
- Check for Levelness: Periodically use a level across several tiles to ensure they are all on the same plane. Gently tap down any high tiles with a rubber mallet or the handle of your trowel.
- Clean as You Go: Wipe away any excess adhesive that squeezes up between the tiles or gets on the tile surface with a damp sponge before it dries. Dried adhesive is much harder to remove.
Cutting Floor Tiles
Cutting floor tiles is an inevitable part of the process, especially around edges, corners, and fixtures.
- Measuring for Cuts: Place a tile next to the last full tile in a row, marking where the cut needs to be made. Account for the grout joint.
- Using a Wet Saw:
- Straight Cuts: Align the tile with the saw blade and guide it through the water bath.
- Angled (Bevel) Cuts: Most wet saws allow you to adjust the angle of the blade.
- Corner Cuts (Chasing Rabbits): For cuts around pipes or irregular shapes, you might need to make multiple straight cuts or use tile nippers.
- Using Tile Nippers: For small, intricate cuts, such as around electrical outlets or curved edges, tile nippers can be very useful. Practice on scrap pieces first to get a feel for them.
- Safety First: Always wear safety glasses and a dust mask when cutting tiles.
Grouting the Tiles
Once all the tiles are laid and the adhesive has cured (typically 24-48 hours, check the adhesive manufacturer’s instructions), it’s time to grout.
- Remove Spacers: Before grouting, remove all tile spacers.
- Mix the Grout: Mix the grout according to the manufacturer’s directions. Aim for a consistent, paste-like texture. Like adhesive, only mix what you can use within its working time.
- Apply the Grout: Using the grout float, spread the grout over the tiles, working it diagonally across the grout lines to ensure they are completely filled.
- Scrape Off Excess Grout: Hold the grout float at a 45-degree angle and scrape off the excess grout from the tile surface, again working diagonally.
- Initial Cleaning: After about 15-30 minutes (depending on humidity and temperature), when the grout begins to firm up slightly, use a damp (not wet) grout sponge to gently wipe away the remaining grout haze from the tile surface. Rinse the sponge frequently in a clean bucket of water.
- Final Cleaning: Once the grout has cured for at least 24 hours, there will likely be a light haze remaining. Buff this off with a clean, dry cloth.
Sealing and Finishing
- Grout Sealing: If you used a cementitious grout, it will need to be sealed to protect it from stains and moisture. Apply a quality grout sealer with a small brush or applicator after the grout has fully cured (check grout instructions, usually 48-72 hours).
- Caulking: Apply a bead of flexible caulk around the perimeter of the room where the tile meets the walls, and around any fixtures like countertops or cabinets. This expansion joint allows for slight movement and prevents moisture from seeping underneath.
Kitchen Tile Maintenance: Keeping Your Floors Beautiful
Proper kitchen tile maintenance will ensure your new floor looks great for years to come.
- Daily Cleaning: Sweep or vacuum your tile floor regularly to remove dirt and grit that can scratch the surface over time.
- Spills: Wipe up spills immediately, especially acidic liquids like wine or citrus juice, which can etch some natural stone tiles or damage grout.
- Washing: Mop the floor with a mild detergent and warm water. Avoid abrasive cleaners or harsh chemicals, as they can dull the finish or damage the grout.
- Deep Cleaning: For stubborn dirt or stained grout, you can use a dedicated tile and grout cleaner. For grout, a stiff brush can help lift grime.
- Re-sealing: Depending on the type of grout sealer used and the amount of traffic, you may need to re-seal the grout every 1-2 years to maintain its protective qualities.
Frequently Asked Questions (FAQ)
Q: How long does it take to lay kitchen floor tiles?
A: For an average-sized kitchen, a DIYer can expect the project to take anywhere from 2-5 days. This includes subfloor preparation, tile laying, grouting, and curing time. Rushing the process can lead to mistakes.
Q: Can I tile over existing linoleum or vinyl flooring?
A: It’s generally not recommended. While some adhesives might stick, the underlying flooring can degrade, shift, or peel, compromising the new tile installation. It’s best to remove old resilient flooring for a solid, reliable base.
Q: What is the best grout for a kitchen floor?
A: For most kitchens, a high-quality sanded grout is a good choice for joints 1/8 inch or wider. For very narrow joints, unsanded grout is used. Epoxy grout offers superior stain and moisture resistance but is more challenging to install. Consider your tolerance for maintenance and your budget.
Q: How do I avoid a bad tile layout with lots of cuts?
A: This is where careful planning and dry laying are essential. Start from the center of the room or a prominent walkway and plan your layout so that full tiles are centered in these visible areas, with cuts happening at the edges or behind appliances and cabinets.
Q: Do I need to seal ceramic tiles?
A: Most glazed ceramic tiles are already quite resistant to staining and moisture and do not require sealing. However, it’s always a good idea to check the manufacturer’s recommendations for your specific tiles. Unglazed ceramic and porous natural stone tiles will definitely require sealing.
Q: How do I clean grout haze after tiling?
A: A damp sponge, rinsed frequently, is the best tool for removing excess grout while the grout is still wet. After the grout has cured, a light haze can be removed with a soft cloth or a specialized grout haze remover.
Q: What are the most common mistakes DIYers make when tiling a kitchen floor?
A: Common mistakes include inadequate subfloor preparation, not finding the center of the room for layout, using the wrong trowel size, not cleaning up excess adhesive or grout promptly, and rushing the curing process before grouting or walking on the tiles.
Embarking on DIY kitchen flooring is a significant undertaking, but by following these detailed steps, you can achieve professional-looking results that will enhance your home and provide lasting satisfaction. Remember to be patient, meticulous, and enjoy the process of transforming your kitchen!