
Image Source: www.dap.com
Getting Started: Caulk for Your Kitchen
Caulking your kitchen backsplash makes it look better. It also protects your walls. What is caulk? Caulk is a flexible material. It fills gaps. These gaps are often where surfaces meet. Think of where your backsplash meets the counter. Or where it meets the wall. Caulk stops water from getting into these spots. Can I use any caulk? No, you need the right type. Some caulk stops mold from growing. Some is best for wet areas. Other kinds are easier to clean. Choosing the right one is key. Who is caulk for? Anyone can caulk. You do not need to be a pro. With good tools and clear steps, you can do it well. This guide will show you how. You will learn to caulk your kitchen backsplash. You will make it look perfect. We will talk about silicone sealant application. We will cover the best caulk gun technique. This helps seal gaps tight. It helps with backsplash gap sealing. It stops water from getting in. This makes for waterproofing kitchen seams. You will learn how to remove old caulk backsplash. You will get a smooth caulk line. We will discuss mold resistant caulk. We will look at acrylic latex caulk. We will also cover tile caulk application.
The Purpose of Caulking Your Kitchen Backsplash
Caulking is very important. It does much more than just look good. It is a key step in home care.
Stopping Water Damage
Water can sneak into very small gaps. These gaps are often behind your backsplash. Water can cause big problems. It can harm your walls. It can cause wood to rot. This can be in your cabinets. It can also damage drywall. This leads to costly repairs. Caulk acts as a strong barrier. It blocks water. It creates a tight seal. This is very important for waterproofing kitchen seams. It protects your home. It keeps your kitchen parts safe and dry. Water damage can spread fast. A good caulk job stops it. It keeps your home healthy.
Preventing Mold and Mildew
Kitchens are often wet places. Water spills. Steam from cooking is common. These things make kitchens perfect for mold to grow. Mold grows in damp, dark spots. It grows in tiny cracks and gaps. Mold resistant caulk has special stuff inside. This stuff stops mold from growing. It helps keep your kitchen clean. It makes it safe for your family. This is vital for good backsplash gap sealing. Mold can cause health problems. It can make your kitchen smell bad. Using the right caulk prevents these issues. It adds an extra layer of health safety.
Making Things Look Better
Old caulk often looks bad. It can be cracked. It can be dirty. It can be discolored. This makes your kitchen look old and tired. New caulk makes everything look fresh. It makes the lines crisp and clean. It gives your kitchen a neat look. A smooth, even line of caulk makes a big difference. It improves the whole room. It adds a finished touch. It shows attention to detail. This simple step can greatly improve your kitchen’s appeal.
Selecting Your Caulk Type
Choosing the right caulk is a big step. Different kinds of caulk do different jobs. Picking the correct one ensures good results.
Acrylic Latex Caulk: A Simple Choice
This type of caulk is very common. It is also called painter’s caulk. It is easy to use. It cleans up with water. This makes cleanup simple. You can paint over it once it is dry. This is great if you want to match colors. It is good for many general jobs. It works well for small gaps. These gaps are often less than a quarter inch wide. It is less flexible than silicone caulk. This means it might not be best for very wet spots. It might not handle a lot of movement well. But it is a good choice for most kitchen backsplash areas. It is often used for tile caulk application. It sticks well to many surfaces. These include wood, drywall, and ceramic tile.
Silicone Sealant Application: For High Performance
Silicone caulk is very different. It is super flexible. It lasts a very long time. It is great for wet areas. It is very good at waterproofing kitchen seams. It can stretch and bend. This means it handles movement well. It is often mold resistant caulk. This makes it perfect for around sinks. It sticks well to smooth surfaces. These include glass, metal, and glazed tile. But silicone is harder to clean. You need mineral spirits or rubbing alcohol for cleanup. You cannot paint over it. It comes in many colors. You need to pick the color you want from the start. It is a top pick for kitchen countertop caulk. This is because it handles water so well.
Hybrid Caulk Options: Combining Strengths
Some caulks mix acrylic and silicone. These are called hybrids. They try to offer the best of both. They are often paintable. They offer good flexibility. They are easy to clean up. Many caulks labeled “kitchen and bath” are hybrids. They are usually mold resistant caulk. They are a good all-around choice for kitchen jobs. Look for these labels when shopping.
Types of Caulk Comparison
Here is a quick look at common caulk types. This can help you choose.
| Caulk Type | Pros | Cons | Best Use Case |
|---|---|---|---|
| Acrylic Latex Caulk | Easy to use, paintable, water cleanup | Less flexible, shorter lifespan, can shrink | General gaps, less wet areas, gaps under 1/4 inch |
| Silicone Sealant | Very flexible, waterproof, long-lasting, often mold-resistant | Hard to clean, not paintable, can be smelly | Sinks, showers, high-moisture areas, where flexibility is key, kitchen countertop caulk |
| Hybrid (Kitchen & Bath) | Often mold-resistant, good for wet areas, some are paintable | Can be more costly than basic acrylic | Kitchens, bathrooms, good all-around for these spots, backsplash gap sealing |
For a kitchen backsplash, especially where it meets the counter or sink, mold resistant caulk is a smart choice. Look for “kitchen and bath” caulk. It often has mold protection built in. If you want the most waterproof and long-lasting seal, a silicone sealant application is best. Just remember it cannot be painted.
Tools and Materials You Will Need
Having the right tools helps a lot. Get them ready before you start. This will make the job smoother.
Essential Tools for Caulking
- Caulk Gun: You need a good quality caulk gun. A drip-free model is best. It stops messy drips when you release the trigger. This keeps your work cleaner.
- Utility Knife or Caulk Tool: This is used to cut the tip of the caulk tube. It also helps remove old caulk. Be very careful when using sharp blades.
- Caulk Removal Tool: This is a special tool. It has different ends. One end can scrape out old caulk. Another can lift it. This makes the job easier and safer than just a knife. It is a must-have for remove old caulk backsplash.
- Putty Knife or Scraper: Good for getting off tough bits of old caulk. It can also help smooth a very large caulk bead.
- Painter’s Tape (Blue Tape): This is for making straight lines. It protects surfaces from extra caulk. It makes cleanup much easier.
- Sponge and Bucket: For cleaning surfaces before caulking. Also for water cleanup if using acrylic latex caulk.
- Clean Cloths/Rags: For wiping surfaces. Also for wiping excess caulk.
- Rubbing Alcohol or Mineral Spirits: For cleaning surfaces before silicone sealant application. Also for cleaning up silicone caulk spills.
- Paper Towels: For quick cleanups. Always have plenty on hand.
- Gloves: To keep your hands clean. Caulk can be messy and sticky.
- Caulk Tube: The right type of caulk. Pick the color you want. Make sure it is fresh. Check the expiration date.
Getting the Backsplash Ready for Caulk
Good preparation makes for a good finish. Do not skip these steps. They are crucial for a long-lasting, neat caulk line.
Safety Before Anything Else
Always put safety first. Wear gloves to protect your skin. Caulk can be very sticky. It can also irritate your skin. Some caulk types have fumes. Make sure your room has fresh air. Open a window. Use a fan if you can. This helps air move through the space. Work in a well-ventilated area.
Removing Old Caulk Backsplash
This is a very important step. Do not caulk over old caulk. Old caulk often looks bad. It may be dirty, cracked, or moldy. It will not bond well with new caulk.
Step 1: Loosen the Old Caulk
Use your utility knife. Carefully cut along both sides of the old caulk line. Try to get under it. Be careful not to scratch your backsplash or counter. Go slowly and steadily. If you have a special caulk removal tool, use its sharp blade. It is designed to lift the caulk away. This makes it easier to pull out.
Step 2: Pull it Out
Once cut, try to pull the old caulk strip out. You might be able to grab it with your fingers. Use pliers if it is stubborn or breaks into small pieces. For tiny bits, use the pointed end of your caulk removal tool. It can get into tight spots. This is vital for a clean remove old caulk backsplash job. You want to get every last piece.
Step 3: Scrape Off Leftovers
Some old caulk bits may stick very tightly. Use a putty knife or a scraper. Scrape them off gently. Go slowly. Do not harm your surfaces. You want the surface to be very clean. No old caulk should be left. This ensures the new caulk sticks well.
Cleaning the Area Thoroughly
After removing old caulk, clean the area. This is very important. New caulk needs a clean, dry surface to stick properly.
Step 1: Wipe Away Dust and Debris
Use a brush or a vacuum cleaner. Get rid of all dust. Remove small bits of caulk. Make sure no crumbs or tiny pieces are left. A clean surface is key for good adhesion.
Step 2: Clean with Cleaner
Use an all-purpose kitchen cleaner. Wipe down the backsplash and counter. Get rid of any grease. Remove any grime or food splatter. Rinse with clean water. Make sure no cleaner residue is left.
Step 3: Use Alcohol or Mineral Spirits
For silicone sealant application, clean the surface with rubbing alcohol. This helps the silicone stick much better. It removes any remaining oils or films. For other caulk types, water is fine. Let the area dry completely. This might take a few hours. Make sure it is bone dry before moving on. Moisture will stop the caulk from bonding.
Taping for a Perfect Line
This step helps you get a super smooth caulk line. It makes the job easier for beginners. It also protects your surfaces.
Step 1: Apply Tape to Backsplash
Place painter’s tape along the backsplash edge. Line it up precisely where your caulk line will start. Press it down firmly. Make sure it is straight.
Step 2: Apply Tape to Countertop
Then, place another strip of tape on the counter. Line it up with where the caulk line will end. This creates a clear space for your caulk.
Step 3: Create a Gap
The space between the two tape lines is your caulk gap. Make it even. Make it wide enough for the caulk bead you want. This creates a neat, clean border for your caulk. It acts as a guide.
Caulk Application Steps
Now for the main event. This is where your caulk gun technique will shine. Take your time.
Loading the Caulk Gun
Step 1: Open the Gun
Pull back the long metal rod on the caulk gun. This releases the pressure. It makes space for the caulk tube.
Step 2: Insert the Tube
Place the caulk tube into the gun. Push the rod forward. It should hold the tube tight. Make sure it feels secure.
Step 3: Break the Inner Seal
Most caulk tubes have a seal inside. You must break it. Use a long nail. Or use the tool on your caulk gun. Push it through the nozzle’s base. You will feel it break through the seal. If you skip this, no caulk will come out.
Cutting the Nozzle Correctly
This step is key for a smooth caulk line. The size and angle of the cut matter.
Step 1: Cut at an Angle
Cut the tip of the nozzle at a 45-degree angle. Use your utility knife. Be careful.
Step 2: Pick the Right Size Hole
The size of the hole matters a lot. Cut a small hole for a thin line. Cut a bigger hole for a thicker line. Always start small. You can always cut more off later. You cannot add it back. The hole size should match the gap you are filling. For backsplash gap sealing, a small to medium hole is often best. This gives you good control.
The Art of Applying Caulk
This needs practice. Go slow and steady. Consistency is key.
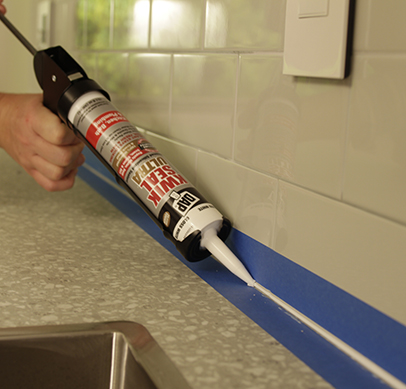
Step 1: Position the Gun
Hold the caulk gun at a 45-degree angle. Point the nozzle directly into the gap. Keep the nozzle touching the surface as you move. This helps push the caulk into the seam. This is good caulk gun technique.
Step 2: Squeeze and Pull
Squeeze the trigger firmly. Keep the pressure steady. Move the gun along the line. Pull the gun towards you. Go in one smooth, continuous motion. Do not stop in the middle of a long line. This helps make a smooth caulk line. If you stop, you might get a lump. Try to do the whole length in one pass.
Step 3: Cover the Gap Fully
Make sure the caulk fills the gap completely. This is for effective backsplash gap sealing. It also helps with waterproofing kitchen seams. You want a solid bead of caulk. It should fill from top to bottom. No air pockets should be left. This ensures a durable, watertight seal.
Smoothing the Caulk Bead
This step makes your caulk line look professional. It is where the magic happens.
Step 1: Choose Your Smoothing Tool
You can use a special caulk tool. These tools have different shapes for various bead sizes. Or, you can use your finger. If using your finger, wear a glove.
Step 2: Prep Your Tool/Finger
If using acrylic latex caulk, dip your finger or tool in a bit of water. This helps the caulk glide smoothly. For silicone caulk, you can use rubbing alcohol on your finger. Or, a dry, gloved finger can work. Do not use water with silicone.
Step 3: Smooth in One Pass
Drag the tool or finger along the fresh caulk bead. Do this right after you apply it. Do not wait too long. Caulk starts to set quickly. Go in one continuous motion. Apply light, even pressure. This pushes the caulk fully into the gap. It also removes any extra caulk. This creates a perfectly smooth caulk line.
Step 4: Remove Excess Caulk
Wipe any extra caulk off your tool or finger onto a paper towel. Do this often. Do not let it build up. Do not let it dry on your backsplash or counter surfaces. Clean as you go.
Removing the Tape (If Used)
If you used painter’s tape, remove it now. It is crucial to do this while the caulk is still wet. If it dries, it might peel off with the tape.
Step 1: Peel Gently
Pull the tape off slowly. Pull it at a 45-degree angle. Pull it away from the caulk line. This helps create a sharp, clean edge.
Step 2: Admire Your Work
You should now have a crisp, clean caulk line. It will look very professional. Take a moment to appreciate your effort.
Common Mistakes to Avoid
Even experienced people can make mistakes. Learn from these common errors to ensure a good result.
Not Preparing Properly
Skipping the prep steps is a big error. Leaving old caulk behind, having dirt on the surface, or working on wet surfaces will cause problems. The new caulk will not stick well. It will not last long. It will likely peel or crack fast. Always clean and dry the area thoroughly. This is the most important step for a lasting bond.
Cutting the Nozzle Wrong
If the hole you cut is too big, you will waste a lot of caulk. It will make a messy, thick line. If it is too small, it will be hard to fill the gap. It will make your hand tired. Cut it just right for the gap size. A 1/4 inch bead is common for most backsplashes.
Not Using Steady Pressure
Uneven pressure on the caulk gun makes a wavy line. It makes the caulk bead too thick in some spots and too thin in others. This looks bad. It also weakens the seal. Practice on scrap cardboard first. Try to keep a steady, even squeeze.
Not Smoothing Fast Enough
Caulk starts to set very quickly. If you wait too long to smooth it, it will be hard to work with. It will look lumpy and uneven. Work fast. Smooth each section right after you apply it. This ensures a clean, uniform look.
Using the Wrong Caulk Type
Using standard caulk in a wet area like a kitchen can lead to mold growth. It may also break down fast due to water. Always use mold resistant caulk for kitchens. Choose silicone sealant application for very wet spots, like around the sink. Check the caulk label carefully before you buy it.
Maintaining Your Caulk
Good caulk can last many years. Keeping it clean helps it last even longer.
Regular Cleaning
Wipe down your caulk lines often. Use mild soap and water. This stops dirt and grime from building up. It also helps prevent mold growth. A quick wipe-down during your regular kitchen cleaning is enough.
Checking for Wear
Look at your caulk every few months. Check for any signs of wear. Look for cracks. See if it is peeling away from the surface. Check for discoloration. Small issues can be fixed early. Catching problems early can prevent bigger water damage.
Re-Caulking When Needed
If the caulk looks bad, it is time to redo it. Do not just put new caulk over old. Always follow all the steps in this guide. Remove old caulk backsplash fully. Clean the area. Then apply new caulk. This is part of good kitchen countertop caulk care. It keeps your kitchen looking good and protected.
Finishing Up: A Perfect Kitchen
You have learned how to caulk a kitchen backsplash. It takes time. It takes care. But the results are truly worth it. Your kitchen will look great. It will be protected from water and mold. This DIY task adds a lot of value to your home. It saves you money on professional services. Enjoy your clean, fresh, and perfectly sealed kitchen. You did it yourself!
Frequently Asked Questions (FAQ)
How long does caulk need to dry?
Most caulk needs about 24 hours to fully dry. This is called “cure time.” Check your caulk tube. It will tell you the exact time. Some caulk is “paint-ready” faster. But avoid getting it wet for a full day. Do not scrub or touch it hard during this time.
Can I caulk over old caulk?
No, you should not. New caulk will not stick well to old caulk. This can cause it to peel faster. It can also trap moisture underneath. This might lead to mold. Always remove old caulk backsplash completely. Then add new caulk. This is very important for a strong, lasting seal.
What if my caulk line is not straight?
It takes practice to get a perfect line. You can use painter’s tape to help guide you. If the caulk is still wet, carefully remove it. Use a damp cloth to clean the area. Then try again. If it is dry, you will need to remove it fully. Then re-apply. Do not worry. Your next line will be better.
How much caulk do I need?
One standard caulk tube usually covers about 25 linear feet. This is for a 1/4-inch bead. Measure the length of your backsplash lines. Then buy enough tubes. It is always good to have an extra tube just in case.
Is silicone sealant application hard to clean up?
Yes, silicone is harder to clean than acrylic. It does not wash off with water. You need mineral spirits or rubbing alcohol. Clean spills right away. Once dry, it is very hard to remove. Work carefully when using silicone.
Can I paint over mold resistant caulk?
It depends on the type of caulk. If it is acrylic latex caulk, yes, you can paint it. If it is silicone caulk, no, you cannot. Silicone does not hold paint well. Always check the label on the caulk tube. It will clearly state if it is paintable or not.
What is the best way to get a smooth caulk line?
Practice helps a lot. Using painter’s tape guides you to a straight edge. A good caulk tool or a wet gloved finger works very well. Work fast after applying the caulk. Do it in one smooth pass. Wipe the excess off your tool or finger often.
What if I get a bubble in the caulk?
Bubbles can happen sometimes. Pop them with a small pin or a knife tip. Do this while the caulk is wet. Then re-smooth the area quickly. This helps keep the waterproofing kitchen seams strong and even.
Can I use caulk for tile grout?
Caulk is not grout. Grout fills the spaces between individual tiles. Caulk fills gaps where surfaces meet. This includes corners or where tile meets a counter. Use caulk where there might be movement. Use grout between tiles. For tile caulk application, always use caulk in corners or where the tile meets a different surface like a countertop or wall.